

How to Use a Mouse
This section only applies to TS Environment for Windows and TS Network Basic with DataServer. For all other Basic ports, TbredComm is required for mouse functionality. Please refer to the TbredComm manual for those details.
Dictionary-IV based applications are fully mouse aware. For a mouse aware character-based interface, simply enable the mouse.

Mouse Functions
Section titled “Mouse Functions”By default, mouse functionality is not enabled. To enable the mouse, execute the Thoroughbred Environment Configuration by executing C:\Program Files\Tbsc\TBConfig.exe and then click on the Mouse Controls tab.
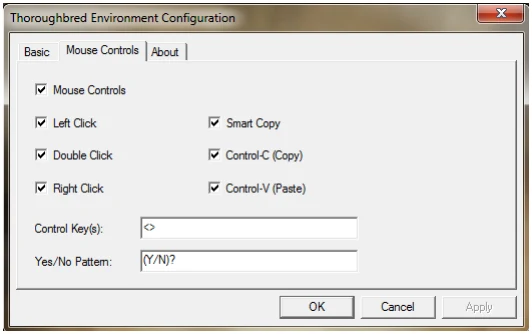
Mouse Controls
Check to enable the mouse.
Left Click
Check to enabled left click.
Double Click
Check to enable double click.
Right Click
Check to enable right click.
Smart Copy Check to enable smart copy. This option determines how to highlight multiple lines of text. When smart copy is disabled, the selection of multiple lines of text will wrap around the end of each line. When smart copy is enabled, the selection of multiple lines of text will not wrap around the end of each line, allowing the selection of a column.
Control-C (Copy)
Check to enable the ability to copy text using the Ctrl+C keys.
Control-V (Paste)
Check to enable the ability to paste text using the Ctrl+V keys.
Control Keys Control keys are identified by a starting and ending character, for example type “<>” in the Control Key text box. When the user clicks in an area encompassed by the start and end characters, the text will be interpreted. If the text contains a known control key code, then that control key will be posted to the Basic INPUT statement.
Multiple Control Key values can be defined. Use a comma to separate entries. For example, type “<>”, “()”,“{}” in the Control Key text box.
For example, if you type “<>” in the Control Key(s) text box, clicking on the “F” or the “4” in <F4> returns a CTL value of 4.
For example:
[MOUSE]yesno=(*/*)?controlkey=<>Yes/No Pattern
The Yes and No characters are identified by a starting, ending and separator character, for example (Y/N).
( is the start character
) is the end character
/ is the separator character
When the user clicks in an area encompassed by the starting and separator character or the separator and ending character, the text will be interpreted. If the text matches the yes/no pattern, the clicked character will be posted to the Basic INPUT statement. Only a single character is sent to INPUT, this is equivalent to an INPUT SIZ=1.
For example, if you type “(Y/N)” in the Yes/No Pattern text box, clicking on the “Y” in (Y/N)? returns a Y. Clicking on the “N” (Y/N)? returns an N.
Mouse Events
Section titled “Mouse Events”Mouse events are trigged by posting a CTL value to a Basic INPUT statement. In most cases, a mouse event requires two INPUTs. The first receives the leading CTL value identifying the type of mouse event. The second input receives the data specific to the mouse event followed by a <CR>. The following is a summary of mouse events.
- Left Single Click
<-20> + ccc + rrr + <CR>- Left Double Click
<–21> + ccc + rrr + <CR>- Right Single Click
HOTKEY value- Control Keys
Function-key-CTL-values- Yes/No Prompts
Yes/No-character
Click Event
When the user clicks, Basic INPUT will receive:
<–20> + ccc + rrr + <CR><-20> is a CTL=-20 identifying a mouse click event.
ccc is the three-byte column position where the mouse was clicked. rrr is the three-byte row position where the mouse was clicked. <CR> is a carriage return.
Basic INPUT statements must be modified to anticipate and collect the click event. Collect the first byte from the input buffer to determine if a mouse click event has occurred (CTL=-20). If true, collect the column and row position from the input buffer. At this point the 3GL application code can execute the appropriate click logic. If false, collect the remaining operator input (keystrokes) from the input buffer.
| For example: | |
|---|---|
INPUT EDT (0,SIZ=1) OPERI$; |
! Collect 1 byte of operator input |
IF CTL=-20 |
! If mouse click event |
INPUT ‘EE’,CLICK$,’BE’, |
! Turn echo off, collect click data, turn echo on |
C=NUM(CLICK$(1,3)), |
! Get the click column position |
R=NUM(CLICK$(4,3)); |
! Get the click row position |
GOSUB CLICK |
! Go process the click logic |
ELSE |
! else |
INPUT OPERI$; |
! Collect remaining operator input (keystrokes) |
FI; |
! endif |
Double Click Event
When the user double clicks Basic INPUT will receive:
<–21> + ccc + rrr + <CR><-21> is a CTL=-21 identifying a mouse double click event.
ccc is the three-byte column position where the mouse was clicked. rrr is the three-byte row position where the mouse was clicked. <CR> is a carriage return.
Basic INPUT statements must be modified to anticipate and collect the double click event. This is similar to the click event. Please see “Click Event” above for details.
Right Mouse Click Event – HotKey Event
The right mouse click event is tied to the Basic HOTKEY directive invoking the current HOTKEY process in Basic. For example, a right mouse click from within OPENworkshop will display the
HOTKEY menu OOMU10; this is equivalent to a typing a Ctrl-P. Please refer to the Basic Language Reference manual for more information on SET HOTKEY. Please refer to the Dictionary-IV manuals for more information on the Desk Services/HotKey menu (Ctrl-P) processing.
3GL applications that already take advantage of the HOTKEY directive do not require any modifications for support of the right mouse click event. The right mouse click event simply posts the HotKey CTL value, and no additional information is posted to the input buffer.
In the following example after executing the SET HOTKEY directive, a mouse click sends a CTL=-15 to Basic. This executes the program “MYPGN”.
SET HOTKEY $10$, “MYPGN”Control Key Events Control key events are designed to work with Basic, Dictionary-IV and OPENworkshop function key prompts. For example:
Press <F1> to continueControl keys are identified by a start and ending character, for example “<>”. When the user clicks in an area encompassed by the start and end characters, the text will be interpreted. If the text contains a known control key code, then that control key will be posted to the Basic INPUT statement.
In the following example clicking on the “F” or the “2” in <F2> returns CTL=2. Clicking on the “F” or the “6” in <F6> returns CTL=6. Clicking on the “F” or the “4” in <F4> returns CTL=4.
Enter: <F2> LookUp <F6> Help <F4> EndIn the following example clicking on the “F” or the “2” in (F2) returns CTL=2. Clicking on the “F” or the “6” in (F6) returns CTL=6. Clicking on the “F” or the “4” in (F4) returns CTL=4.
Enter: (F2) LookUp (F6) Help (F4) EndMultiple control key values can be defined with entries separated by commas “<>,[],{},(), F-,F=” for example.
Yes/No Events
The Yes/No events are designed to work Yes/No prompts. For example:
Do you want to continue (Y/N)?The Yes No characters are identified by a start, ending character and a separator character. When the user clicks in an area encompassed by the start and end characters, the text will be interpreted. If the text matches the yes/no pattern, the clicked character will be posted to the Basic INPUT statement.
3GL applications may need to be modified. The Yes/No event will post a single character to the input buffer. For Yes/No events an INPUT SIZ=1 must be used.
In the following example clicking on the “Y” in (Y/N)? returns Y. Clicking on the “N” (Y/N)? returns N.
Do you want to continue (Y/N)?In the following example clicking on the “J” in [J-N]? returns J. Clicking on the “N” in [J-N]? returns N.
Do you want to continue [J-N]?From the Customization and Tuning Guide: Devices, version 8.9.1. Open this page in the PDF