

CONNECT SCREEN
CONNECT SCREEN enables you to connect to a screen definition, display the screen, and initiate screen maintenance. If there is no data file, the system prompts for creation of the data file.
Screen definitions are also used by Script-IV INPUT SCREEN, Script-IV PRINT SCREEN, and
8INPUT. They require a Format and a Link. For more information see Format Definition and Link Definition in the Dictionary-IV Developer Guide.
For more information, see the Database Maintenance section in this manual. Also see Screen Definition in the Dictionary-IV Developer Guide.
Selecting CONNECT SCREEN
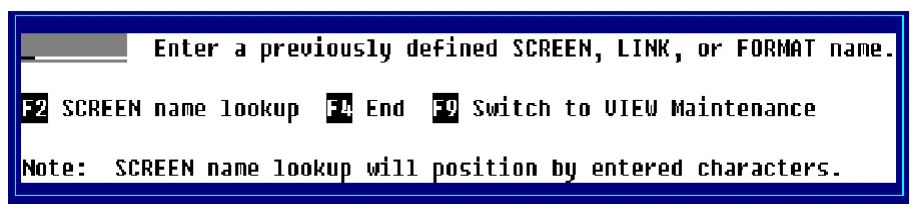
Section titled “Selecting CONNECT SCREEN”You can execute CONNECT SCREEN by selecting S Screen (CONNECT SCREEN) from the Dictionary-IV Development Menu or by pressing F2 from any Dictionary-IV menu and selecting Screen, the system displays the following:
You can also execute CONNECT SCREEN from a pop-up menu by pressing F1 and adding the
CONNECT SCREEN to the pop-up menu.
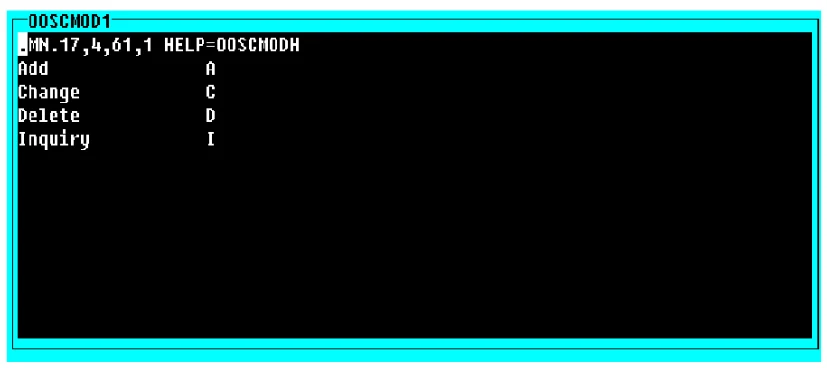
The system displays a window similar to the following:
For information on executing CONNECT SCREEN from a script, see the Script-IV Language Reference.
Performing CONNECT SCREEN
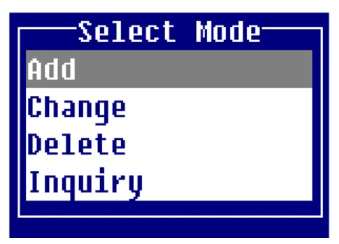
Section titled “Performing CONNECT SCREEN”You can initiate CONNECT SCREEN by selecting S Screen (CONNECT SCREEN) from the Dictionary-IV Development Menu or pressing F2 from any Dictionary-IV menu and selecting Screen. The system allows you to enter a screen name. Once a screen name is entered the following pop-up menu is displayed.
Maintenance Modes
Section titled “Maintenance Modes”You may select a maintenance mode (Add, Change, Delete, or Inquiry).
Select one of the following options:
Add
This mode allows you to add a record to the file. This is the default.
If you try to add a record that already exists, the system switches to the change mode. When data entry is complete the system prompts:
Add this record? Yes-Add record No-Do not add record
<F4> Make corrections.
Select one of the following:
Y Adds the record to the file.
N Does not add the record to the file.
F4 Returns to the record. You may make corrections.
Change This mode allows you to edit a record in the file. It functions as the add mode except the change mode does not switch to the add mode if a record does not exist.
If you enter an existing file you can select the next record in the file by pressing the Down Arrow key at the last key field on the screen. You can also select the previous record by pressing the Up Arrow key at the first key field on the screen.
The system prompts:
Key specified not on file, <CR> to continue.
When the changes are complete the system prompts:
Save Changes? Yes-Update record No-Do not update record
<F4>-Make Corrections.
Select one of the following:
Y Saves the changes.
N Does not save the changes.
F4 Returns to the record. You may make corrections.
Delete This mode allows you to delete a record from the file. If you enter an existing file, you can select the next record in the file by pressing the Down Arrow key at the last key field on the screen. You can also select the previous record by pressing the Up Arrow key at the first key field on the screen.
Type the key to the record and press Enter. If the system finds the record, the system prompts:
Delete record?
Select one of the following:
Y Deletes the record from the file.
N Does not delete the record, but allows you to continue selecting records to delete.
Inquiry Type the key of an existing record to display and press Enter. This mode is for display only. If you enter an existing file, you can select the next record in the file by pressing the Down Arrow key at the last key field on the screen. You can also select the previous record by pressing the Up Arrow key at the first key field on the screen.
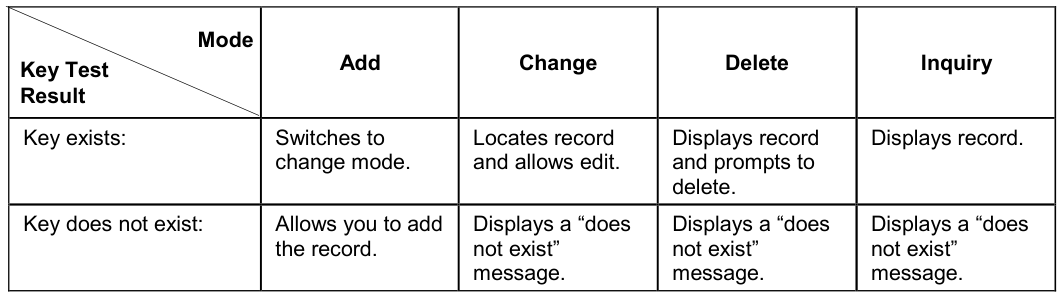
Key Value Test
Section titled “Key Value Test”Once you select a maintenance mode, the system positions the cursor at the first key field. When you enter a key value, the system checks to see if it exists.
Primary Keys
To select a record using the primary key value type the primary key value and press Enter.
Press Down/Up Arrow in the primary key field to get the next/previous record in the file. Press Enter to select the record.
Press Page Down/Up to go to the last/first record in the file. Press Enter to select the record.
Secondary Keys To select a record using the existing sorts press F5. If secondary keys exist you may select one from the lookup sort view.
For more information see F5 Sorts.
Key Test for CONNECT SCREEN
Quick Key Reference
Section titled “Quick Key Reference”| You | may perform the following functions. |
|---|---|
| Key | Description |
| F1 | Changes maintenance mode. |
| F3 | Prints the record. For more information see Software Conventions. |
| F4 | Exits the record. For more information see Software Conventions. |
| F5 | Selects a sort. Sorts are defined in Link definition. For more |
| information see F5 Sorts. Also see Link Definition in the | |
| Dictionary-IV Developer Guide. | |
| F6 | Displays on-line help if help is defined for the data element (key |
| field). For more information see Software Conventions. | |
| F9 | Switches to View maintenance. |
| F10 | Goes to a field. A lookup of available field names appears. Select |
| the field in the lookup and press Enter. |
Cursor Movement
Section titled “Cursor Movement”In a key field
| The following | keys have special actions in key fields: |
|---|---|
| Key | Description |
| Page Down | Moves to the last/first record in the file. |
| Page Up | Moves to the first record in the file. |
| Down Arrow | Moves to the next record in the file. |
| Up Arrow | Moves to the previous record in the file. |
In all fields
The following keys perform the same action in key and data fields:
| Key | Description |
|---|---|
| Right | Moves one character to the right in the field. |
| Arrow | |
| Left Arrow | Moves one character to the left in the field. |
| Tab | Moves ½ the length of the field right. |
| Back Tab | Moves ½ the length of the field left. |
| Home | Moves to the last/first character in the field. |
In a data field
The following keys have special actions in data fields:
- Key
- Description
- Page Down
- Moves between the last data field in the record.
- Page Up
- Moves to the first data field in the record.
- Down Arrow
- Moves to the next field in the record. The entry order is determined by the Order specified in Screen definition. For more information see Screen Definition in the Dictionary-IV Developer Guide.
- Up Arrow
- Moves to the previous field in the record. The entry order is determined by the Order specified in Screen definition. For more information see Screen Definition in the Dictionary-IV Developer Guide.
- Enter
- Accepts the data and moves the lightbar to the next entry field. The entry order is determined by Element Order specified in Screen definition. For more information see Screen Definition in the Dictionary-IV Developer Guide.
F5 Sorts
Section titled “F5 Sorts”You can use sorts to access specific records in CONNECT SCREEN.
Selecting a Sort
Section titled “Selecting a Sort”Press F5 and the system displays a listing of defined sorts. Select the sort and press Enter.
The system prompts:
Enter secondary key value:
If, for example, you are working with a customer database, you may now process the records for your customers by city or you edit customer records in a specific city by typing the name of the city.
The following options are available at this prompt:
- Type the secondary key value and press Enter. The system selects the first secondary key record that matches the value that you enter. If there is no match, the system selects the next secondary key record in sequence to the value that you enter.
- Press the Down Arrow key to select the next secondary key record.
- Press F4 to return to the maintenance mode selector.
- Press F5 to select another sort.
Using Sorts in Maintenance Modes
Section titled “Using Sorts in Maintenance Modes”Add The add mode cannot be used with a secondary sort active. If you try to add a record, the system switches to the change mode.
Change The change mode displays the secondary key record selection prompt to allow you to select a record. It then allows you to change or maintain the data fields in the record. You cannot change the primary key fields.
Delete The delete mode alternately displays the secondary key record selection prompt to allow you to select a record. You must then approve each deletion.
F7 Special Functions
Section titled “F7 Special Functions”When you press F7 Special Functions, the system displays the following pop-up menu:
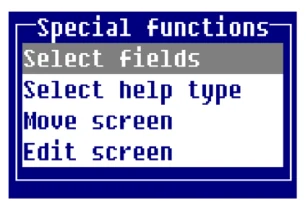
Select fields
This function controls input to fields during maintenance. It allows you to select only those fields you must maintain now. You do not have to move the cursor through each field. The other information can be added at a different time, by a different operator, at a different terminal.
For example, if you have a simple Customer File Screen. When adding a customer, you may only need to add a Customer Code, Name, Address, and Telephone Number immediately. You (or another operator) can enter credit information and outstanding balance at another time. Select the Customer Code, Name, Address, and Telephone Number fields to allow you to move quickly through each new record.
When you select this option, the system places an asterisk (*) into every field. You can maintain only those fields containing an asterisk. Remove the asterisk to restrict access to a field.

You must select the key fields and required fields as specified in the Format Definition. You may select any number of non-key fields. For more information, see Format Definition in the Dictionary-IV Developer Guide.
Press F4 to exit this selection. The asterisks are no longer visible.
Select help type Selects the type of help to display when you press F6. When you select this option the system displays the following pop-up menu:
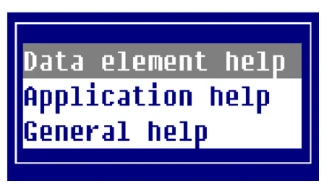
Data element help
Displays on-line help for the fields.
Application help
Displays on-line help for the screen. If no help exists for the screen, general help displays.
General help
Displays on-line help that describes the screens function.
Move screen Moves the screen. When you select this option, the system displays a Left/Right Arrow in the bottom-right corner of the screen. Use the keys in the following chart to move the screen:
| Key | Description |
|---|---|
| Left Arrow | Moves to the left 1 column. |
| Right Arrow | Moves to the right 1 column. |
| Back Tab | Moves to the left 5 columns. |
| Tab | Moves to the right 5 columns. |
| Up Arrow | Moves up 1 row. |
| Down Arrow | Moves down 1 row. |
| Page Up | Moves up 5 rows. |
| Page Down | Moves down 5 rows. |
| Enter | Toggle window resize modes. |
| Home | Expand to maximum number of rows. |
| . (Period) | Expand to maximum number of rows. |
| F1 | Toggle window resize and window move. |
| F4 | Terminate window resize and window move. |
Edit screen Provides access to all the Screen Editor functions. For more information, see Screen Editor in the Dictionary-IV Developer Guide.
From the Dictionary-IV User Guide, version 8.9.1. Open this page in the PDF