

Query Maintenance
This section describes the options in the Query Maintenance Window, including how to start a new query, how to maintain existing queries (add, retrieve, delete, rename, copy and list) and how to print query definitions.
Executing query maintenance
Section titled “Executing query maintenance”When you run Thoroughbred Query-IV by pressing F1 and selecting Query the system displays the
Query View. Once a query is selected press F1-Edit and the system displays the Query Control Window:
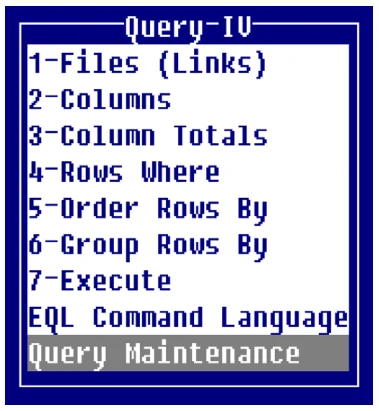
Press Q to highlight Query Maintenance, and press Enter to select it. The Query Maintenance Window contains the following options: retrieve, delete, rename, copy, list, print definitions, new query (clear), query parameters, and schemas.
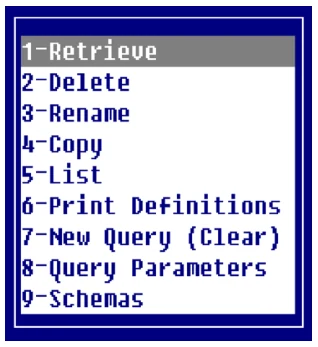
Perform query maintenance
Section titled “Perform query maintenance”When you open Query-IV the workspace is empty and you may retrieve and create queries. Once you place a query in the workspace, it remains there until it is saved or cleared.

Enter the following information:
Query Name At the Query Name field, type a name from 3 to 8 characters long to identify the query and press Enter. (The first 2 characters are the library, used to group your queries together.)
If the library does not exist, you are allowed to create the new library automatically when the following prompt is displayed:
Creating new library: XX. Enter title:If you did not intend to create a new library, press F4. Otherwise, enter an optional library title.
The following function keys are available at the Query Name field:
- F2
- Provides a listing of queries in a selection window
- F4
- Cancels the selection and redisplays the Query Maintenance Window
- F6
- Provides a window that lists existing queries and allows you to select one
Description Type up to 40 alphanumeric characters for an optional query description to identify the query. Press Enter. If the HEADING clause is specified in EQL, this query description is included in the table heading, overriding the default table heading.
1-Retrieve
Section titled “1-Retrieve”This option allows you to place a query into the workspace.
Type a query name from 3 to 8 characters long and press Enter. When you select 1-Retrieve and there is currently a query in the workspace, the system gives you the opportunity to save the current query.
When you retrieve a query, it becomes the current query. Press F4 to return to the Query Control Window and you may edit this query. You may select any of the Query Framer options or the EQL Command Language to perform Query Maintenance.
When you have completed, press F4 and the system prompts:
Save current query?Select one of the following:
Y Saves the current query and prompts for a name description.
N Does not save the current query.
2-Delete
Section titled “2-Delete”This option allows you to delete a query from the dictionary (where query definitions are saved).
Type a query name from 3 to 8 characters long and press Enter. The system prompts:
Are you sure you want to delete (Y/N)?Select one of the following:
Y Deletes the query.
N Does not delete the query.
3-Rename
Section titled “3-Rename”This option allows you to change the name of a query.
Enter new name:When you rename the query, it does not have to remain in the same library. If you rename it and the library does not exist, you are allowed to create the library automatically.
4-Copy
Section titled “4-Copy”This option allows you to copy a query, producing an identical copy of the query with a new name.
Type a query name from 3 to 8 characters long and press Enter. The system prompts:
Enter copy to name:When you copy the query, it does not have to remain in the same library. If you copy it and the library does not exist, you can create the library automatically.
5-List
Section titled “5-List”This option is used to print a list of queries.
Type a query name from 3 to 8 characters long and press Enter. The system prompts:
Select printer (xx xx):Select the printer; xx represents a defined printer name for your system.
The query listing screen is displayed. Enter the following:
Library
Type the 2-character library name for which you want a query list.
Select everything?
Select one of the following:
Y All queries in the library will be listed. You cannot select a range or mask.
N Positions the cursor at the next field. You can select a range or mask.
from name Type the 3 to 8 character name of the first query in the range and press Enter. The default is First. If a query name is entered at the from name field, press Enter at the to name field to enter the same name.
to name Type the 3 to 8 character name of the last query in the range and press Enter. The default is Last (or the name is entered in the from name field).
using name mask
A name mask allows you to select queries without specifying an individual name. The default is None.
A mask sets up a matching test. If a query name matches the mask, then it is selected. If no match is made, it is bypassed.
A mask contains match and passing characters. The characters in a query name must match all of the match-characters (same character and position) for it to be selected. The pass character (?) is used to indicate that no match in this position is needed.
| Mask | Action | Query Names | ||
|---|---|---|---|---|
| XA? | selects | XAB | XAC | XA1 |
| XA? | bypasses | XaB | XcA | X11 |
Is the displayed information correct?Select one of the following:
Y Starts the listing.
N Allows you to change the information.
The listing is displayed or printed and includes library information, query name, description, query creation date, and last change date.
When the listing is finished, you are returned to the Query Maintenance Window.
6-Print Definitions
Section titled “6-Print Definitions”This option is used to print query and schema reports. The system displays the following:
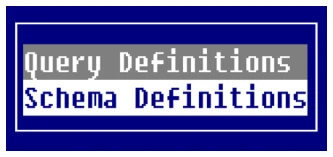
Query and schema reports are copies of the actual query definitions, containing all of the specifications, content and format information that is recorded.
These reports are used primarily in design of the queries and as an aid for Query Maintenance. The following is a description of the prompts and responses.
The prompts for queries and schemas are the same.
Select printer (xx xx):xx represents a defined printer name for your system.
The query reporting screen is displayed. Enter the following information:
Library
Type the 2-character library name for which you want to print.
Select everything?
Select one of the following:
Y All queries in the library will list. You cannot select a range or mask.
N Positions the cursor at the next field. You can select a range or mask.
from name Type the 3 to 8 character name of the first query in the range and press Enter. The default is First. If a query name is entered at from name field, press Enter at the to name field to enter the same name.
to name Type the 3 to 8 character name of the last query in the range and Enter. The default is Last (or the name is entered in the from name field).
using name mask
A name mask allows you to select queries without specifying an individual name. The default is None.
A mask sets up a matching test. If a query name matches the mask, then it is selected. If no match is made, it is bypassed.
A mask contains match and passing characters. The characters in a query name must match all of the match-characters (same character and position) for it to be selected. The pass character (?) is used to indicate that no match in this position is needed.
| Mask | Action | Query Names | ||
|---|---|---|---|---|
| XA? | selects | XAB | XAC | XA1 |
| XA? | bypasses | XaB | XcA | X11 |
Is the displayed information correct?Select one of the following:
Y Starts the printing.
N Allows you to change the information.
The system prompts:
PrintingThe report is printed, including library information, query name, description, creation date, and last change date and time, as well as all the definitions from the Query Framer and EQL Command Window (e.g., Files/Links, columns, and column totals).
When the report is finished, you are returned to the Query Maintenance Window.
7-New Query (Clear)
Section titled “7-New Query (Clear)”Use this option if you have a query currently in the workspace and want to create a new query. You automatically start with an empty workspace when you run Query-IV.
When you select New Query, you are given the opportunity to save the current query (unless the current query was not changed):
Save current query?Select one of the following:
Y Allows you to save the current query (requests a query name and description) before the query is cleared.
N Does not save the current query before the query is cleared.
The system prompts:
Query has been cleared, RETURN to continue.After you clear a query, you return to the Query Maintenance Window.
8-Query Parameters
Section titled “8-Query Parameters”Directs you to the Operator Preferences option (F7 Special Functions) in the Query Control Window. For more information, see the Operator Preferences section of this document.
9-Schemas
Section titled “9-Schemas”This option allows you to create schemas.
A schema is a schematic diagram of a database that shows the relationships among various files. Often the data required to complete your query or request resides in multiple files. Query-IV allows you to select multiple files with just the data-names necessary to complete the schema.
You may use a schema in place of a Link during Query-IV file/table selection. A single schema definition can be used for multiple related files using selected Data Names from associated files, while the Link definition is designed for a single data file and format. For files to be related the key in one file and the Data Name in another file must be the same.
When you select this option the system displays the following screen:
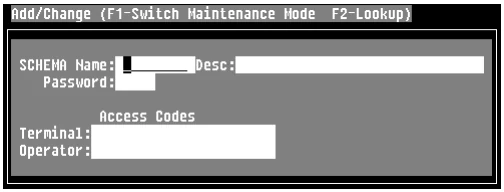
SCHEMA Name
Type from 3 to 8 alphanumeric characters for the schema name and press Enter.
A schema may include multiple related Links and a subset of Data Names from those Links. When using schemas from the Query Framer Menu, you may access only one schema. Your data name selection will be limited to the names defined here in schema maintenance.
The following function keys are available:
F1 Switches maintenance mode (add/change, delete, rename, and copy)
F2 Displays a selection window of schema names
F4 Exits
F6 Displays on-line help
Desc Type up to 40 alphanumeric characters for the description of this schema and press Enter. This field is optional.
Password Type from 1 to 3 alphanumeric characters for a password and press Enter. If the system security is active and a password is specified, the password is required. This field is optional.
Terminal Access
Use this field to allow access to or restrict access from the terminals.
0, term-code [,term-code]... | |
0 | Allows access to the specified terminal codes. |
term-code | Type the 2 alphanumeric character terminal codes for the terminals that can access this selection. |
If this is left blank all terminals have access.
1, term-code [,term-code]... | |
1 | Denies access to the specified terminal codes. |
term-code | Type the 2 alphanumeric character terminal codes for the terminals that cannot access this selection. |
If this is left blank all terminals have access. Terminal access is not applicable to scripts.
Examples:
0,T0,T3Allows access for terminals T0 and T3.
1,T1Denies access for terminal T1.
Operator Access
Use this field to allow access to or restrict access from the specified operators.
0, oper-code [,oper-code]…
0- Allows access to the specified operator codes.
oper-code- Type up to 3 alphanumeric characters for the codes of the operators that can access this selection.
- If this
- is left blank all operators have access.
1,oper-code [,oper-code]... | |
1 | Denies access to the specified operator codes. |
oper-code | Type up to 3 alphanumeric characters for the codes of the operators that cannot access this selection. |
If this is left blank all operators have access. Operator access is applicable to scripts.
Examples:
0,JBT,NRSAllows access for terminals JBT and NRS.
1,JMGDenies access for terminal JMG.
The system displays the following:
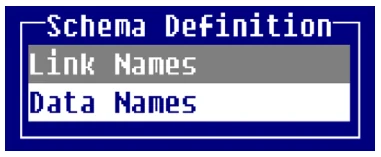
Link Names
You must select at least one Link before selecting any other options in the Schema Definition Window.
The following keys are available:
Enter Selects the Link
- F2
- Deletes the selected Link from the window
- F4
- Exits
- F6
- Displays on-line help
The Link selection window displays a list of Links. More than one Link may be selected but the Links must be related. After a Link is selected, it is placed in the selected Links window and the list is redisplayed (starting at the selected Link).
Data Names The Data Names selection window displays a list of Data Names from all selected Links. They display in alphabetical order. The system assumes duplicate Data Names are the same and display them only once.
Any number of Data Names may be selected. The selected Data Name is then displayed at the bottom of the screen in the selected Data Name area.
The following keys are available:
Enter Selects a Data Name and displays it in the Data Name area
- F2
- Deletes the selected Data Name from the selected Data Name area
- F4
- Exits
- F6
- Displays on-line help
- F8
- Selects all Data Names from the selected Data Name area
- F9
- Deletes all Data Names from the selected Data Name area
Sample schema:
A schema may look like the following:
From the Query-IV Reference, version 8.9.1. Open this page in the PDF