

SSH Public and Private Keys
This section describes how to configure the host and the client to use Public and Private Key pairs and an optional Passphrase. It assumes an SSH server has been installed on the host and is functioning properly.
Prepare the Host
Section titled “Prepare the Host”The following describes configuring SSH key pairs for openSSH on a Linux host. Depending upon your operating system, there may be some differences.
On the host in your home directory ($HOME) create the directory .ssh with permissions using chmod 755.
mkdir .sshchmode 755At the prompt type ls -la and press Enter. You should see something like the following.
drwxr-xr-x 2 dmd users 1024 Jan 27 10:41 .sshdrwx------ 5 dmd users 1024 Jun 16 09:49 ..In $HOME/.ssh directory create the public key file. Depending upon which version of SSH is installed, the file name must be either authorized_keys or authorized_keys2.
The content of this file is not highly sensitive however the default permissions required by sshd are strict. The permissions should be read/write for the user and not accessible by others; chmod 600, chmod 640, and chmod 644 typically work.
mkdir authorized_keyschmode 600At the prompt type ls -la and press Enter. You should see something like the following.
-rw-r--r-- 1 dmd users 222 Jan 27 12:44 authorized_keysThe authorized_keys file will contain the public key generated by the TbredComm Key Generator (TBKeyGen.exe).
Generate Public and Private Keys – TBKeyGen
Section titled “Generate Public and Private Keys – TBKeyGen”On the client run Tbredcom-program-path\TSI\Bin\TBKeyGen.exe. This will bring up the TbredComm Key Generator program.
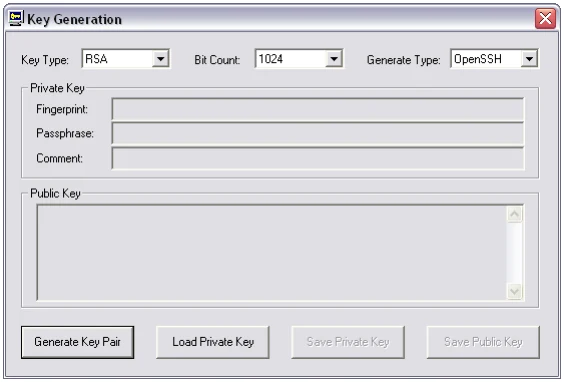
**Key Type (**RSA or DSA)
Select the correct one for your host or contact your system administrator for the information.
Bit Count Select the correct bit count for encryption on your host or contact your system administrator for the information. The default is 1024.
**Generate Type (**OpenSSH, RSA1, SSH)
Select the correct one for your host or contact your system administrator for the information.

Generate Key Pair
Select the Generate Key Pair button to generate both the public and the private key.
This will display the public key, the fingerprint and a default comment. The default comment is included in the Public Key. Entering your own comment is recommended, something that will help you identify this public key. For example, a nickname for the remote host and a passphrase hint.
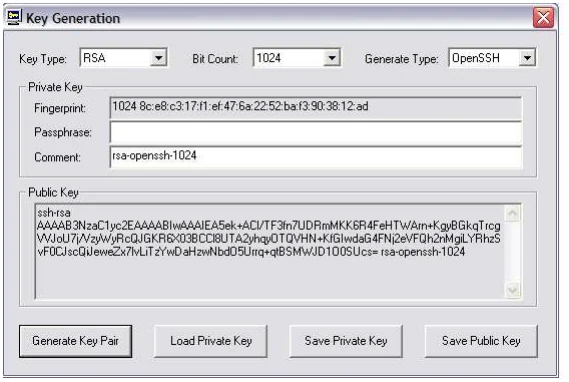
Copy the public key to your windows clipboard or write down your public key. The public key must be added to your key_authorization file on the host. If you elect not to copy the public key at this point you can use the Load Private Key described below to retrieve your public key at any time.
Passphrase The passphrase allows only those users who know it to access the Private Key To generate a Passphrase place the cursor on the Passphrase field the following window appears.
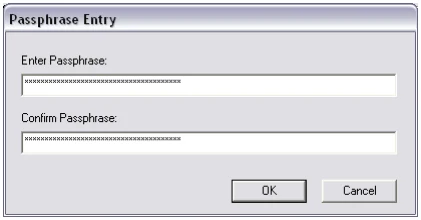
This should be a minimum of 20 characters including numbers, spaces and punctuation characters. It is recommended that you select a phrase that can be easily remembered. Confirm the passphrase and select the OK button.
If you do not want to use a Passphrase leave the Passphrase field empty.
Save Private Key From the Key Generation window select the Save Private Key and the following window appears.
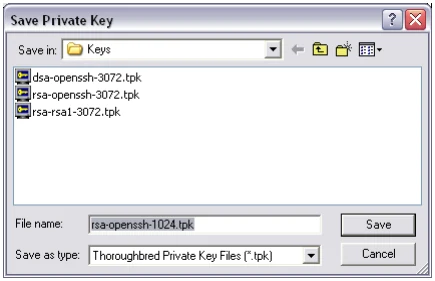
Enter the name for your private key file or use the default file name. The default private key file name is made up of the key type, generate type, and the bit count. All private key files must have the .tpk file extension and must be saved in the Keys directory. If the Keys directory does not exist, it will be created for you.
- On Windows 10/Windows 11/Windows Server 2016/Windows Server 2019/Windows Server 2022/Windows Server 2025 the Keys directories are unique for each user. These are located in Tbredcom-user-path\Tsi\Keys.
When the .tpk file is saved, a .dat file of the same name is also created. A private key requires both these files.
Select the Save button to save the private key files and you will return to the Key Generation window.
Save Public Key From the Key Generation window select the Save Public Key and the following window appears.
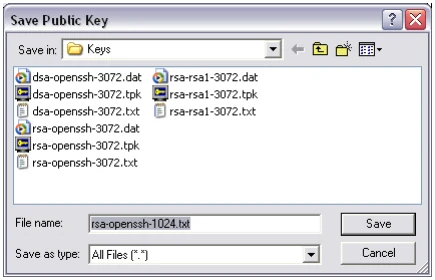
Enter the name for your public key file or use the default file name. The default public key file name is made up of the Key Type, Bit Count and Generate Type. Public key files must have a .txt extension and must be saved in the Keys directory. If the Keys directory does not exist, it will be created for you.
- On Windows 10/Windows 11/Windows Server 2016/Windows Server 2019/Windows Server 2022/Windows Server 2025 the Keys directories are unique for each user. These are located in Tbredcom-user-path\Tsi\Keys.
Select the Save button to save the public key file and you will return to the Key Generation window.
Load Private Key This allows you to retrive the corresponding public key for a key pair that has been previously defined.
Select the Load Private Key button and you will be prompted to locate the private key file (.tpk) on the client. If you had defined a Passhprase you will be required to enter the Passphrase in order to open the private key file (.tpk).
The public key will be displayed in the Key Generation dialog box.
Close Key Generator Closes the Key Generator program. This must be closed before attempting to make a SSH connection.
Add the Public Key to Host
Section titled “Add the Public Key to Host”From your clipboard paste the public key in your $HOME/.ssh/authorized_keys file on the remote host. Care must be taken not to insert any leading or trailing characters, including spaces. The public key must be entered exactly as it appears in the Thoroughbred Key Generation dialog box.
To create a SSH connection using the Public Key authentication, please refer to the Connect - TCP/IP (Protocol: SSH1, SSH2, SSHAuto) section in this manual.
From the TbredComm Reference, version 8.9.1. Open this page in the PDF