

The Report Definition
This section is a reference to the Report-IV report definition.
Introduction
Section titled “Introduction”This section covers reference information regarding the Report-IV Definition including:
- Report-IV Definition Maintenance
- The Four Sections of a Report-IV Definition
- Screen Header Field Descriptions
- Report-IV Editor Features
- Function Keys
- Components of the Report-IV Definition
Report-IV Definition Maintenance
Section titled “Report-IV Definition Maintenance”Select 1-Edit at the Dictionary-IV Development Menu or press the F1 key from any Dictionary-IV menu. The following pop-up menu is displayed:
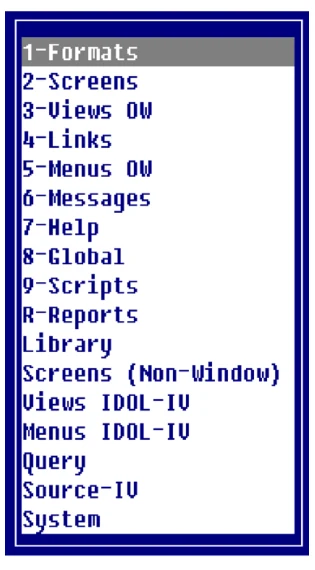
At the pop-up menu select R-Report. The system displays a Report View similar to the following:
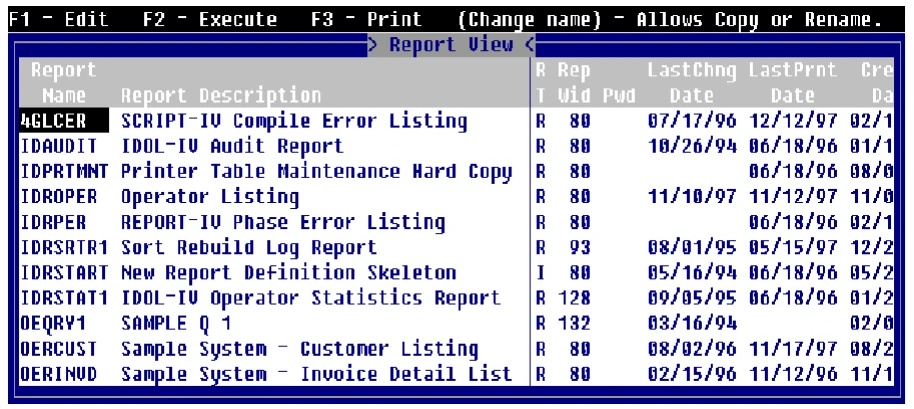
F1 - Edit
Section titled “F1 - Edit”From the Report View press F1 to edit the system displays the Thoroughbred Report-IV Definition Screen:
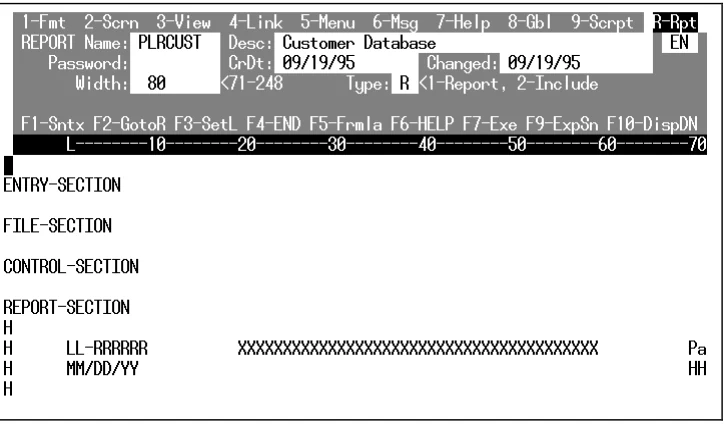
Custom report definitions are created and maintained using Dictionary Maintenance. Maintenance is an option from the Dictionary-IV Development Menu.
F2 - Execute
Section titled “F2 - Execute”To execute a report from the Report View, highlight the report name and press F2.
F3 – Print
Section titled “F3 – Print”To print a report definition from the Report View, highlight the report name and press F3.
The system prompts:
Print Formulas?Y prints the report with formulas.
N prints the report without formulas.
Is this correct?Y prints the report.
N allows you to change the information entered.
Change Name (Copy or Rename)
Section titled “Change Name (Copy or Rename)”To change the name of a report definition, from the Report View highlight the name to be changed and type over the existing text. The system will display a window with the definition name and the name the definition is being changed to. It also displays a pop-up menu with the option to Cancel, Copy, or Rename. If you select Cancel the system will cancel your request to change the definition name. If you select Copy the definition is copied with the new name and also exists with the original name. If you select Rename the system completely renames the report definition.
To Add a Definition
Section titled “To Add a Definition”To add a definition name press Line Insert from the Report View. Enter a definition name from three to eight characters long. If you enter a name and the library does not exist, you will be allowed to create the library automatically.
If you enter a new name, you are adding a new definition. If you enter an existing name, the system will display the following message:
A record already exists with the key used to define the record beingadded to the file. Add request will be denied.To Delete a Definition
Section titled “To Delete a Definition”To delete a report definition from the Report View, highlight the report name and press Line Delete. The following prompt is displayed:
Delete Record?Y deletes the definition.
N keeps the definition.
For more information on maintenance within the View, see the Maintenance modes section earlier in this document.
Remarks
Section titled “Remarks”The report definition is one of many definitions that is maintained by Dictionary-IV during Definition Maintenance (also referred to as Dictionary Maintenance).
The report definition header information provides the specifications for the report definition.
Move the cursor through the fields in the header to enter the report definition editing area.
Available function keys are displayed.
The standard entering and editing keys are active in the fields in the report definition header.
Report Definition Screen Specifications
Section titled “Report Definition Screen Specifications”The following is a description of fields that appear in the Report-IV Definition Screen header.
Report Name
This specifies a 3 to 8 character alphanumeric name for the report definition. It can be any combination of letters (A to Z, uppercase and lowercase) or numbers. The first two characters of the name designate the library. This is affected by PRM upper in the IPL File.
Desc
This is an optional entry used to help you identify the definition. The maximum length is 40 characters.
Password
If system security is active and a password (1 to 3 characters) is specified, the password is required in order to edit the report definition. The password restricts other users from performing maintenance on this definition.
CrDt
The system-generated date when the report definition was initially created is automatically inserted in this field.
Changed
The system-generated date when the report definition was last modified is automatically inserted in this field.
Width
The report definition width can be decreased to a minimum of 71 characters or increased to a maximum of 248 characters. The default width is 80 characters.
Type
This designates the report definition type as follows:
1 or R Report - a standard report definition.
2 or I Include - the components of this report definition in another standard report. The include name is specified in the other report definition which will merge or include the components of this definition when the report is compiled.
Features of the Report-IV Definition Editor
Section titled “Features of the Report-IV Definition Editor”Full-screen editor features, with cursor control and function keys for report definitions.
Ability to print the report to the terminal screen or to a printer.
Reports consist of multiple components including text, Data Names from selected databases, special code characters and formulas.
The report width and size can be specified by the user based on the header entry.
Data Names from the specified file(s)/links can be defined or moved to any location on the report.
Special codes can be used to display variable system information such as date, time, and operator code.
Function keys
Section titled “Function keys”Available function keys are displayed on the Report Definition screen. This section discusses the operations of the function keys within the report definition.
- F1-Sntx
- Syntax Check
Evaluates the contents of the definition and notifies you of detected syntax errors. Most syntax errors display the associated error message. This function also updates the report workspace.
The syntax check does not check the contents of F5 formula windows. Syntax in formulas is checked when the formula is saved.
To use new variables defined in the REPORT-SECTION a syntax check must be performed whenever changes are made to the ENTRY-SECTION, FILE-SECTION and/or CONTROL-SECTION.
If an error message does result, press the F1 key again and the system will display the generated code that is producing this message.
F2-GotoR Go to Right Margin
Scrolls to the right margin of the Report Definition screen. If the display exceeds the width of the report, continue pressing the F2 key to scroll further to the right.
- F3-SetL
- Set Left Margin
Sets the left margin within the report definition editor. After setting the left margin, press the Enter key to return the cursor to the position set by the F3 key. The Back Tab and left arrow keys ignore the left margin settings.
To release the margin set by the F3 key, press the Home key.
- F4- END
- End/Exit
Ends the last operation selected or exits the function. After editing the report definition, press the F4 key to save the report modifications and end the editing session.
F5-Frmla Formula Window
Displays a formula window, where you can enter Data Names, calculations, etc.
F6-HELP Help/Inquiry
Provides a sophisticated help network allowing you to perform inquiries on Dictionary-IV components or obtain information about syntax.
F7-Cpl Compile
Provides the option to compile and run the report. When F7 is pressed the system prompts:
Do you want to save and compile?If Y is selected the system prompts:
Do you want a printed copy?F9-ExpSn Expand Screen
Allows screen expansion while editing reports. Options are:
- Horizontal
- Toggles between 80 and 132 character mode. This is available if your terminal type supports 132-character mode.
- Vertical
- Removes the report heading information and gives the editor 5 additional lines for editing.
- Compressed
- Removes the report heading and sets the terminal to 132-character mode. This is available if your terminal type supports 132-character mode.
- Normal
- Sets the terminal to normal display mode and restores the report heading information.
- F10-DispDN
- Display Data Names
At any location within the report definition, you can select the Data Names associated with the Link(s) specified in the FILE-SECTION and ENTRY-SECTION that you want to appear (printed as text) in the report definition. Position your cursor where you want the Data Name to appear as text and press the F10 key. You can select the Data Names by using cursor control keys. Press the Enter key to select the highlighted Data Name and to reposition your cursor. This feature is useful for specifying column headings, SORT BY and SELECT WHEN clauses, and control breaks.
In the F10 display window you can press F7 to switch between Data Name and Data Name descriptions.
Sections of the Report Definition
Section titled “Sections of the Report Definition”All report definitions are divided into four sections: ENTRY, FILE, CONTROL, and REPORT.
These section names are recognized by Report-IV and act as commands to define the report definition areas. They must be present in every report definition, even though it is not necessary to complete all sections in every report. If you accidentally delete the section names, retype them in upper-case letters exactly as they appeared.
Special codes and options within each section of the report definition perform various functions and define the layout of the report.
ENTRY-SECTION
Specifies the definition of Data Names to be included in the report, and Initialization and Termination routines.
FILE-SECTION
Specifies which Links are to be used in the report and how they are to be accessed.
CONTROL-SECTION
Controls the printing of special lines or report components, specifies controls of totals and subtotals, conditional page breaks, and so on.
REPORT-SECTION
Lays out the positions of data fields to be printed, specifies formulas, literal text, and so on.
Report Definition Components
Section titled “Report Definition Components”Data Fields
The formula window is used to define the location for Data Names or formulas to display or print on the report. Formula windows may contain different types of information. One type is a single Data Name.
The other is an expression or formula computed with or without file data. The Report Definition screen holds the place of the data field length to print by displaying X characters for string or mixed data,
masking characters for date or numeric data, ? for a conditional formula, or the literal strings.
In the formula window you can press F10 for a lookup of Data Names. The lookup can be displayed using either the Data Names or the Data Name descriptions of the current language. Press F7 will toggle between a display of the Data Names and the Data Name descriptions.
When selecting a Data Name from the Data Name View, the corresponding Data Name will be used to populate the formula. All references to Data Names must use the Data Name, not the description.
For more information on Multi-Language, see the Dictionary-IV Administrator Guide.
Literal Text
Text that is printed directly on the report such as headings is entered in the REPORT-SECTION.
Report Commands
Report commands or functions are specified on a command line, within a formula or in a conditional line.
Valid commands or functions are displayed below:
| Code | Function |
|---|---|
| (/CTR) | Center data to print |
| /EJECT | Page break; form feed |
| /EJECTnn | If less than nn text lines are available on the page, then eject. This function prevents related data fields from breaking across pages. |
| /FIELD(nn) | Temporary area that specifies the actual number of characters (nn) to print for specified Data Name(s) |
| /LC=n | Set line count to n lines. To retrieve current line count use n=/LC |
| /LINES (n)=dataname | n — number of text field lines to print. START =string-expression — start with line containing string-expression END = string-expression — end with line containing string-expression |
| /O | Omit line if blank |
| (/OLS) | Omit leading spaces |
| (/OTS) | Omit trailing spaces |
| /P | To change page character. |
| /PC=mnemonic | Set printer mnemonic defined in the printer table. Example: /PC=ULON For more information,, see the Dictionary-IV Administrator Guide |
| /PN=n | Set page number to n. To change the default page number use /PN=string value where string value is any single quoted character. To suppress page numbers use /PN=” “. |
| /RL=n | Set report length to n lines |
| /SKIP | Skip this line |
| /SPACE | Number of spaces |
Special Code Characters
Section titled “Special Code Characters”Special code variables, also called /variables (slash variables), designate a specified area in the report definition that stores an assigned string or value. These characters are variable, depending on the report definition. Special code characters are:
| /Variable | Purpose |
|---|---|
| /D | System date, DAY. |
| /d | Terminal date. |
| /F | File suffix. For more information on file suffixes, please refer to the Script-IV Developer Guide. |
| /I | Installation name, centered in a 40-character field. |
| /i | Terminal identification. |
| /O | Operator code. |
| /P or # | Page number. Use the # symbol for Header lines only. |
| /R | Report name. |
| /r | Report title, centered in a 40-character field. |
| /T | Current time (12 hour, no seconds, AM/PM). |
| /t | Current time (24 hour). |
Comments
Section titled “Comments”Comment lines are designated with an ! (exclamation mark) line type and can be included in the report definition to provide information or identification for the user. Comment lines do not print on the report.
Line Types
Section titled “Line Types”Line type codes designate the functional nature of a line in a report. A line type is indicated by a line type designator code, sometimes followed by a number, a command line option or a formula. A line type code is entered at the left margin of the line in the report definition. It may indicate text or data to be printed, or one or more commands to be executed when the report is generated. Line types are:
| Section | Line Type | Function |
|---|---|---|
| ENTRY-SECTION | DN FN I1nn T9nn | Define Local Data Name(s). Declare Format. Initialize Command. Terminate Command. |
| FILE-SECTION | LN LNU/LNu LNC LNX LNS | Link Name. Operator Code. Continue Processing. Selection Criteria. Sort Criteria. |
| CONTROL-SECTION AND REPORT-SECTION | CB CT ST | Control Break. Computed Total Print/Accumulate. Subtotal Break. |
| ENTRY-SECTION FILE-SECTION, AND CONTROL-SECTION | INCLUDE | Merge or include the name of the report that was designated as an include. Note: Press the Tab key to align the INCLUDE line type directly under the L in the header ruler on the Report Definition screen. |
| REPORT-SECTION | H D F | Header Line. Detail Line. Footer Line. |
| ALL AREAS EXCEPT: D, H, F, CB, ST, CT LINES IN THE REPORT SECTION ALL AREAS | : ! | Continue syntax for line type onto the next line. Used in all areas of the report definition. Causes the position and all characters following it on a line to be treated as comments and not to be printed. It is not valid in a formula window. |
| LINE TYPE MODIFIERS IN REPORT-SECTION | ? C /O | Indicates Conditional Line. Command Line. Omit Line if Result is Blank. |
From the Report-IV Reference, version 8.9.1. Open this page in the PDF