

Query Framer
The Query Framer allows you to define a query, or frame a request, without having to use EQL Command Language. To create a query, select from the options presented in the Query Framer windows. The Framer automatically generates the query command for you.
You can then execute the command generated by the Query Framer or bring the command into the EQL window for further editing and changes. For more information, see the EQL section in this document.
Executing the Query Framer
Section titled “Executing the Query Framer”When you run Thoroughbred Query -IV the system displays the Query Control Window:
Query Control Window - Query Framer
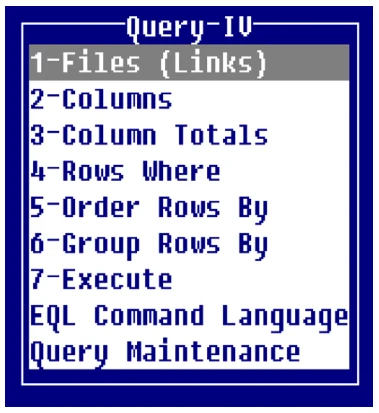
Selections 1 through 7 of the Query Control Window are known as the Query Framer. Selections 1 through 6 display selection windows that you may use to create queries. Selection 7 executes the query in the Query Framer.
If you want to change or execute an existing query, select the Query Maintenance option in the Query Control Window. After you retrieve an existing query through Query Maintenance, you can use the Query Framer to change or execute it.
You are required to select something from the first 2 selections in the Query Framer: Files (Links) and Columns. All the other selections are not required.
The following keys are active in the Query Framer:
- Enter
- Executes the highlighted selection
- F4
- Exits the Query Control Window
- F6
- Displays Help for the highlighted selection
- F7
- Special Functions
- Up Arrow
- Moves up one selection
- Down Arrow
- Moves down one selection
- Home
- Moves to the top of the window
- [X]
- Moves to the selection beginning with the character you type (1, 2, 3, 4, ..., a, b, c, d, ...)
F7 Special Functions
Section titled “F7 Special Functions”The following options are available in Special Functions:
Save Current Query
Select this option to save the current query and then continue working on this query.
Operator Preferences Select this option to set Query-IV Operator Preferences. For more information, see the Operator Preferences section of this document.
Gateway If the Gateway interface is active this allows you to turn Gateway access on or off. It displays N/A if Gateway is not installed.
Files (Links)
Section titled “Files (Links)”This option selects the files to be used in creating this query.
The system displays a listing of links or schemas. You may define this mode in Query-IV Parameters (Operator Preferences).
The selection window displays a list of Links or Schemas. More than one may be selected, but they must be related. When using Schemas, you may only select one.
Your selection is placed in a window and you may continue to make selections or press F4 to continue creating the query.

The following keys are available in this option:
Enter To select a File or Link or schema name
- F2
- To delete the Link or Schema selection. If you delete a Link (or Schema), the Query Framer automatically removes all references to columns or data in that Link from the query.
- F4
- To return to the Query Control Window
- F10
- To lookup a specific file. The system prompts:
Enter Key ValueType from 1 to 8 characters of the Link or Schema name and press Enter. The system displays the first file or Link name to match your entry.
Columns
Section titled “Columns”This option selects the Data Names from the file (or files) selected to be used in this query.
The system displays a listing of Data Names. In Query-IV Preferences you may define the order in which they display as either alphabetical or physical

The length of the Data Name is also displayed and can be used to determine whether the Data Name is numeric or alphanumeric.
Examples:
- 3.0
- 8.2 1.0 4.2 6.2
Represents numeric lengths. The field size depends upon the numeric type defined in the data file format. For more information, see the Formats section of the Dictionary-IV Developer Guide.
- 58
- 1 30 15
Represents alphanumeric lengths or 58, 1, 30, and 15) as defined in the data file format. For more information, see the Formats section of Dictionary-IV Developer Guide.
The selected column is then displayed at the bottom of the screen in the selected column area. The selected column area displays the following information for all selected columns:
- Column #
- Column Heading
- Data Name
- Numeric Output Mask
If you select a column that is defined as a multiple occurrence the system prompts:
Which Occurrence (1 thru x)X is the number of occurrences. Type the occurrence to be used and press Enter. You may continue to add the other occurrences.
The following keys are available from this option:
- Enter
- To select a column.
- Left Arrow
- To move one column to the left in the display of selected columns at the bottom of the screen
- Right Arrow
- To move one column to the right in the display of selected columns at the bottom of the screen
- Tab
- To move one window width to the right in the display of selected columns at the bottom of the screen
- Back Tab
- To move one window width to the left in the display of selected columns at the bottom of the screen
- Home
- To move to the first (or last) Data Name in the listing
- Up Arrow
- To move one line up in the Data Name listing
- Down Arrow
- To move one line down in the Data Name listing
- F2
- To delete the highlighted column from the selected column area
- F3
- To reorder the columns, for more information, see the F7 Other Options section later in this section.
- F4
- To return to the Query Control Window
- F7
- To open the Other Options Window. These options allow you to place headings on the columns, add and delete columns, and reorder columns. As you make your selections, the columns displayed at the bottom of the screen will change. For more information, see the F7 Other Options section later in this section.
- F10
- To lookup a specific file. The system prompts:
Enter Key ValueType from 1 to 20 characters for the Data Name and press Enter. The system places the cursor at the first matching Data Name.
F7 other options
Section titled “F7 other options”When you press F7 the system displays:
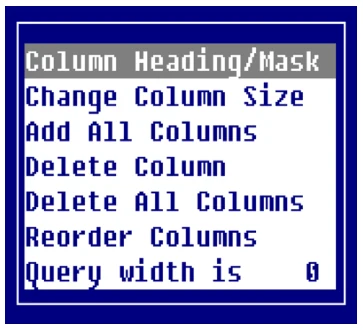
You may select one of the following:
Column Heading/Mask This option allows the creation of headings for a column. The default heading will be the same name found in the Data Name list window. If the column contains numeric data, an optional output mask can be defined.
When you select this option and press Enter, the system prompts:
Column Heading:Column Mask:The default heading is the Data Name (or description). The field will scroll to accept a maximum of 60 characters, but only the first 20 characters are displayed in the selected column area, even though the entire heading will be used in the query.
If you select a numeric Data Name or a phone number, date, or social security number field, the system prompts for a numeric output mask.
Press Enter to accept the default, or enter another mask. For more information on masking, see the EQL Command Language section later in this document.
Change Column Size This selection allows you to change the size of any character data column. The column name being changed is highlighted to the left. The new column size cannot be greater than the current column size.
When you select this option and press Enter, the system prompts:
Enter column size: xx is the maximum field length. Type the column size to be used in this query and press Enter. This number must be equal to or less than the maximum field length.

If the column is a multiple occurrence the system prompts:
Which Occurrence (1 thru x)x is the number of occurrences. Type the occurrence to be changed and press Enter. You may continue to change the size of other occurrences.
When you exit this option the system adds a line to the selected column area:
Column Size
This is represented by:
x represents the new column size.
Add All Columns When you select this option and press Enter, the system adds all columns in the specified Format/Link to the query. If a Data Name specifies multiple occurrences, all occurrences will appear in the query.
The columns appear in the order in which they appear in the Data Name window. For more information about changing this order, see the Query-IV Preferences section in this document.
Delete Column When you select this option and press Enter, the system deletes the selected column from the current position. If there are multiple occurrences the system prompts:
Which Occurrence (1 thru x)x is the number of occurrences. Type the occurrence to be deleted and press Enter. You may continue to delete other occurrences.
Delete All Columns When you select this option and press Enter, the system deletes all columns from the query. If a Data Name specifies multiple occurrences, all occurrences will be deleted from the query.
Reorder Columns
When you select this option and press Enter, the system displays the list of columns in your query.
The following keys are available:
Enter To select the column to move
- F4
- To end
Highlight a column and press Enter to select it. The system redisplays the list of columns in your query. The following keys are available:
Enter To select the new column position
- F4
- To end

You may select additional columns to move or press F4 to return to the column selection window.
Query width is The system displays the width, in number of characters, for a single row of data in the query you are building. This information will be used for screen scrolling and condensed printer printing.
The report width is rounded up to 80, 96, or 132.
Column Totals
Section titled “Column Totals”This option selects the numeric Data Names for which you want column totals.
The system displays a listing of selected numeric Data Names.
Any number of numeric Data Names may be selected for totaling. When a Data Name is selected, it is placed in the selected column totals window.
The following keys are available in this option.
Enter Selects the Data Name for totaling
- F2
- Deletes the highlighted Data Name from the selected column totals window
- F8
- Selects all numeric Data Names for totaling
- F9
- Deletes all numeric Data Names from the selected column totals window
Rows Where
Section titled “Rows Where”This selection allows you to enter a condition for selecting rows.
The system displays an entry window. Type the selection conditions and press Enter. The condition consists of two or more values that interact with operators to form either a true or false result.
For more information about the operators and conditions, see the Command Language section in this document.
If no condition is specified, all rows are selected. The condition consists of two or more values that interact with operators to form either a true or false result.
The following keys are available from this option.
- F4
- Returns to the Query Control Window
- F6
- Displays on-line help
- F10
- Displays a list of Data Names from all selected Links or Schemas. The system displays a listing of Data Names.
- F11
- Displays the operand menu
Example:
CUSTOMER-BALANCE > 1000This selects rows where the customer balance is greater than 1000. If you enter an invalid condition, you cannot exit the window without correcting the problem or deleting the condition from the window.
The syntax for the condition in this window is described in the section on the EQL Command Language. In this entry window you do not have to enter the WHERE that precedes the condition.
Order Rows By
Section titled “Order Rows By”This option allows you to select a sort order.
The system displays a Sort selection window containing a list of existing sorts defined for the first Link or Schema. You may also create a Sort. It may look like the following:
- SORT0
- CUST-CODE
- SORT1
- CUST-NAME
. . .
Create a Sort
SORT0-SORTn SORT0 through SORTn represents the sorts defined in Dictionary-IV. For more information, see the Links section of the Dictionary-IV Developer Guide.

The following keys are available:
Enter To select the Sort
- F4
- To end
Only one Sort may be selected at any given time. After you select a Sort, you automatically return to the Query Control Window.
You cannot use Order Rows By and Group Rows By in the same query. Grouping automatically orders rows by the selected group and overrides any sorting selected in the Order Rows By window.
Create a Sort Order This option allows the user to create a Sort order that is not a Dictionary-IV predefined Sort. Query-IV will sort and order the results using this value. The user will be given the opportunity to select a single Data Name from the listing in ascending or descending order.
Group Rows By
Section titled “Group Rows By”This option allows you to group rows together by the specified Data Name and produces a summary row for each group.
The system displays a listing of Data Names.
Only one Data Name may be selected for grouping. When a Data Name is selected, it is placed in a window.
The following keys are available:
Enter To select a Data Name for grouping.
- F2
- To delete the highlighted Data Name from the Group Rows By window.
- F4
- To end.
- Grouping
- can be used to display the unique values in an alphanumeric column. Compare the first query
below, which does not use grouping, with the second query, which does.
| Example: | |
|---|---|
| Files (Links): | Q4EMPLOY |
| Columns: | DEPT-CODE |
| Rows Where: | EMPLOYEE-NAME BETWEEN “A” AND “E” |
Table Displayed:
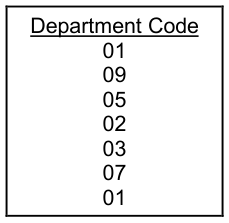
Notice that the code 01 is displayed twice.
| Example: | |
|---|---|
| Files (Links): | Q4EMPLOY |
| Columns: | DEPT-CODE |
| Rows Where: | EMPLOYEE-NAME BETWEEN “A” AND “E” |
| Group Rows By: | DEPT-CODE |
Table Displayed:
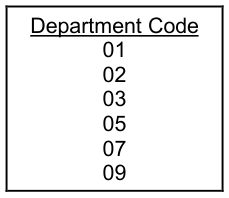
Notice that the code 01 is displayed only once.
If a numeric column is selected, the query displays a single number for each group based on the group function used in the query. For the SUM function, it is the sum of the values. Compare the first query below, which does not use grouping, with the second query, which does.
| Example: | |
|---|---|
| Files (Links): | Q4EMPLOY |
| Columns: | DEPT-CODE, BONUS |
| Column Totals: | BONUS |
| Rows Where: | EMPLOYEE-NAME BETWEEN “A” AND “E” |
Table Displayed:
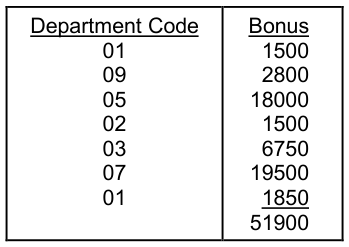
Again notice that department 01 displays twice, once for each employee.
| Example: | |
|---|---|
| Files (Links): | Q4EMPLOY |
| Columns: | DEPT-CODE, BONUS |
| Column Totals: | BONUS |
| Rows Where: | EMPLOYEE-NAME BETWEEN “A” AND “E” |
| Group Rows By: | DEPT-CODE |
When you execute this query the system prompts:
Use GROUP BY as Summary or DetailSelect one of the following:
Summary
Displays the Group By Data Name (DEPT-CODE) and totals the numeric columns selected (BONUS).
Detail
Displays all detail for each group.
Summary Table Displayed:
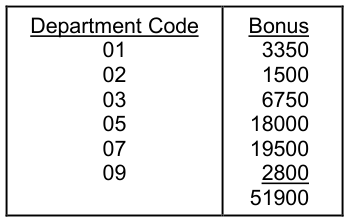
Notice that each department displays only once showing the bonus for each department and a total for all departments that fit the criteria.
Detail Table Displayed:
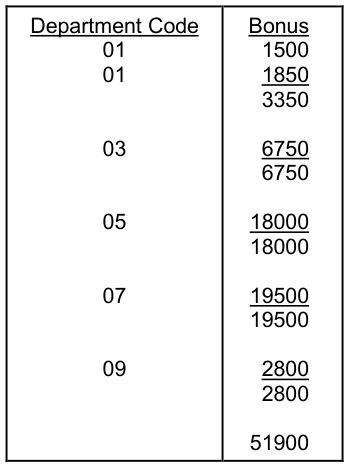
Notice that each employee bonus is displayed for each department; each department is totaled; and all departments fitting the criteria are totaled.
You cannot use Group Rows By and Order Rows By in the same query. Grouping automatically orders rows by the selected group and overrides any sorting selected in the Order Rows By window.
Execute (Framer)
Section titled “Execute (Framer)”This option executes the query framed by the Query Framer and produces a table of information from the request.
It also generates and displays an SQL statement on the screen.
Summary
For the last example on the previous page a Summary query would produce:
TOTAL BONUS;SELECT DEPT-CODE, SUM(BONUS)FROM Q4EMPLOYWHERE CUST-NAME BETWEEN "A" AND "E"GROUP BY REP-CODEDetail
For the last example on the previous page a Detail query would produce:
DETAILTOTAL BONUS;SELECT DEPT-CODE, SUM(BONUS)FROM Q4EMPLOYWHERE EMPLOYEE-NAME BETWEEN "A" AND "E"GROUP BY DEPT-CODEFor more details, refer to the section on Executing a Query.
Table scrolling
Section titled “Table scrolling”When you execute a query and the table displays on the screen, you may need to scroll the table to display all the columns and rows.
The following keys are available:
- Enter
- To display additional rows
- Home
- To move to the left/right side of the table
- Right Arrow
- To move the window right 1 character
- Left Arrow
- To move the window left 1 character
- Tab
- To move the window right 5 characters
- Back Tab
- To move the window left 5 characters
From the Query-IV Reference, version 8.9.1. Open this page in the PDF