

Presentation Classes
The help subsystem lets you provide context-sensitive, structured help throughout an OPENworkshop application. You can specify help messages to display on an application, class, or data element name level. You can present help in a number of different forms.
OPENworkshop displays a help message whenever a user selects Help (F6). Other help messages are displayed as prompts by OPENworkshop applications. As a developer you can define the size and position of the window in which the help is displayed. In VIP size and position confirms to Windows standards. There are two alternative strategies for developing the text of help messages:
- Since OPENworkshop allows you to create help whenever none is defined, it is possible to wait until the application has been created then build the help as the application is exercised. For help messages that will be displayed in response to the user selecting Help this strategy will often serve to make your help more relevant and accurate in shorter time.
- The alternative is to create help through the Help Header, shown below. This method must be used to create indexed or function key help.
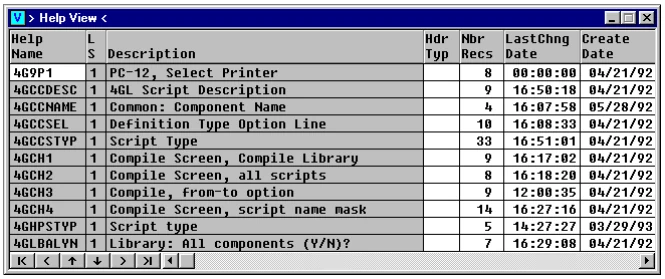
To add a new help item select Line Insert in the Header View. OPENworkshop creates a new row.
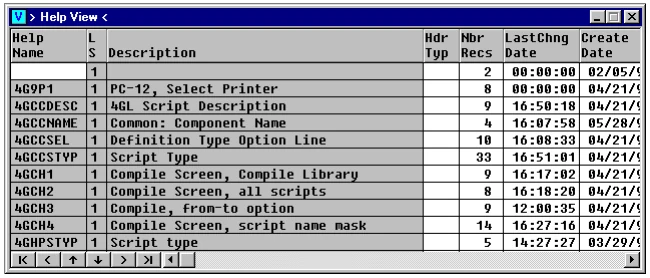
Enter a name, description, and other required attributes, as shown in the table below. Then, with the highlight on the Help Name, select Edit (F1) to create the help text using the help text editor.
| Column | Attribute |
|---|---|
| Help Name | Two-character Library name followed by up to 6-character Help name |
| LS | Language Suffix. Defaults to 1. Select a different suffix for different languages where you are using multi-language support. See Dictionary-IV Administrator Guide for more details. |
| Description | Up to 40-character description |
| Hdr Typ | Header Type. C = Centered L = Left aligned R = Right aligned space = no header OPENworkshop uses the Description as the Header. |
| Other columns | Maintained by OPENworkshop |
Help Text Editor
The help text editor allows you to create and edit the contents of a help text file, and also control where the window is displayed on the screen. In VIP size and position confirms to Windows standards. The following table provides an overview of the facilities provided by the editor. See the on-line help within OPENworkshop or review the Dictionary-IV Reference Manual for more details. Below is a table of help editor for character functions:
- Key
- Function Description
F1 Split Line Splits the current line into two lines at the cursor position.
Characters after the current cursor are moved to the following line.
F2 Join Line Joins two lines eliminating any blanks at the end of the
first line and the beginning of the second.
- F3
- Spell Check Performs a spelling check on the help file contents.
F4 End Ends the editing session, giving you the choice of saving
or discarding the changes made.
F5 Format Text Justifies text from the current line to the end of the
paragraph.
- F6
- Help Displays help for the help file editor.
- F7
- Special Functions A menu of special functions as follows:
- Change Tabs
- Sets tab positions for the file.
- Resize/Move Window
- Moves and resizes the window in which help is displayed.
- Edit Another Document
- Allows you to view or edit another document, returning the current document on completion.
- Color Settings
- Allows color highlights to be added to help.
- Edit Mode Options
- Allows the on/off status of a number of flags to be changed. These flags control text mode vs graphics mode, right margin alignment, automatic hyphenations, character attributes.
- Change Window Title
- Allows the title of the help message to be changed.
- Select date
- Inserts the current date into the file being edited.
- Extended Help
- Presents help on how to design help text.
- Window Move
- Allows the position of the help window to be changed using tab and up/down keys.
F8 Search/Replace Allows a search or search and replace throughout the text
file
- F9
- Expand Window Expands the window to full screen size.
- F10 GoTo
- Searches the document for a pattern and places the cursor at that position.
| Key | Function | Description |
|---|---|---|
| F11 | Margin | Sets the left margin to the current cursor position. |
| F12 | Copy | Copies the contents of another document to the current position in the help text. |
| F13 | Cut/Paste | Allows text to be cut from one place and pasted elsewhere within the file. |
| F14 | Undo | Undoes the last change made to the file. Multiple uses successively undo previous changes. |
| F15 | Character/Graphics Mode | Switches editing between editing characters and editing graphics characters. |
| F16 | Prints the help message text. |
OPENworkshop offers a choice of types of help. See the beginning of this subsection for examples of their appearance. The type is specified to OPENworkshop by the first line of the help text.
Simple Help
Displays a simple text message when Help (F6) is selected. Any help text file that does not begin with one of the reserved help type specifiers (see the following) is assumed to be simple help.
To define a simple help file select Line Insert in the Help Header, specify the attributes required, then select Edit (F1). Create the text. Adjust the position and size of the help window as required, and save the help file.
Indexed Help
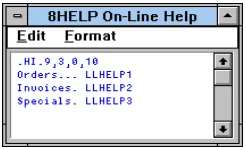
Shows a list of help subjects that the user can select when this indexed help is displayed. After the operator has selected from the list OPENworkshop displays the referenced help file.
Indexed help is specified by the characters .HI. starting at the first row, first column. You must then specify the window size and position for the help. (In VIP size and position conforms to Windows standards.) In this example, the help is to be displayed in a window that is 9 characters wide, 3 characters high, positioned at column 0, row 10.
To define a help index file select Line Insert in the Help Header, specify the attributes required, then with the highlight on the name field select Edit (F1) for the help index file. Create the text as indicated in the model shown above and save it. Then create a help item for each of the options specified in the indexed help list. Typically, each of these items will be simple help, but they may be any type.
Function Key Help
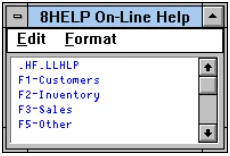
Displays a help message for a number of function keys, determined by the contents of the function key help file. When the user presses a function key while this help message is displayed, a further help message is shown, selected by appending the two-digit function key value (01, 02, etc.) to the help name prefix specified in the first line of the file.
In this example, pressing F3 would display a help module named LLHLP03. Function key help is specified by the characters .HF. starting at the first line and the first column of the help file.
To define a function key help file press Line Insert in the Help Header view, specify a help name, then with the highlight on the Help Name select Edit (F1) for the help text file. Create the text as indicated in the model shown. Adjust the position and size of the help window as required, and save the help file. (In VIP size and position conforms to Windows standards.) Then create a help item for each of the function keys specified in the function key help file to contain the required help text. Typically, each of these items will be simple help, but they may be any type.
String Substitution
The help subsystem allows the application developer to substitute strings in a help message under the control of the application. To take advantage of this facility, use the CONNECT HELP directive and supply substitution parameters in the HELP$ string array, which is described in the HELP$ section of this manual.
Help Topics Subsystem
Section titled “Help Topics Subsystem”Complementing the context-sensitive help system, OPENworkshop provides an indexed help subsystem to let users find help on any topic.
Using Help Topics
From the Main menu select Help.
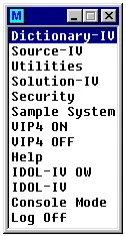

A menu of major topics is presented for the user to select from.
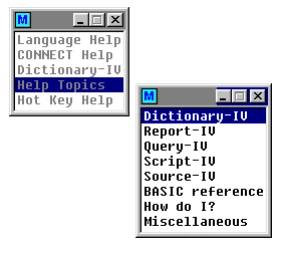
Select the category required, and the Help Topics subsystem opens a view of all available help for the selected category.
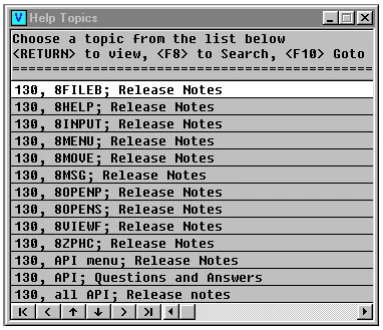
Select Search (F8) to search for items that contain one or more keywords.
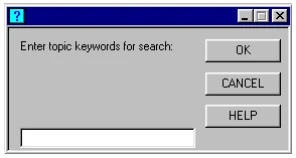
At the prompt, enter either a single text string or multiple items separated by commas. OPENworkshop searches for all items in the current category that contain any of the keywords entered, i.e., the keyword search does a logical OR between multiple keywords.
Select GoTo (F10) to go to an entry in the list that commences with a specified character string.
The list contains both help items and menus. Once the required item is located in the list, select it to display the item. If the chosen item is help, OPENworkshop simply displays the help text. If the chosen item is a menu, OPENworkshop displays the menu and allows the user to either select from that menu or end the display.
Creating Help Topics Items
The developer can make help items or menus available to the Help Topics subsystem simply by adding a .TOPIC declaration to its definition.
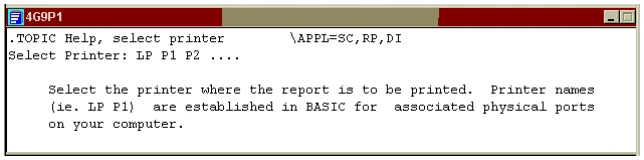
The help shown above contains a Help Topic declaration. The text, Customer Code, will be added to the topics available. The category into which this topic is to be placed is defined in the \APPL segment of the declaration; this declaration will be in the OE category. If no \APPL statement is made, the item will be placed in the Miscellaneous (ZZ) category.
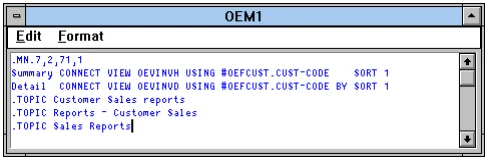
The menu shown above contains multiple Help Topic declarations, enabling the item to be searched for in various ways.
Generating the Help Topics Index
The Help Topics index must be generated before the Help Topics subsystem can be used. Use the Control Menu/System Administration menu to display the menu below.
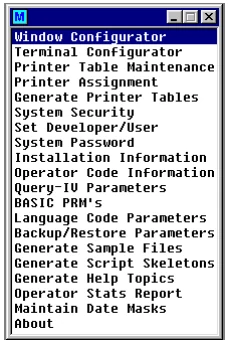

OPENworkshop requests the names of the libraries to be added to the index. If an index already exists, you are given the choice of appending to the existing index or replacing the existing index. For more information see the Dictionary-IV Administrator Guide.
A menu allows the user to choose an action from a number of options. OPENworkshop supports three different forms of menus: a simple list, a matrix menu, and a selection menu.
List Menu Sample
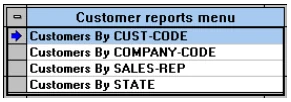
In a list menu on a character terminal move the cursor up and down using the Up Arrow and Down Arrow keys. Alternatively, you can press the first character of the option you require, and the lightbar will move to the next line starting with that character. In a graphical user interface, point and double click on the item.
Matrix Menu Sample
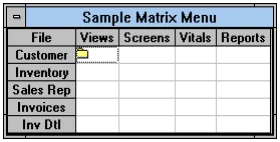
A matrix menu allows you to choose from a matrix of options. On a character terminal use the arrow keys to move around the columns and rows, and the Enter key to select the required option. On a graphical workstation, point and double click to select the option.
Selection Menu Sample
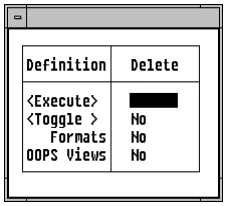
A selection menu is used to pass selection parameters to an operation. The example on the previous page shows a menu that will execute a Delete function when the Enter key is pressed. Each of the parameters listed below the cursor can be toggled by moving to the cell and selecting it. Alternatively, select Toggle to toggle all the parameters at once, when you are ready, select Execute.
The developer is able to control the position and appearance of the list, matrix, or selection menu on the screen, and the groups of users who may see and select the menu as whole or individual options on the menu.
Maintaining Menus
To maintain menus move to the Menu Header view, as shown below:
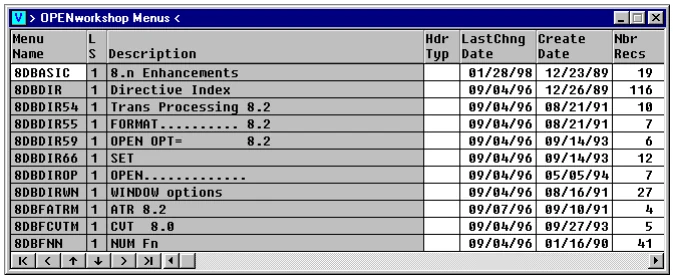
To edit an existing menu, move to the row and select Edit (F1). To create a new menu, select Line Insert, enter a name and attributes (see below) for the menu and then with the highlight on the name field select Edit (F1) to edit the new definition.
| Column | Attribute |
|---|---|
| Menu Name | Two-character library name followed by up to 6 character help name. |
| LS | Language suffix. Defaults to 1. Select a different suffix for different languages where you are using multi-language support. See the Dictionary-IV Administrator Guide for more details. |
| Description | Up to 40-character description. |
| Hdr Typ | Header Type: C = Centered L = Left aligned R = Right aligned space = no header OPENworkshop uses the description as the Header. |
| Other columns | Maintained by OPENworkshop |
A file containing the menu definition is opened. You can edit the file using the text editor. The definitions for each of the three sample menus shown at the beginning of this section are shown in the following. The type of menu required is specified in the first line of the menu definition.
List Menu
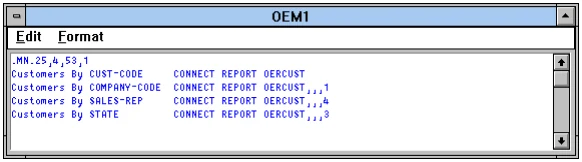
In the first line, .MN. specifies this as a list menu, to be displayed in a window that is 25 characters wide, 4 lines high, and positioned at column 53 and row 1.
Each line of the menu is defined in the following lines of the definition. The first 25 characters are displayed in the window. The directive to be processed when the option is selected starts at character position 25+2. If the definition defines more options than the height of the window, scroll within the window.
Matrix Menu
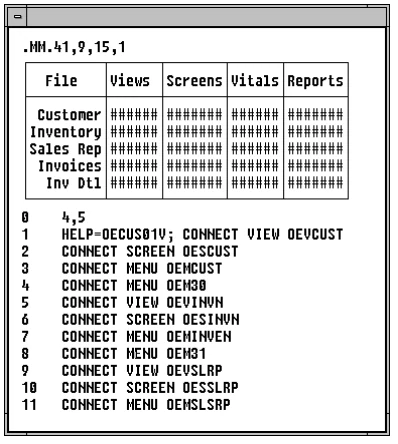
As with the list menu, the first line defines the type of menu and the size and position of the window. The example also shows how to specify a help file that will be available when the menu is displayed.
The next 9 lines, including the line graphics, in this example define the layout of the menu on the screen. Line graphics define the outline border. Other text is displayed as typed, except fields filled with a # (pound sign).
These fields define where the cursor can move to in the displayed matrix menu.
You must specify a regular matrix, i.e., no gaps can be left. However, different columns do not all have to be specified at the same width. Choose widths that suit the column headings.
The line numbered 0 that follows the screen representation specifies the number 4 columns and 5 rows within the matrix menu options matrix. Each row and column combination offers an option to the user, defined in the following lines of the menu definition.
The following lines specify the directives to be executed for each cell in the matrix. Lines are numbered by counting the columns row-by-row. The line numbered 1 specifies the directives to be executed for row 1 and column 1. Line 2 specifies the option for row 1 and column 2. Line 5 specifies row 2 and column 1. See the following table for cell numbering in this example.
For more information on the VIEW$[ALL] array, please see the online help: CONNECT HELP, CONNECT VIEW, VIEW MSG array.
F8 Functionality for USERS
Create a custom F8 Command menu in order to provide limited F8 functionality when the user mode is set to USERS.
This can be done at anytime by creating an OPENworkshop startup method and setting the global format #IDSV.VIEW-USR-CMD set to the name of the F8 Command window to be displayed from a View. This is useful if you do not want your users to be able to access F8 commands like COPY, MOVE, DELETE, SUM, COUNT.
If #IDSV.VIEW-USR-CMD is not set the default menu OOM2 will be used.
For convenience a modified version of OOM2 named OOM2USR is distributed with OPENworkshop. This version of the command window limits options to LIST, PRINT, QUERY, CHART, EXPORT, and EXCEL.
Single Record Maintenance (F9)
Select Single Record Maintenance (F9) to display a screen showing the current row in more detail. The screen that will be displayed will normally be defined in the link definition. If a screen was not specified in the link definition, a default screen will be generated.
Press F9 from a screen to display a view starting with the current record. The view that will be displayed will normally be defined in the link definition. If a view was not specified in the link definition, a screen will be displayed that allows a link name to be entered. The view will be created from the link name entered.
Format Editor (F11)
The data element name definition is displayed within a text editor that can be edited using the editor. Attributes are shown in the first line of the file, and succeeding lines display directives that define Valid Values, messages, pre- and post-processing directives, and other definitions for the data element name.
Select F11 to display the following window:
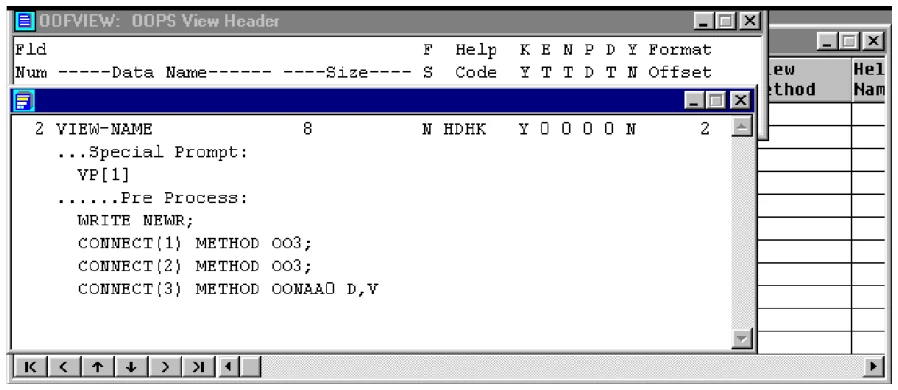
This definition contains directives organized into sections. The editor assists in creating headers for these sections, and handles indentation.
Create/Maintain View
To create a new view or maintain existing views move to the View Header, as shown below:
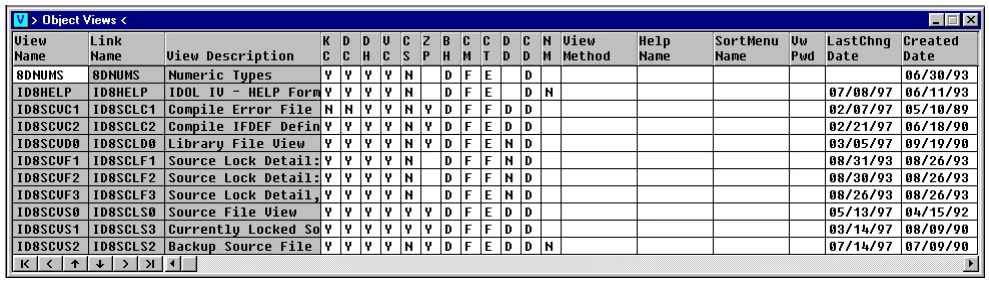
To edit an existing View definition, position the cursor to the required row and select Edit (F1). To change the name of, or to copy an existing view, type the new name and choose the option required from the succeeding menu. To create a definition of a new view, select Line Insert, type a name for the new screen, then with the highlight on the name field select Edit (F1) to edit the new definition.
OPENworkshop maintains the following objects and attributes for a view:
| Column | Attribute |
|---|---|
| Link Name | The link used by the view to locate the required data for the view. |
| KC | Key Change. Value Y allows the key data to be changed by the user. N prevents change. |
| DC | Data Change. Value Y allows non-key data in the view to be changed by the user. N prevents change. |
| DH | Display Headings. Value Y causes the view heading (column headings) to be displayed. N switches them off. |
| VC | View Changes. Value Y allows the specification of the view to be changed by the user. N prevents change. |
| CS | Change Sort. Value Y allows the sort used for data displayed in the view to be changed. N prevents change. |
| ZP | Zero Print. Where a data item is zero is can be displayed in the view as a “0” character (ZP = Y), or as a blank (ZP = N). |
| BH | Border Heading. An eight-character view name is displayed in the left-most top border (BH = V), the view description is centered in the top border (BH = D), Both the eight character view name and description are displayed in the top border (BH = B), or No headings display in the top border (BH = N). |
| CM | CR Mode. Controls the behavior of the view when the user presses Enter. Value F: enter Field Edit. S: enter associated Screen. E: exit and return the key value for the current row to the caller. See description of the VIEW$ array. See the VIEW$ section of this manual. |
| CT | Cursor Type. Value C displays a single-character cursor. E: highlight the current field. F: highlight to full row. |
| DD | Display Data Element Name. The name is displayed at the bottom left corner of the border. D: display the data element name. d: display the data element name description. N: none. |
| CD | CR Direction. After user presses Enter, move to the next cell D: Down, L: Left, R: Right, U: Up. |
| View Method | Called whenever a view has read data for a row and is preparing a row for display. The view method ensures that all required data items, including any calculated columns, are available. See the OPENworkshop Methods section of this manual for more information about view methods. |
| Help Name | Specifies the help file that should be used to offer context-sensitive help for this view. |
| Sort Menu Name | Name of a menu that may be used to help the user select a sort sequence in which to display the view. |
| View Password | If security requirements mean that a password should be used to be able to display the view the required password is specified in this field. |
From the OPENworkshop Reference, version 8.9.1. Open this page in the PDF