

Associated Systems
This section provides information about systems and facilities that can be utilized by OPENworkshop applications:
- Testing and Debugging
- The Cross Reference system
- Gateway for Windows
- Security
- Controlling access to Developer facilities
Testing and Debugging Environment
Section titled “Testing and Debugging Environment”OPENworkshop provides testing and debugging facilities. System activity can be traced and trapped, and data values investigated using a set of run-time utilities. To make the debugging environment available, ensure that the IPLINPUT file contains the statement:
PRM DEBUG=OOZ00Activating the Debugging Environment
Section titled “Activating the Debugging Environment”At any time during development or testing of an OPENworkshop application with graphical user interface (GUI) active, press Ctrl-B to invoke the debugging environment. In windows, the following message will be displayed:
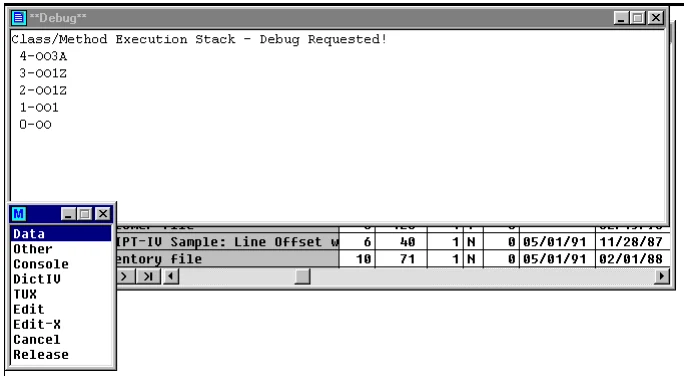
The highest number displayed provides the interrupted level. In the example above, the number is 9.
OPENworkshop displays the current stack of classes and methods in progress. Active classes and methods are displayed with the highest numbers being the most recently invoked. A short menu displays the options available at this stage:
| Option | Action |
|---|---|
| Data | Allows the developer to investigate the current data environment. |
| Other | See the Other debug functions section later in this manual. |
| Console | Enters the Thoroughbred Basic Environment. |
| DictIV | Presents the Dictionary-IV Menu. |
| TUX | Enters Thoroughbred’s TUX utility. |
| Edit | Enters Source-IV for the program that is interrupted. |
| Edit-X | Enters Source-IV for general program editing. |
| Cancel | Returns to executing the current program. |
| Release | Exits the Thoroughbred Environment. |
When you select Data, the method levels display:
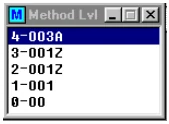
Select the method level and the following displays:
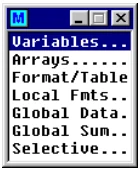
| Option | Action |
|---|---|
| Variables | Displays the status of all variables in the current environment. |
| Arrays | Displays the status of all arrays in the current environment. |
| Format/Table | Displays global formats. |
| Local Fmts | Displays Script formats containing links. |
| Global Data | Displays the status of all global data. |
| Global Sum | Displays size information on global data. |
| Selective | Allows a selection of data types to be displayed. |
The following diagram shows a window displayed after selecting Format/Table from the menu.
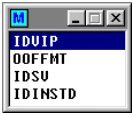
Make your selection and the system displays the following:
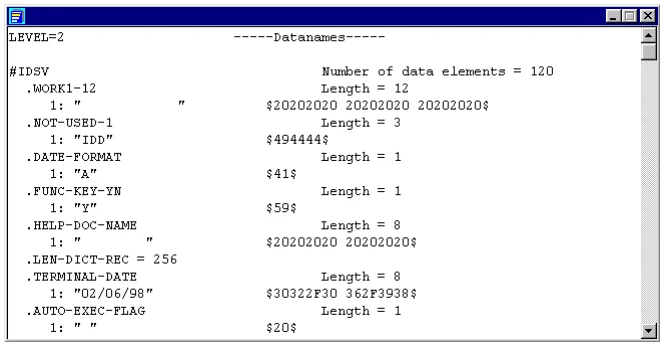
The window is displayed in text editing mode, allowing you to page through the file, or enter a search for values or data element names.
This example displays data element name information for Level 2 and the contents of the global data element name #IDSV. To investigate the data element name values for a different level, move the cursor to the level displayed, for example, over the 2 in the example above, type in the level you want to check, and select End (F4).
To search for a data element name or any other string in the file, select Search (F10), provide the name to be searched for, preceded by a “ (quote) and select OK (Enter).
When you select Other the system displays the following menu:
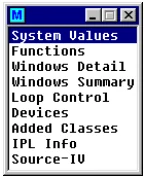
The options shown above give you access to the items as indicated in the menu and below. As with the data environment, you can review the values at different levels by modifying the level indicator and selecting End (F4).
| Item | Information |
|---|---|
| System Values | Values of all system variables in the environment. |
| Functions | Location and use of functions. |
| Windows Detail | Detailed status of all windows in the environment. |
| Windows Summary | A summary of the above. |
| Loop Control | Status of any loop control statements that are active, e.g., WHILE, GOSUB, and so on. |
| Devices | Channel assignments for files, printers, terminals, and other device control status information. |
| Added Classes | Lists all classes or methods that have been added to the environment. |
| IPL Info | Current status of IPLINPUT parameters. |
| Source-IV | Displays the Source-IV menu. (For more information see the Source-IV Reference Manual. |
Breakpoints
Section titled “Breakpoints”Breakpoints can easily be added to methods to trap any combination of program path or condition. A convenient way to create a breakpoint is to edit the method to insert code that tests for the required condition, then executes a statement of the kind:
INPUT "Breakpoint Reached",A$When this message appears, press Ctrl-B to enter the debugging environment. On exit from the debugging environment, the interrupted method continues execution.
Global Cross Reference System
Section titled “Global Cross Reference System”The Global option on the Dictionary-IV menu allows you to access the OPENworkshop global cross-reference system. To use the system you first create cross-reference tables containing the references you need, then view them. A new set of tables can be created whenever you wish.
Select 1-Edit from the Development Menu or press F1 from any Dictionary-IV menu. The system displays the Class pop-up window:
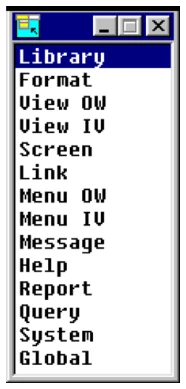
Select 8-Global. When you first enter this system you must create the cross-references you require. The system displays the following:
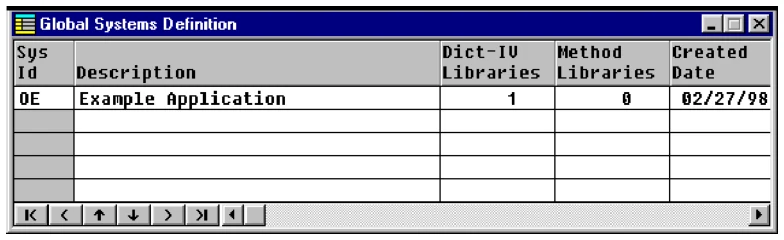
Select Line Insert to add a new line to the Global Systems Definition, enter the System ID and description.
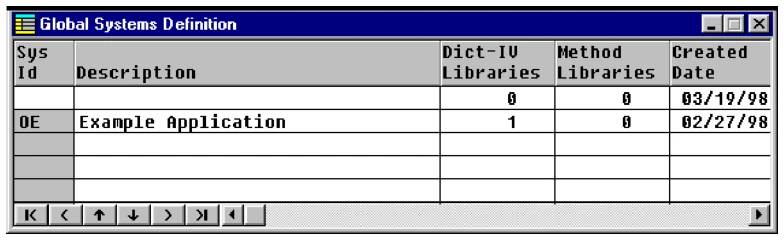
In the Dictionary-IV Libraries column press the Enter key and type the names of the libraries you wish to add to the list shown. Note that more than one library can be specified in this list. Enter the Library. Press F2 to display the Library View.
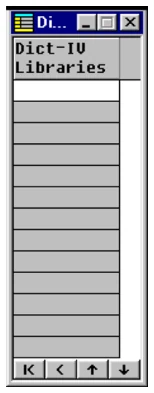
Press the Tab key. Press the Enter key. Use the same procedure to add the Method libraries column, press Tab key, and then press the Enter key to add the Method libraries.
Move the cursor to the System ID column and select the Create (F5) option to build the cross-references.
You may also press F16 to create a report:
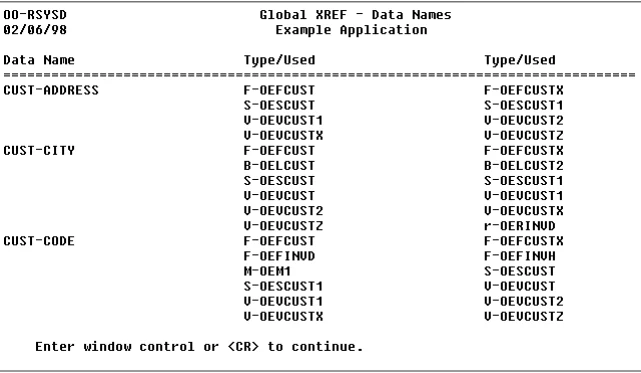
Once the cross-references are built, press F1 in the Sys Id column to explore the cross-reference information that is available through the following WhereUsed menu:
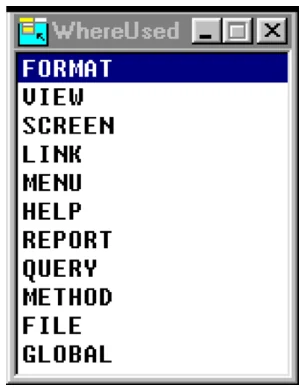
Each option allows you to select a class or other set of system components to review. For example, the FORMAT option displays all formats in the system and shows where they are used. Select FORMAT to produce the FORMAT Where Used View, for example:
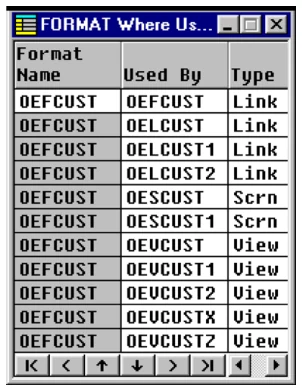
This view shows where every Format in the selected system is used and the type of system component that uses it. Note that all the classes themselves can be displayed or edited from this where-used view. Move the cursor to the required item and select Edit (F1) or Display (F2).
F1 to Edit
Section titled “F1 to Edit”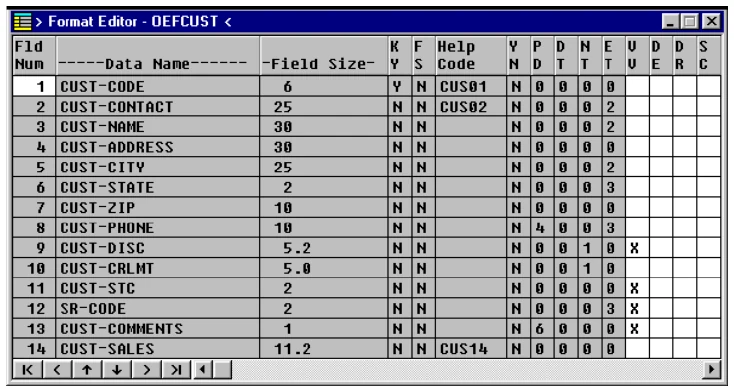
F2 to Display
Section titled “F2 to Display”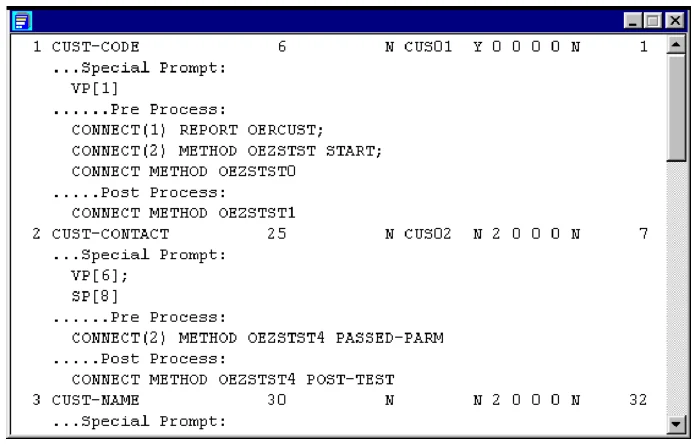
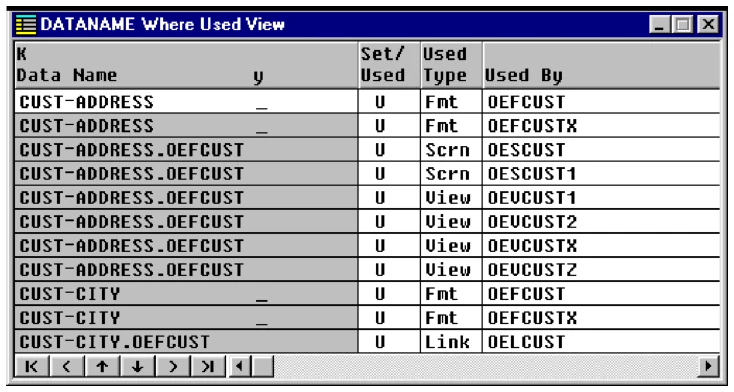
The GLOBAL option of the WhereUsed menu shows where data element names are set or used:
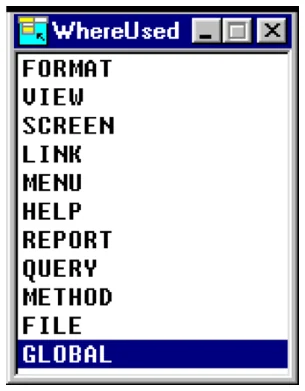
Select GLOBAL to display the Global Dataname Where Used menu:
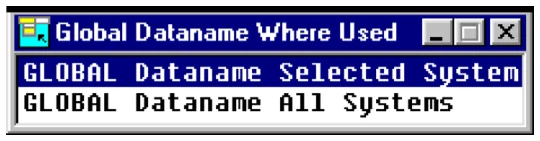
Selecting the highlighted option displays the following menu:
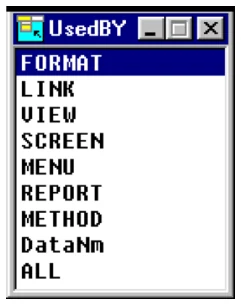
As before, you can review or change the definitions of items from these views. These cross-reference views are extremely flexible and powerful as can be seen from the following examples.
The Used By Format option shows which formats contain a definition of which data element names throughout the application.
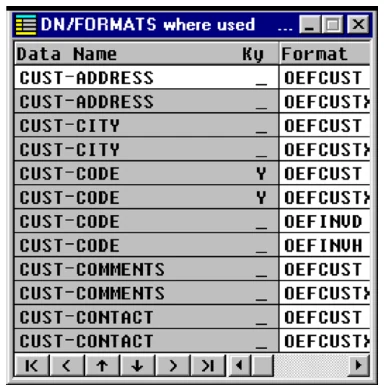
The Used By Method option shows all data element names that are used by methods, and whether the method simply read the data name or may also set its value.
The Used By Data Name option shows data element names that are set or used from other data element names. Typically, these uses are to be found in data element name pre-process or post-process definitions. The normal order of presentation of the format name and data element name in the left hand column of this display is reversed, so that data element names are listed in alphabetically sorted order.
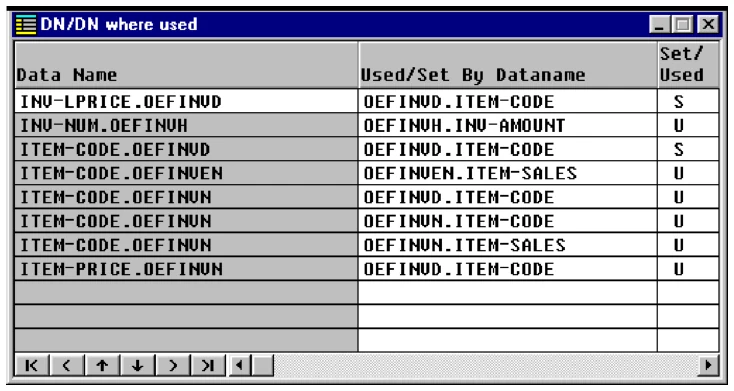
The Used By All option shows all uses of data element names by all classes and methods in the application.
Communication with Gateway for Windows
Section titled “Communication with Gateway for Windows”Gateway for Windows enables a host application to communicate directly with any application software running in the Microsoft Windows environment. It uses DDE communications to transport data between the software running in the Windows environment and the host application. OPENworkshop applications are able to communicate through Gateway for Windows.
You can communicate data through Gateway for Windows using Report-IV, Query-IV, or a method. For more information on Gateway for Windows, see the Gateway for Windows Reference Manual.
The following chart was produced by Microsoft Excel, based on the output from a Report-IV report.
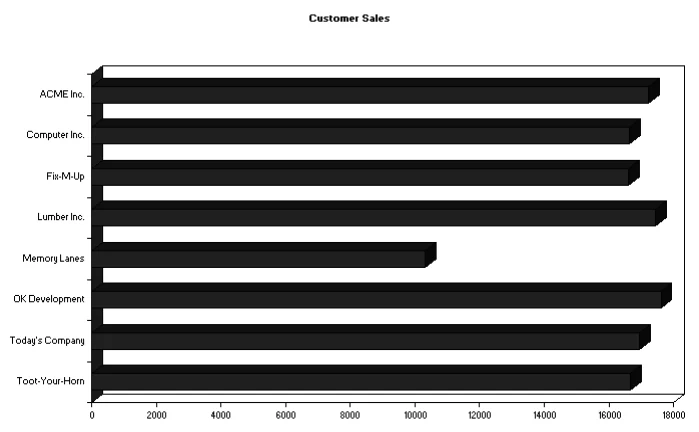
The report that produced the chart follows:
ENTRY-SECTION
I111 DIM M$[5];:     R5 = 0!                                Start Excel running
I112 M$[1] = "I3";:     M$[2] = "EXCEL";:     M$[3] = "SYSTEM";:     CALL "GWWCOM", M$[ALL]!                                Set Excel column width
I113 M$[1] = "E";:     M$[5] = "[SELECT(" + QUO + "C1" + QUO + ")]":           + "[COLUMN.WIDTH(20)]":           + "[SELECT(" + QUO + "R1C1" + QUO + ")]";:     CALL "GWWCOM", M$[ALL]!                                Select sheet 1
I121 M$[1] = "P";:     M$[3] = "SHEET1"!                                Termination. Draw chart of the top 8.
T911 M$[1] = "E";:     M$[3] = "SYSTEM";:     M$[5] = "[WORKBOOK.INSERT(2)]":           + "[CHART.WIZARD(TRUE," + QUO + "SHEET1!R1C1:R8C2" + QUO:           + ",10,1,2,,,2," + QUO + "Customer Sales" + QUO:           + "," + QUO + QUO + "," + QUO + QUO + "," + QUO + QUO:           + ",1,0)]";:     CALL "GWWCOM", M$[ALL]!                                Terminate DDE, leave Excel running
T921 M$[1] = "T";:     CALL "GWWCOM", M$[ALL]
FILE-SECTION
LN    OELCUST SORT BY SORT2:     SELECT WHEN CUST-CODE LIKE "100*"
CONTROL-SECTION
REPORT-SECTION
!                                For each row send customer name and!                                sales to Excel worksheet columns 1!                                and 2.
DC    R5 = R5 + 1;:     R5$ = STR(R5)
DC    M$[4] = "|R" + R5$ + "C1|":           + "|R" + R5$ + "C2|"
DC    M$[5] = "|" + CUST-NAME + "|":           + "|" + STR(CUST-SALES) + "|"
DC    CALL "GWWCOM", M$[ALL]
Security
Section titled “Security”The OPENworkshop security system was designed to be a logical layer of security that exists on top of an operating system’s security. It is based on UNIX concepts, but accommodations have been made to allow the logical security layer to function with other operating systems such as Windows.
The primary features are:
- Group level access to menus and selections from menus.
- Group level access to data file links.
- Group level access to fields within a data file.
- Group level access to record levels.
- Drill down views of user IDs and groups that quickly show users within group and groups of which a user is part.
- Prior versions of security that show the delta from one version to the next.
- Reports showing group to user and user to group association.
- Initialization and regeneration of logical security layer from user ID and group files after modifications.
Security locks may be specified for links, menus, and data element names. This is done by specifying a list of groups allowed access. Users who are not part of these groups are denied access. The format of the specification is:
[group-nbr1,group-nbr2, . . . ,group-nbrn]Example:
[15,25,50,51]In the above example, a menu, link, or data element name containing this specification allow access to users who are part of groups 15, 25, 50 or 51. Users who are not part of groups 15, 25, 50, or 51 are denied access.
Note: Menus, links, and data element names that do not contain a group security lock are accessible by all groups.
The security lock specification can be placed in the menu header or on a MENU selection.
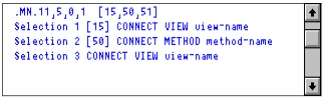
Assuming the above menu, the following is true:
- Only users in group 15, 50 or 51 have access to the menu.
- Only users in group 15 can execute selection 1 from the menu.
- Only users in group 50 can execute selection 2 from the menu.
- Any user allowed access to the menu could access selection 3.
The security lock specification can be placed in the link terminal access codes. The group numbers can now contain an R for Read-only access when using CONNECT SCREEN and CONNECT VIEW. CONNECT SCREEN will be forced into Inquiry mode and CONNECT VIEW will run in PRINT VIEW mode.
Example 1:
0,T0,T1 [15,50R,51]Users in group 15 or 51 would have access regardless of terminal, whereas group 50 will have Read-Only access in CONNECT SCREEN (Inquiry Mode) and CONNECT VIEW (PRINT VIEW mode).
Example 2:
1,T0,T1 [15,50,51]Only users in group 15, 50 or 51 are allowed access when logged in from a terminal other than T0 or T1.
Example 3:
[15,50,51]Only users in group 15, 50 or 51 are allowed access regardless of their login terminal.
Data Element Name
Section titled “Data Element Name”Data element name access restrictions are defined in the security attribute field of the data element name definition. Groups not having access through the group security option will be restricted by this specification. The restriction is made up of the following three parts:
security-mode,display-mode[,password]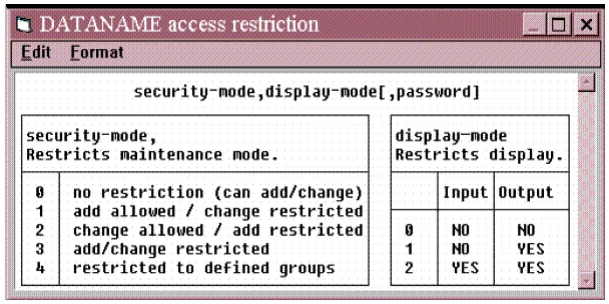
[,password] overrides security mode but not display mode. If specified, it is required regardless of other security settings. An asterisk (*) can be specified as the password and indicates the password is to be the first 3 characters of the data element name’s content.
The security lock specification can be placed in the Data Name security attribute field.
Example 1:
3,2 [15,50,51]Users in group 15, 50 or 51 are allowed entry and display access to the data element name. All other users are denied add, change and display access.
Example 2:
1,1 [15,50,51]Users in group 15, 50 or 51 have entry and display access to the data element name. All other users are denied change and display access when not adding a new record.
Example 3:
[15,50,51]All users have entry and display access to the data element name. This is a useless security specification because no security restriction is specified for users other than 15, 50 or 51.
Record Level
Section titled “Record Level”Record Level security allows the access of data records to be restricted to specified group levels. This is accomplished by defining a 2-character field in the desired format with a security code of 4. For more information see Format Definition in the Dictionary-IV Developer Guide.
When the value of this field matches a record level restriction key, only the groups defined for the key are allowed to access the data record. This record level security applies to OPENworkshop, Dictionary-IV, and Report-IV
Administration of the Security System
Section titled “Administration of the Security System”Principles of operation
OPENworkshop security permissions are maintained in tables that define the relationships between user IDs and security group numbers. These tables are used at run time to determine access permissions. The tables are created initially by copying data from the security files in the UNIX operating system.
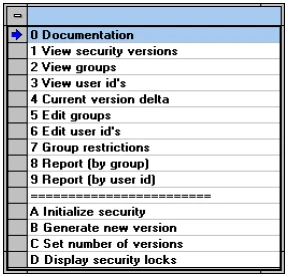
The OPENworkshop main menu contains the item SECURITY, which is accessible to developers. When that item is selected, the menu below is displayed.
Creating security tables
After initial installation, OPENworkshop does not have the security system enabled. To enable security, you must:
- Select option A: Initialize security. This option removes any OPENworkshop security files.
- Select option B: Generate new version. This option creates a new version 1 set of security tables and populates them with data taken from /etc/passwd and /etc/group.
- Select option C: Set number of versions. This option controls the amount of history of changes to the security permissions that is maintained by OPENworkshop.
- Ensure the system user ID and group files reflect the desired user/group relationships for the installation. Options 5 and 6 (Edit groups and Edit user ID’s) can be used to establish desired relationships in the operating system tables. If not, edit user IDs and groups to the required values, then use option B again to create a new security version. Option B can be used as many times as needed to generate new security versions.
If you are using a UNIX operating system, you must have root permissions to modify the group or user ID file.
Reviewing security permissions
Select option 1 from the security menu to view security versions.
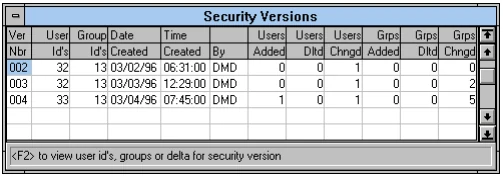
This view allows the administrator to review the changes made between versions, and the current access permissions for groups and the members of those groups.
Group restrictions
Data element name access permissions can be further qualified by using the Group Restrictions option from the security menu. See the Data element name section earlier in this manual for further information on permissions.
Displaying security locks
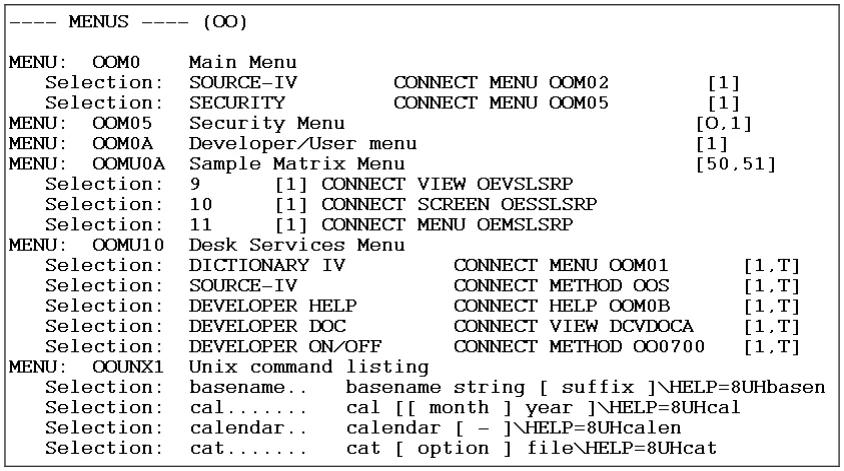
The security locks that have been defined by the developer for an application can be displayed and reviewed using option D from the security menu. Enter a list of one or more libraries to be reported.
This listing shows all security group statements that have been applied to menus, links and data element names in the selected libraries:
Developer Status
Section titled “Developer Status”During development of an OPENworkshop application it is very convenient to be able to access and change class definitions quickly. It is also essential that these definitions can be protected from change by other users. This control is provided by the Developer Status.
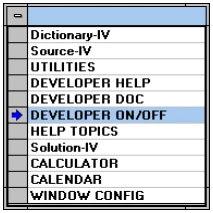
Developer Status is controlled by an option on the hotkey (Ctrl-P) menu displayed above. Access to this item is controlled by menu level security. The user must be a member of security group [01] to gain access to this menu option.
When Developer Status is enabled for a user, that user has access through F1 to edit views, screens, menus and help; through F8 to move views, screens, menus and help; and through F11 to edit data element names.
Selecting DEVELOPER ON/OFF displays the menu below. The Developer Status can be set to DEVELOPER or USER for individual logins or for all logins to an application.
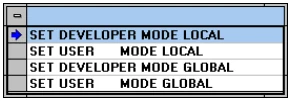
The options are described in the following table:
| Mode | Effect |
|---|---|
| SET DEVELOPER MODE LOCAL | Gives the current user access to classes controlled by developer mode. This takes place immediately. |
| SET USER MODE LOCAL | Takes away access to developer mode from the current user. |
| SET DEVELOPER MODE GLOBAL | Gives developer mode access to all users who have the appropriate security group access. |
| SET USER MODE GLOBAL | Takes away developer mode from all users. This action takes place with effect from the next time any user logs on. |
From the OPENworkshop Reference, version 8.9.1. Open this page in the PDF