

Installation
Back Up Existing Program and Data File Before Installing
Section titled “Back Up Existing Program and Data File Before Installing”- Use site procedures to back up your application and data files.
- Use site procedures to back up the IPL, IPLINPUT, and TERMINAL files from the Thoroughbred Basic directory. From the IDL4 directory, back up the TCONFIGW and TCONFIG8 files.
Uninstalling TS Network Basic with DataServer – 8.5.x through 8.6.0
Section titled “Uninstalling TS Network Basic with DataServer – 8.5.x through 8.6.0”These instructions assume you had previously installed using the default folder C:\Program Files\Tbsc. The folder names may vary slightly depending upon which products you have installed and where the products were originally installed.
-
Login using an Administrator account.
-
Backup your application data and programs.
-
From the Administrative tools select Services and stop the Thoroughbred Server Manager (tsmgr.exe).
-
Uninstall the Thoroughbred Server Manager by running srvcmgr.exe with the –d argument.
From the Windows Start menu Select RUN.
Click on the Browse button and point to the folder where you installed the Basic. Typically, this is C:\Program Files\Tbsc. Highlight the file named srvcmgr.exe and press the Open button. Edit the Open option in the Run dialog appending the -d option. The run option is not quoted. For example: C:\Program Files\Tbsc\srvcmgr.exe –d
From the Run dialog press OK.
If the service is deleted a message box will display saying: Service ‘tsmgr’ successfully deleted! When the Thoroughbred Server Manager is uninstalled click the OK button and continue with the uninstall procedure.
If the service could not be deleted, a message box will display saying: Unable to delete service ‘tsmgr’!. If the delete fails do not continue with the uninstall procedure, contact Thoroughbred Support for assistance.
-
From the Control Panel select the applet to add and remove applications. Remove TS Network Basic with DataServer.
-
Files not installed by the setup or files that have changed since the setup was run are not removed.
If you have already uninstalled other Thoroughbred products some the following files may no longer
exist. Erase the following folders and files:
C:\Program Files\Tbsc
C:\Windows\Tsi.ini
C:\Windows\tsiconst.ini
C:\Windows\TBRED8?.BAS -
We recommend running a reliable registry cleaner at this point.
-
Reboot your system.
The system is now ready for the 8.9.1 TS Network Basic with DataServer installation. When that is complete you can recover your application data and programs. Please be sure to review the Installed Directories and Files section of this manual before you recover your application files.
Uninstalling TS Network Basic with DataServer – 8.7.x
Section titled “Uninstalling TS Network Basic with DataServer – 8.7.x”These instructions assume you had previously installed using the default folder C:\Program Files\Tbsc and C:\Program Data\Thoroughbred Software. The folder names may vary slightly depending upon which products you have installed and where the products were originally installed.
-
Login using an Administrator account.
-
Backup your application data and programs.
-
From the Administrative tools select Services and stop the Thoroughbred Server Manager (tsmgr.exe).
-
Uninstall the Thoroughbred Server Manager by running srvcmgr.exe with the –d argument.
From the Windows Start menu Select RUN.
Click on the Browse button and point to the folder where you installed the Basic. Typically, this is C:\Program Files\Tbsc. Highlight the file named srvcmgr.exe and press the Open button. Edit the Open option in the Run dialog appending the -d option. The run option is not quoted. For example: C:\Program Files\Tbsc\srvcmgr.exe –d
From the Run dialog press OK.
If the service is deleted a message box will display saying: Service ‘tsmgr’ successfully deleted! When the Thoroughbred Server Manager is uninstalled click the OK button and continue with the uninstall procedure.
If the service could not be deleted, a message box will display saying: Unable to delete service ‘tsmgr’!. If the delete fails do not continue with the uninstall procedure, contact Thoroughbred Support for assistance.
-
From the Control Panel select the applet to add and remove applications. Remove TS Network Basic with DataServer.
-
Files not installed by the setup or files that have changed since the setup was run are not removed. If you have already uninstalled other Thoroughbred products some the following folders and files may no longer exist. Erase the following folders or files:
C:\Program Files\Tbsc
C:\Program Data\Thoroughbred Software\Tsi.ini
C:\Program Data\Thoroughbred Software\TBManager.ini
C:\Program Data\Thoroughbred Software\TBSCSYS.ini
C:\Program Data\Thoroughbred Software\TBRED8?.BAS
C:\ProgramData\Thoroughbred Software\TS Network DataServer
C:\ProgramData\Thoroughbred Software\TbscWe recommend running a reliable registry cleaner at this point.
-
Reboot your system.
The system is now ready for the 8.9.1 TS Network Basic with DataServer installation. When that is complete you can recover your application data and programs. Please review the Installed Directories and Files section of this manual before you recover your application files.
Installed Directories and Files
Section titled “Installed Directories and Files”Windows Desktop workstation or Windows server class machine
Section titled “Windows Desktop workstation or Windows server class machine”The installs follow Microsoft best practice rules. Some of the rules are: all executables must be installed in Program Files, files that require read write access cannot be installed in Program Files or Window system folders. This required a new directory structure.
Application Data folder: This is where the Dictionary-IV and OPENworkshop environment will be installed. This includes IPLINPUT.TXT, SERVER.MAP, TERM.MAP, TERMINAL and the IDL4, UTILS, and WORK folders. The setup will install the Dictionary-IV merge files and all other merge files activated by the module code in the IDL4 folder. During the install process you will have the option to override the default folder C:\ProgramData\Thoroughbred Software\Tbsc. The application data folder requires read, write and modify permissions for all users.
Basic Executable folder: This is where the Network Basic with DataServer executables and dlls will be installed. During the install process you will have the option to override the default folder, we STRONGLY recommend selecting the default folder C:\Program Files\Tbsc. The Basic executable folder should limit permissions to read for all users.
Thoroughbred system files will always be installed in common folder C:\ProgramData\Thoroughbred Software\Tbsc , there is no override option. This includes TSI.ini, Tsiconst.ini, and TBManager.ini and other Thoroughbred system files. The common folder requires read, write, and modify permissions for all users.
When referencing directories the Server ID must be included. To specify the IDL4 directory defined as DEV D0,1,,2,,,,S1:IDL4 use S1:IDL4.
All DEV lines defined in the IPLINPUT.TXT file are relative to the application data folder.
Installing the Host Files to Your Hard Drive
Section titled “Installing the Host Files to Your Hard Drive”All installations and activations must be run with Administrator privileges. Once fully installed and activated the products can be run using standard user accounts.
If you are installing on Windows Server with Terminal Services in Execute Mode switch to Install Mode prior to running setup.exe.
- To set Install Mode, from a command line enter chgusr /INSTALL.
- After completing the install, switch back to Execute Mode. From a command line enter chgusr /EXECUTE.
- At any time, the current mode can be verified with chgusr /QUERY.
The chgusr command is a Terminal Services tool. For more information regarding installing applications with Terminal Services please refer to Microsoft documentation.
- Login using an Administrator account.
- We recommend closing all unnecessary applications before running the install.
- Run setup.exe located in the Tsnetbas folder. This setup will install TS Network Basic with DataServer on Windows Server 2016, Windows Server 2019, Windows Server 2022 and Windows Server 2025. While it is possible to install on Windows 10 or Windows 11, we recommend installing product on a machine with a server class operating system.
- The InstallShield Wizard will start the installation and guide you through the rest of the process.
Microsoft Prerequisites
Section titled “Microsoft Prerequisites”The installation will first check the target workstation to determine if the required Microsoft prerequisites are present. If they are not, you will be prompted to install them. You must install the prerequisites if the install dialog prompts you to do so. When that installation is complete, the TS Network Basic DataServer installation will continue automatically
User Information – All Platforms
Section titled “User Information – All Platforms”Enter your Name and Company.
Thoroughbred Module Code – All Platforms
Section titled “Thoroughbred Module Code – All Platforms”Enter the Module Code located on the label. You must enter the correct module code for your product. If you make a mistake, you will not be able to activate your system.
Choose Destination Location – Windows Desktop workstation or Windows Server class machine
Section titled “Choose Destination Location – Windows Desktop workstation or Windows Server class machine”The first destination dialog will allow you to choose the Application Data folder. This is where the Dictionary-IV and OPENworkshop environment will be installed (IDL4 folder) and where the IPLINPUT.TXT, Server.map, TERM.MAP, TERMINAL files will be installed. These files must reside in this folder. This is also where the application programs and data files should reside.
Press Next to install into the default folder C:\ProgramData\Thoroughbred Software\Tbsc or press Browse to select an alternate folder. Example Application Data folders are:
C:\ProgramData\Thoroughbred Software\Tbsc E:\MyApps\Tbsc C:\MyApps
The second destination dialog will allow you to choose the Basic Executables folder. This is where the Network Basic with DataServer executables and dlls will be installed. No other files should be placed here. Press Next to install into the default folder. We STRONGLY recommend installing in the default folder.
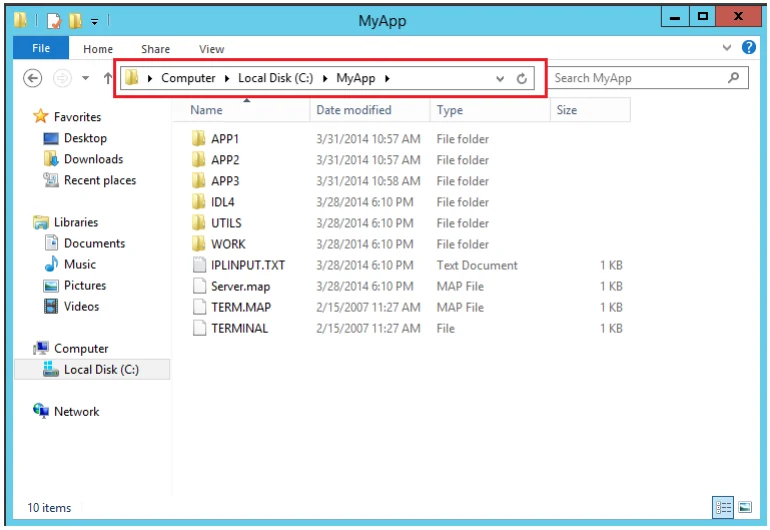
Example Application Data folder on Server 2012:
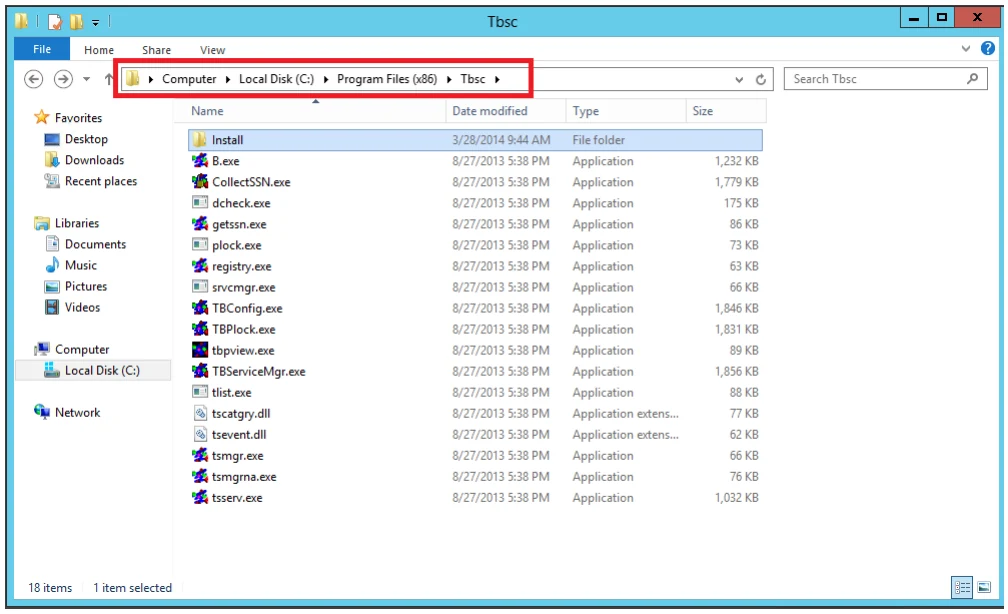
Example Program folder on Server 2012:
Serial Number – All Platforms
Section titled “Serial Number – All Platforms”The installation procedure will display a dialog box to collect the serial number.
Enter the Serial Number provided on the media label. If the operating system noted on the media does not match the target operating system, the serial number will not be validated. When internet access is available, you will have an option for Internet Activation. Press Continue to automatically activate over the internet. Automatic activation is easier and faster with no web forms to fill out and no delay waiting for an email reply. Activation is an immediate process using this method. Press Skip to activate manually; see the Activation of the DataServer section of this manual for details.
A serial number must be entered before TS Network Basic with DataServer can be run. The serial number can be entered at any time by manually executing CollectSSN.exe:
- Locate CollectSSN.exe in the <install-path>\directory. For example, C:\Program Files\Tbsc
- Double click to execute it and enter the serial number from the License Assignment Card in your Order Confirmation email.
If a serial number is not entered, then TS Network Basic with DataServer will not run and an “Unauthorized Installation” message will be displayed.
Setup Complete – All Platforms
Section titled “Setup Complete – All Platforms”Click Finish and then reboot the system.
See the OPENworkshop and Dictionary-IV Installation guides located on the Thoroughbred website under Documentation and then Reference Manuals.
Installing the Client Files to Your Hard Drive
Section titled “Installing the Client Files to Your Hard Drive”The Host installation creates an Install folder on the server containing the installation files required for the Client installation. The client is installed by sharing this folder, mapping a drive to it and then running the client setup.
Share and Map the Client to the Host – Windows Desktop workstation or Windows Server class machine
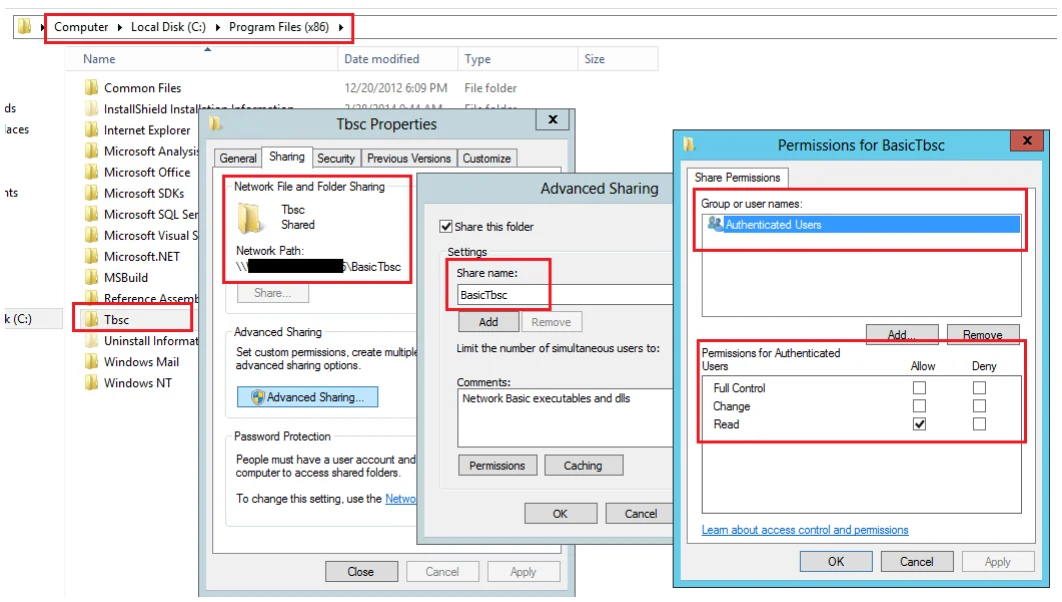
Section titled “Share and Map the Client to the Host – Windows Desktop workstation or Windows Server class machine”On the host, share the Basic Executable folder (for example C:\Program Files\Tbsc).
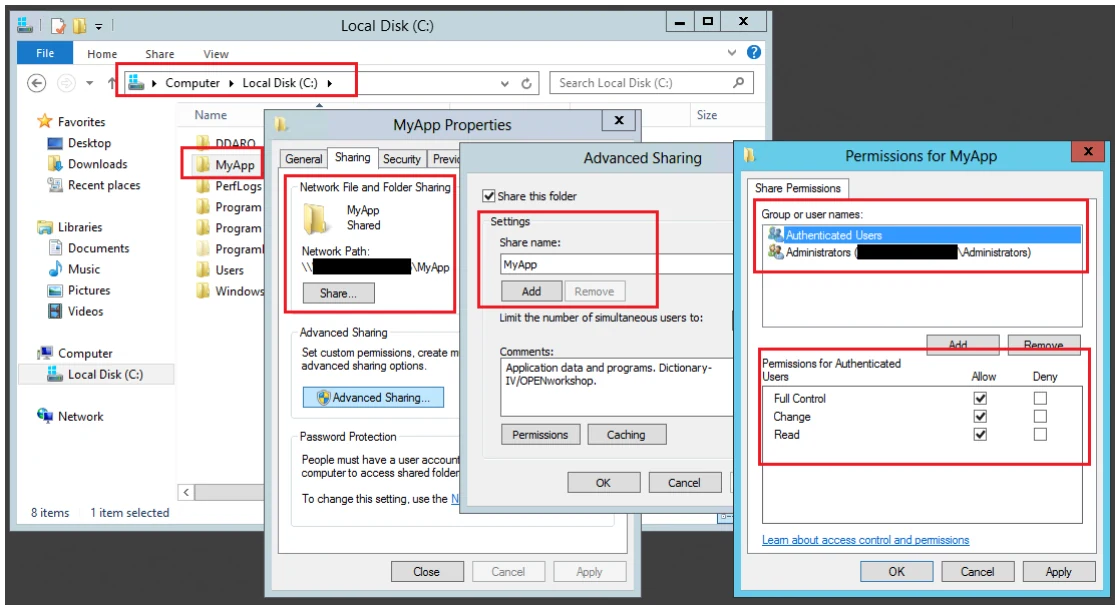
On the host, share the Application Data folder where the Dictionary-IV and OPENworkshop environment is installed (for example: C:\ProgramData\Thoroughbred Software\Tbsc, or E:\MyApps\Tbsc, or C:\MyApps). All users must have Full Control, Change, and Read permissions to this share.
Example shares on Server 2012:
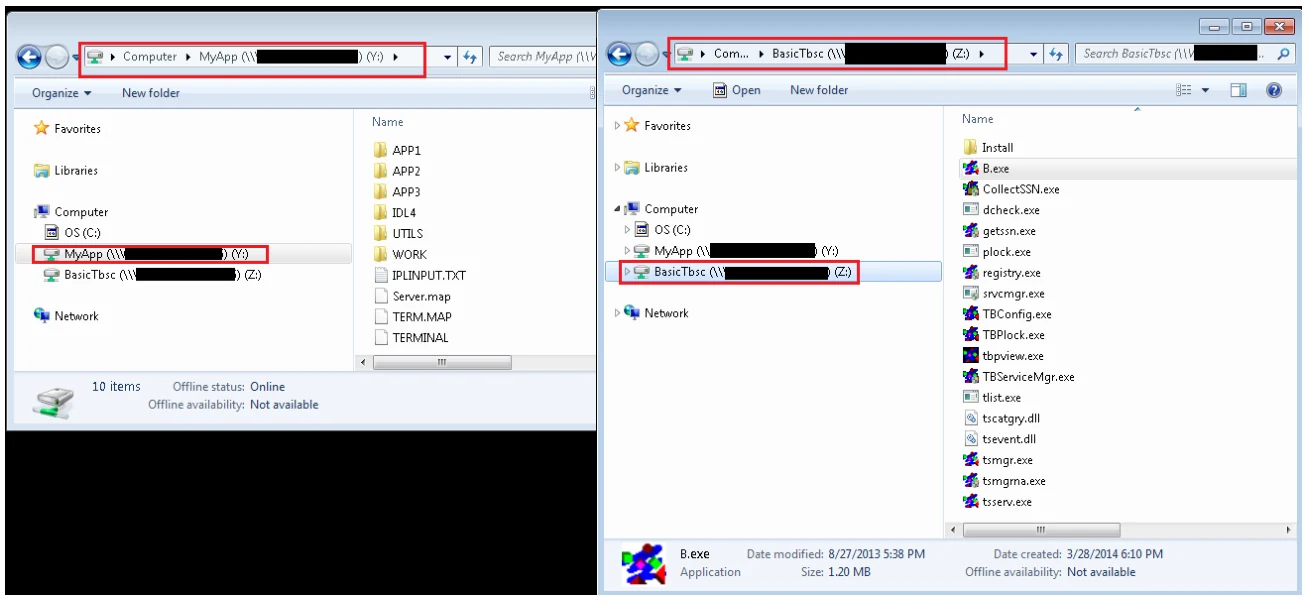
On the client, create a mapped drive to the server connecting to the Basic Executable folder (for example, Z).
On the client, create a mapped drive to the server connecting to the Application Data folder (for example, Y).
Example mapped drives on Windows 7:
Install Client Windows Desktop workstation or Windows Server class machine
Section titled “Install Client Windows Desktop workstation or Windows Server class machine”On the client, open the mapped drive with the Network Basic with DataServer executables and browse for the Install folder, for example H:\Install. Open the Install folder and double click on Setup.exe to start the installation for the client.
InstallShield will display a dialog with the following input fields:
- Shortcut Name
- You will have the option to enter a shortcut name overriding the default name.
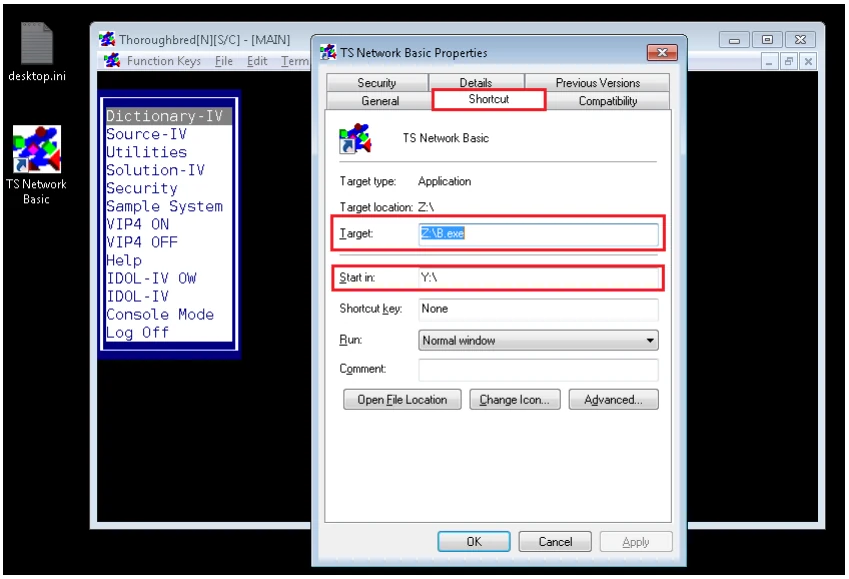
- Shortcut Target Value
- Enter the mapped drive where the Network Basic executables have been installed (for example, Z:\b.exe).
- ShortCut Start in Value
- Enter the mapped drive with the application data folder. If the application data share is C:\ProgramData\Thoroughbred Software\Tbsc, and mapped to Y, the Start In Value would be V:\ If the application data folder is E:\MyApps\Tbsc, shared as E:\MyApps and mapped to V, the Start In Value would be V:\Tbsc.
Example shortcut on Windows 7:
From the TS Network Basic with DataServer Installation Guide, version 8.9.1. Open this page in the PDF