

How to use TS ODBC DataServer Expose Utility
To ensure proper operation of this utility, exit all ODBC applications that are referencing Thoroughbred data sources. For Multiple-Tier installations, this utility should be run from only one point on the server system. Multiple environments may result in Expose Utility data file conflicts.
The function keys common to all Thoroughbred products are available:
F4 Cancels an operation or process. When no operation or process is running under the TS ODBC DataServer screen, pressing this key will return you to the Dictionary-IV Control Menu.
F6 Displays a context-sensitive pop-up Help window.
To use the TS ODBC DataServer Expose Utility, log on to Dictionary-IV. In the Selection: field of any menu, type:
ODBCand press the Enter key.
If the system responds with the message “Not found”, run ODGLOB. This will update the global menu IDGLOBAL. When complete, retry the entry.
Alternatively, the program OD101 can be executed from Console Mode or a menu selection.
If this is the initial execution of the utility, the ODBC Expose Control Information screen will be displayed.
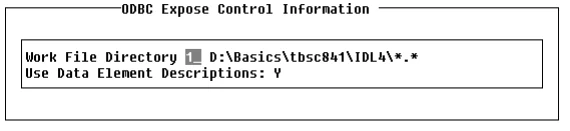
For instructions, please refer to the information on Control File maintenance in the section titled Special functions. If this is not the first execution of the utility, the TS ODBC DataServer Expose Utility screen will be displayed:
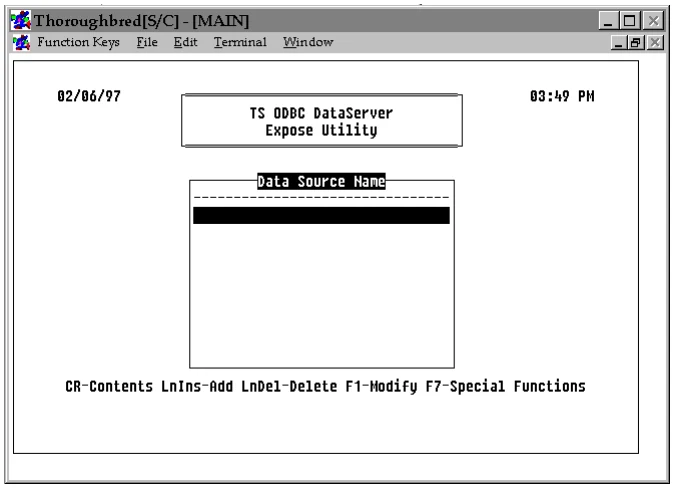
The TS ODBC DataServer Expose Utility contains the Data Source Name window, which displays a list of the configured Data Sources. The keys listed just below the Data Source Name window launch processes:
LnIns or Line Insert key, executes a process to add a Data Source. When selected, an entry screen will be displayed containing the following fields:

- Data Source Name:
- Any name up to 32 characters in length. This name will be used to reference the Exposed Link data in the ODBC applications.
- Data Source Description
- : A description of the Data Source.
Following the entry of this data, the system will proceed to the ODBC Exposed Links window.
- LnDel
- or Line Delete key, will delete the selected Data Source. It will remove the Data Source information from the Thoroughbred environment only. The ODBC.INI or Registry entry will not be deleted. Refer to the documentation for the Thoroughbred Administrator for more information about removing Data Sources.
- CR
- or Enter key, for Contents, is used to modify the definitions in the Data Source and will proceed directly to the ODBC Exposed Links window.
- F1
- for Modify, is used to modify the Data Source parameters. It executes a process similar to the one employed by the Add option, except that the Data Source Name is not modifiable.
- F7
- displays a menu of special functions. For more information refer to the section titled Special functions.
Following an Add or Contents option from the Data Source Name window the ODBC Exposed Link window is displayed.
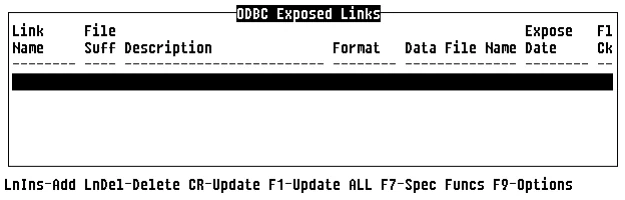
The keys listed just below the ODBC Exposed Links window launch processes:
- LnIns
- or Line Insert key, exposes a link to ODBC and adds an entry for the link to the ODBC Exposed Links window. This process is described in the section titled How to expose links to ODBC.
- LnDel
- or Line Delete key, unexposes a link from ODBC and deletes the entry for the link from the ODBC Exposed Links window. This process is described in the section titled How to unexpose a link.
- CR
- or Enter key, updates the Data Source for a link already exposed to ODBC. This process is described in the section titled How to update an exposed link.
- F1
- will update the Data Source with all links already exposed to ODBC. This process is the same as the CR option, but it will update all links.
- F4
- exits the ODBC exposed Links window and builds the Data Source and UDD.
- F7
- displays a menu of special functions. For more information, please refer to the section titled Special functions.
- F9
- displays a menu of diagnostic functions. For more information, please refer to the sections on Options later in this section.
How to expose links to ODBC
Section titled “How to expose links to ODBC”Use the following procedure to expose data to ODBC. After you successfully expose a Link, it is added to the ODBC Exposed Links window. The name that will be used to reference a Link from the ODBC application, or the Table Name, is derived in a number of ways.
- The Link name itself.
- All ODBC applications at one level or another use SQL to retrieve the data. If the Link name contains characters not valid for access via SQL statements, the Link name will be converted to conform to SQL acceptable characters. Refer to sections titled Character and Column Name Conversion and Table Name Construction for details about conversions.
The resultant Table Name may be defined in the Dictionary-IV Link Header using the Server Table Name field. The first 17 characters of this field will be used. This field must be defined prior to adding links to the Data Source. Refer to the appropriate Dictionary-IV instructions for modifying a link header.
Refer to the section titled Options - Link/Table Name XREF for instructions for viewing the Table Names associated with each link.
-
Press the LnIns or Line Insert key. The Library List window will be displayed. A list of libraries that contain links you can expose to ODBC will be displayed.
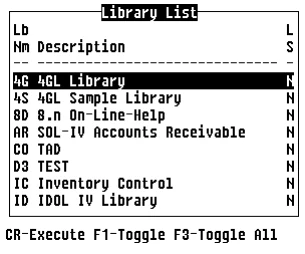
The following keystroke options are available:
CR or Enter key, selects the current library and continues the process.
F1 toggles the state of the selected library. You can expose multiple libraries at one time. The
current toggle state is displayed in the LS (library selected) column.
F3 toggles the state of all listed libraries. The current toggle state is displayed in the LS (library
selected) column.
F4 cancels the process and returns to the ODBC Exposed Links window.
-
Select the libraries that contain the links you plan to expose.
-
Press the Enter key. The ODBC - Selected Library Link List window will be displayed. It displays a list of all the links in the selected libraries that you can expose to ODBC. Only links that contain valid information in the format and data file fields will be listed. Links that reference Indexed files are not supported.
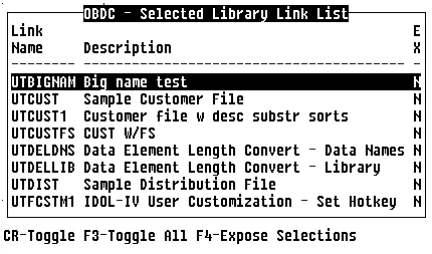
The following keystroke options are available:
CR or Enter key, toggles the EX (expose) value of the selected link
between Y and N.
F3 toggles the EX value for all links in the view
F4 exits the process and returns you to the Library List window. -
By default, each listed link has an EX (expose) value of N. If a link is to be exposed to ODBC, select the link and press the CR key to change the EX value from N to Y.
-
Press the F4 key. The following message will be displayed:
Update ODBC information for selected items (Y/N)?Y Update the information.
N Cancel the process and return to the Library List window. -
Type Y and press the Enter key.
-
The ODBC Exposed Links window will be redisplayed. Press F4 to process the Data Source. Should a link name not appear as expected, refer to the section titled Error Messages, Conditions section.
The process generates a pop-up window that displays the ODBC creation status. After the information in the links is updated, the names of the links will be placed in the ODBC Exposed Links window. You will return to the TS ODBC DataServer Expose Utility screen.
How to unexpose a link
Section titled “How to unexpose a link”Use the following procedure to unexpose a link from ODBC. Once unexposed, the link will be removed from the ODBC Exposed Links window.
-
In the Exposed Link window, select the link you plan to unexpose from ODBC.
-
Press the LnDel or Line Delete key. The following message will be displayed:
Disable ODBC access for link-name (Y/N)?Y Unexpose the link.
N Cancel the process. -
Type Y and press the Enter key.
-
The ODBC Exposed Link window will be redisplayed. Press F4 to process the Data Source.
The process generates a pop-up window that displays the ODBC creation status. After the link is unexposed, the link entry will be deleted from the ODBC Exposed Links window. You will return to the TS ODBC DataServer Expose Utility screen.
How to update an exposed link
Section titled “How to update an exposed link”Use the following procedure to update the ODBC information for an already exposed link if the format or sort information in Dictionary-IV has changed. An update rereads the dictionary information. No changes are made to the physical data or the definitions.
-
In the Exposed Link window, select the link you plan to update.
-
Press the Enter key. The following message will be displayed:
Update ODBC information for link-name (Y/N)?Y Update the ODBC information for the exposed link.
N Cancel the process. -
Type Y and press the Enter key.
-
The ODBC Exposed Link window will be redisplayed. Press F4 to process the Data Source and build the UDD.
The process generates a pop-up window that displays the ODBC creation status. After the information for the link is updated, you will return to the TS ODBC DataServer Expose Utility screen.
Special functions
Section titled “Special functions”To select TS ODBC DataServer special functions, press the F7 key at the main Expose Utility window or the Exposed Links view. A pop-up menu will display the following options:
Control File maintenanceFile Suffix maintenanceRelease NotesControl File Maintenance
Control File maintenance is a process to maintain system configuration information.
To perform control file maintenance, use the following procedure:
-
Select the Control File maintenance option.
-
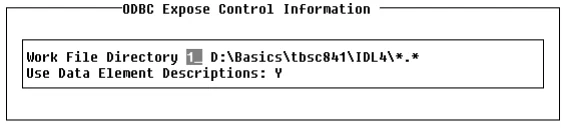
Press the Enter key. The ODBC Expose Control Information window will be displayed.
-
Enter the appropriate information for each field:
The Work File Directory is the directory where the data and work files associated with this utility are stored.
Any valid directory number will be accepted. Once a directory number is entered, it is validated against the directories configured in the IPLINPUTfile. If found, the description is displayed, otherwise the cursor remains on the field.
The Use Data Element Descriptions field is used to control the values for the column names displayed on the ODBC applications. A Y will use the current languages data element descriptions. An N will use the format element names. If Y is selected but no descriptions are defined, the system will default to the format element names.
-
After entry of the Use Data Element Descriptions option, the following message will be displayed:
Is the displayed information correct (Y/N)?Y The information is accurate.
N Cancel the process and return to the ODBC Expose Control Information window. -
Type Y and press the Enter key. You will return to the TS ODBC DataServer Expose Utility screen.
File Suffix Maintenance
File suffix maintenance is a process to maintain file suffixes. In order to access data files whose links are defined using file suffixes, a separate entry is necessary in the exposed link data for each suffix. This process allows the suffixes used by Dictionary-IV based applications to be used by the utility as it exposes links.
Refer to the section titled Table Name Construction for an explanation of how file suffixes are used and the impact on table names.
To perform file suffix maintenance, use the following procedure:
-
Select the File Suffix maintenance option.
-
Press the Enter key. The ODBC File Suffix window will be displayed.
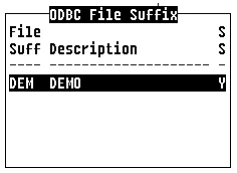
This window contains a list of file suffixes.
-
Use the following keystroke options to perform file suffix maintenance:
F1 toggles the SS (suffix selected) value of the selected file suffix between Y and N. Suffixes
with a Y value for the SS column will be used during the expose process. This allows the processing of a different set of file suffixes for each link.
LnIns or Line Insert key, enables you to add a file suffix to the file suffix list. Use the following
procedure:
-
Press the LnIns or Line Insert key. A window will display the File Suffix: Description: fields.
-
Type a valid file suffix name in the File Suffix: field and a description of the file suffix in the Description: field.
-
Press the CR or Enter key. The following message will be displayed:
Is the displayed information correct (Y/N)?Y yes, the information is accurate.
N no, cancel the process and return to the ODBC File Suffix window. -
Type Y and press the Enter key. An entry for the file suffix will be added to the list in the ODBC File Suffix window.
-
LnDel or Line Delete key, enables you to remove a file suffix from the file suffix list. Use the following procedure:
-
Press the LnDel or Line Delete key. The following message will be displayed:
Delete file suffix name (Y/N)?Y yes, delete the file suffix name from the list.
N no, cancel the process and return to the ODBC File Suffix window. -
Type Y and press the Enter key. The entry for the file suffix will be deleted from the list in the ODBC File Suffix window.
- F4
- exits the process and returns you to the TS ODBC DataServer Expose Utility screen.
Release Notes
The Release Notes option contains a list of software changes and enhancements.
Options - Integrity Check
Section titled “Options - Integrity Check”A program has been supplied to check the data referenced by the exposed links. Its primary operation is to verify that the data matches the defined format, especially where field separators are used.
If errors occur during access to the Thoroughbred data via an ODBC application, execute this utility to determine if the problem is related to data errors.
For files that contain multiple record types, refer to the section titled Options – Selection Criteria to define the Selection Criteria prior to running this process since the Integrity Check uses these rules to select only the appropriate records for a particular format.
The Integrity Check produces two types of output: Type 1 and Type 2.
Type 1 output includes information that lists the fields whose physical data is greater in length than the data element length defined in the format.
Type 2 output shows records that have bad dates or data that does not match the data type defined in the format. Also included in this output are records that contain more field separators than defined in the format.
To execute this program, use the Arrow keys to move to the link to be checked and press F9. A pop-up menu displays the following options:
Integrity CheckIntegrity Check ResultsSelection CriteriaSelection Criteria ReportLink/Table Name XREFSelect Integrity Check to run the check program. If the file contains over 100 records a status screen appears that counts the number of records checked. Depending upon the number of records in the file, the program may run for an extended period of time.
After all the records are checked, the ODBC Exposed Links view is displayed. The Fl Ck field contains the status generated by the check program:
- OK
- all records pass the check.
- ER
- data file cannot be opened.
- BD
- invalid dates exist in the data file.
- B1
- invalid dates and bad records exist in the data file.
- ##
- is a number between 1 and 99, which specifies the number of bad records found by the check program. A value of ** means that more than 99 bad records exist.
- NM
- invalid numerics exist in data file.
- ND
- data file contains both invalid dates and invalid numerics.
To display the list of the exceptions, highlight the link that was checked and press the F9 key. A pop-up menu displays. Select Integrity Check Results. A second pop-up menu displays.
Field Length ResultsData Record ResultsTo view the Type 1 exceptions, select Field Length Results. This process displays a view of any field in the data file that contains data greater in length than the format specifies. The column Defnd Lngth refers to the length defined in the format and Data Lngth refers to the actual length of the physical data in that field.
To correct this type of problem, the format needs to be modified so that the field in question is defined to be large enough to hold the data; or, the physical data must be analyzed and modified to conform to the format definition.
If there are any Type 1 exceptions, make the appropriate corrections and rerun the Integrity Check since these errors may have caused some Type 2 errors to occur.
To view the Type 2 exceptions, select Data Record Results. A list of exceptions for the link displays. The listed information includes the data file name, the primary key and the field that contains the data mismatch. In the case of concatenated fields, the field name is the first field of the concatenation.
To correct this type of problem (if the Type 1 fixes, above did not do so), either delete the bad records, rewrite the records to match the format or modify the format to conform to the data.
Options - Selection Criteria
Section titled “Options - Selection Criteria”This section describes the procedure for defining selection criteria for data files that contain multiple record types. These files are sometimes called multi-format files. In order for an ODBC application to distinguish one record type from another, it is necessary to define a rule by which the system can determine which records associate with a particular format. This information is then processed as a WHERE clause.
To define a rule, choose Selection Criteria from the Options (F9) menu. The following screen displays:
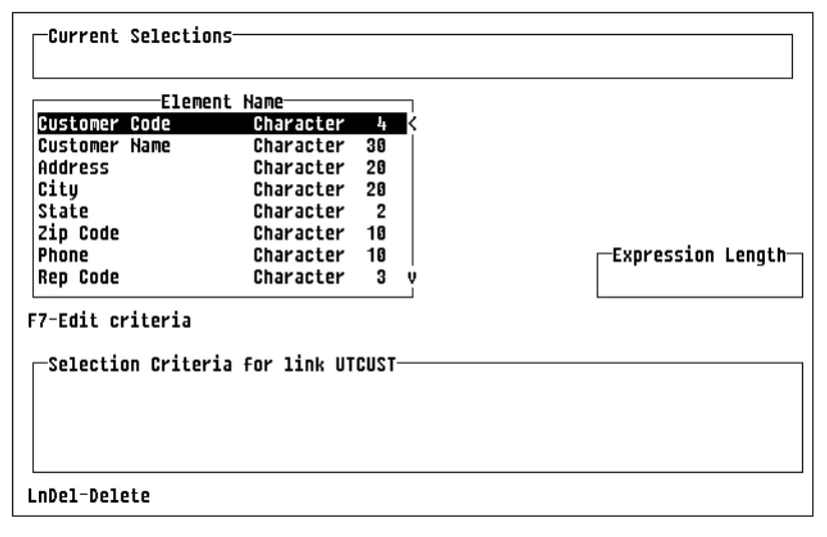
The screen is divided into the following areas:
- Current Selections: Displays the components of the current condition being defined.
- Element Name: Lists all the elements in the format. The display shows either the data element names or the data element descriptions depending upon the value for the Use Data Element Descriptions field in the Control File. For more information refer to the section titled Security.
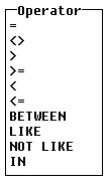
- Operator: Lists the available operators for defining a condition.
- Expression Length: This window contains the current length of the condition each time a condition is saved. There is a 432-character limit. Therefore, only enter conditions that may be described in 432 characters or less. Any condition added that results in a total condition length exceeding 432 characters, is not saved.
- Selection Criteria for link XXXXXXXX: Displays the current set of defined conditions.
Available function keys are:
- F3
- Can be used to move to the previous section from the Current Selections or Operator sections.
- F4
- Moves directly to save processing (Step 6 below) if any new conditions are entered. Otherwise, it returns to the ODBC Exposed Link view.
- F6
- Displays on-line help.
- F7
- Moves processing to the Select Criteria for link XXXXXXXX section (while in the Element Name section), where previously defined conditions can be deleted.
- Line Delete
- Deletes the condition highlighted by the cursor. Only available in the Select Criteria for link XXXXXXXX section. See the Delete a Condition section.
To add a Condition:
The procedure for defining a condition is described below. If conditions already exist, proceed to Step 6.
-
Select a data element name. It displays in the Current Selections window and the cursor moves to the Operator window.
-
Select an operator. The selected operator displays in the Current Selections window and the cursor moves to the Current Selections window for input of the rule value.
-
Enter a value. The format of the value depends on the operator and type of field selected. For date fields (SQL Dates, type 5 or 8), enter the value in the following standard SQL format:
{d ‘YYYY-MM-DD’}
For example, to enter the date 9/9/99 into the value field use {d ‘1999-09-09’}.
For numeric and string fields, refer to the following table:
| Operator | Values for Numeric Elements | Values for String Elements |
|---|---|---|
| =, <>, >, >=, <, <= | Any numeric value. | Any string value enclosed in single or double quotes. Length of string should not exceed field length. |
| BETWEEN, | Two numeric values separated by an AND. For example, 0 AND 10 | Two strings each enclosed in either single or double quotes separated by an AND. For example, “AAAA” AND “ZZZZ” |
| LIKE, NOT LIKE | N/A | Any string enclosed in single or double quotes. Wildcard characters can be used to match one or more characters. To match a single character use the _ character and to match a group of 0 or more characters use the %. |
| IN | Any numeric value. Multiple values should be separated by a space. | Any string enclosed in single or double quotes. Multiple values should be separated by a space. Length of string should not exceed length of field. |
-
Following the entry of all test values, the system prompts:
Is the displayed information correct (Y/N)?N returns to the element name screen. Return to Step 1.
Y proceeds to step 5. -
The system prompts:
Enter more conditions (Y/N)?N proceeds to Step 7.
Y proceeds to Step 6. -
The system prompts:
Select logical operator ANDPress Enter to select the appropriate operator. The condition is posted to the Selection Criteria screen. Return to Step 1.
-
Once all the conditions have been entered, the system prompts:
Save selection criteria (Y/N)?N aborts the selection criteria entry screen and returns to the ODBC Exposed Links view.
Y saves the conditions and returns to the ODBC Exposed Links view.
To delete a condition:
-
From the Element Name section press F7. The first condition in the Selection Criteria for link XXXXXXXX section is highlighted. Use the Up and Down Arrow keys to choose the condition to delete, followed by the Line Delete key. The system prompts
Are you sure you want to delete (Y/N)?Y deletes the condition. Proceed to Step 1 in the To Add a Condition section.
N returns to the Element Name window.
Options - Selection Criteria Report
Section titled “Options - Selection Criteria Report”This report has been included to provide a way to review the defined selection criteria either on screen or as a hard copy. The report includes all conditions for all Data Sources.
To print the report, select Selection Criteria Report from the Options (F9) menu.
Options - Link/Table Name XREF
Section titled “Options - Link/Table Name XREF”Under certain conditions, the Expose Utility may require the use of a name other than the standard Dictionary-IV link name for the ODBC table. The reasons for this are outlined in the section titled Table Name Construction.
To display the list of table names associated with a link, select Link/Table Name XREF from the Options (F9) menu. A list displays that shows the links for the Data Source selected and the associated table names that reference these links in the ODBC application.
From the TS ODBC DataServer Reference, version 8.9.1. Open this page in the PDF