

Connect - TCP/IP (Protocol: SSH1, SSH2, SSHAuto)
This section describes establishing a secure connection to a host running an SSH1 or SSH2 server. It assumes a working knowledge of SSH and that an SSH server has been properly installed on the host.
If you intend to connect using Public and Private Keys please refer to the SSH Public and Private Keys section later in this document.
Connections can be made using the standard TbredComm connection dialog or by defining TbredComm AutoLogons in the WorkStation Manager. For more information about AutoLogons please see the WorkStation Manager reference manual.
From the TbredComm menu bar select the Connect menu and then select Connect - TCP-IP. The following screen appears.
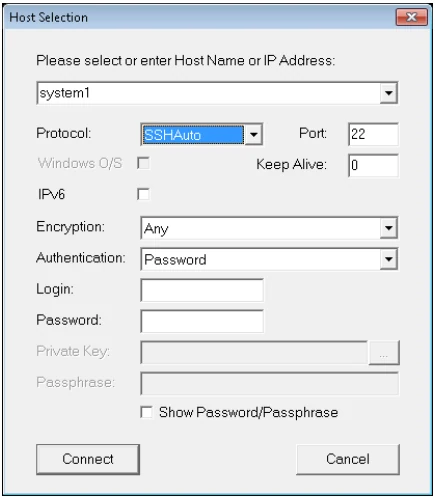
Host name/IP address selection Enter either the host name or the IP address of the host. The list box button can be used to select a host from a list of prior TCP/IP connections.
Protocol You may select SSH1, SSH2 or SSHAuto from the Protocol drop down list box. SSHAuto is the recommended default.
Port
Enter the desired port for the connection. The default port is 22.
Keep Alive Enter the number of seconds of inactivity before a “KeepAlive” packet is sent to keep the connection alive. The default is defined by the Default Keep Alive defined on the TbredComm tab of the WorkStation Manager. A 0 value will disable Keep Alive.
IPv6
Check this to first try connecting to the specified host using IPv6 connectivity. If that fails, TbredComm will try again using IPv4 connectivity.
Encryption You may select Any, DES, 3DES, or AES from the encryption drop down list box. If a a specific encryption type is not required, select Any.
Authentication
Select the authentication method.
Both Select Both to authenticate with a login and password and also one of the other authentication methods.
Password
Select Password to authenticate using a login and a password.
Public Key
Select Public Key to authenticate using private and public key pairs.
SecurID Token
Select SecurID Token to authenticate using a a token device.
Keyboard Interactive Select Keyboard Interactive if your host requires some other form of authentication using the keyboard.
Login Enter your login. If you leave this field blank you will be prompted to enter your login after selecting the Connect button.
Password Enter your password. If you leave this field blank you will be prompted to enter your password after selecting the Connect button.
Private Key Enter the name of the private key file on the client or select the file lookup button to browse for the private key file. Private key files are .tpk files and are saved in the Keys directory on the client. If you leave this field blank you will be promted to enter your private key file name after selecting the Connect button.
- On Windows 10/Windows 11/Windows Server 2016/Windows Server 2019/Windows Server 2022/Windows Server 2025 the Keys directories are unique for each user. These are located in Tbredcom-user-path\Tsi\Keys.
This field is only enabled when the Authenticaiton type is set to Public Key.
For more information on Public and Private Keys please refer to the SSH Public and Private Keys section later in this document.
Passpharse
This field is only enabled when the Authenticaiton type is set to Public Key.
If you have elected to use a Passpharse with your Private key, enter your Passphrase. If you leave this field blank and you have defined a Passphrase you will be prompted to enter your it after selecting the Connect button.
For more information on Passphrase please refer to the SSH Public and Private Keys section later in this document.
Show Password/Passphrase
Check the Show Password/Passphrase check box to display enter password and/or passphrase.
Connect
Select the Connect button to make the connection.
If you have selected an authentication that requires a login and a password and you have not entered them, the following screen will be displayed:
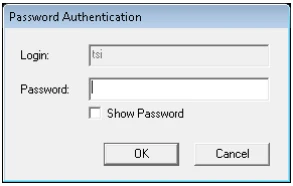
Enter your Login and Password then select the OK button to connect to the host or select the Cancel button to exit.
Check the Show Password check box to display the entered password before connecting.
If you have selected an authentication that requires a Private Key or a Passphrase and you have not entered them, the following screen will be displayed:
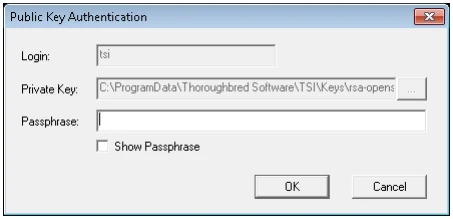
Enter the Login, Private Key, or optional Passphrase as described above and select the OK button to connect to the host or select the Cancel button to exit.
Check the Show Passphrase check box to display the entered passphrase before connecting.
Cancel
Select the Cancel button to exit the connection dialog.
From the TbredComm Reference, version 8.9.1. Open this page in the PDF