

Using Report-IV to PDF
Note: The following does not apply to the 3GL wrapper. Please see the 3GL wrapper section in this document.
Runtime Settings and Options
Section titled “Runtime Settings and Options”If you are running OPENworkshop the system will determine if #OOFPDF1 has been initialized. If #OOFPDF1.INIT-FLAG <> “1”, then the global format will be populated using the Settings and Options values.
If you are not running OPENworkshop (or IDOL-IV) you must call OORPDF02 to initialize #OOFPDF1 before accessing Report-IV to PDF. This can be done in a start up program by making the following call:
DIM PDF$[1]; ! Dim arrayCALL "OORPDF02",PDF$[ALL] ! Call method to init globalsSome of the values for the data elements in global format #OOFPDF1 can be modified at run time. This is useful if you need to override the default settings.
For example, when OPENworkshop is run, #OOFPDF1.POST-SAVE-METHOD is set to the default value for the Post Save Method defined in the Settings and Options screen. If a particular report requires a different Post Save Method. you can override the default value for #OOFPDF1.POST-SAVE-METHOD in your application code.
LET DFLTMN$ = #OOFPDF1.POST-SAVE-METHOD, ! save the default#OOFPDF1.POST-SAVE-METHOD = alternate_method_name ! override the defaultCONNECT REPORT report_name ! execute the reportLET #OOFPDF1.POST-SAVE-METHOD = DFLTMN$ ! restore the defaultOnce changed, the default values will not be reset until the global format is initialized.
Depending upon your application, it may be necessary to restore the default values in your application code by CALLing OORPDF02 to initialize the global format.
DIM PDF$[1]; ! Dim arrayCALL "OORPDF02",PDF$[ALL] ! Call method to init globalsIn addition to the values defined on the Settings and Options screens there are several other global settings in #OOFPDF1 that can be manipulated at run time. Only the global data elements documented in this manual should be modified. All others are for internal use only. Changing these could cause the conversion to fail or produce undesired results.
#OOFPDF1.PDF-RPT-NAME
Section titled “#OOFPDF1.PDF-RPT-NAME”The name of the .pdf file. Before the conversion process has completed, #OOFPDF1.PDF-RPT-NAME will contain the name of the temporary text file with a file extension of .txt1 instead of .pdf.
If this field is not set prior to executing a CONNECT REPORT a default file name will be created using the following convention:
- (1,8)
- Report-IV definition name padded to 8 bytes using the "-" character.
- (9,20)
- Create date and time YYYYMMDDHHMISSSSSSSS
- (29,3)
- Operator code
(32,4) File extension (.pdf).
#OOFPDF1.FAX-TOFAXNUMBER
Section titled “#OOFPDF1.FAX-TOFAXNUMBER”The fax to phone number.
#OOFPDF1.FAX-TONAME
Section titled “#OOFPDF1.FAX-TONAME”The fax to name.
#OOFPDF1.FAX-TOCOMPANY
Section titled “#OOFPDF1.FAX-TOCOMPANY”The fax to company name.
#OOFPDF1.EMAIL-ADDR
Section titled “#OOFPDF1.EMAIL-ADDR”One or more send email addresses. The format will vary depending upon the email software being used. For example:
emp1@tbred.com,emp2@tbred.com,emp3@tbred.com#OOFPDF1.EMAIL-CC
Section titled “#OOFPDF1.EMAIL-CC”One or more carbon copy (CC) email addresses.
#OOFPDF1.INIT-FLAG
Section titled “#OOFPDF1.INIT-FLAG”Setting INIT-FLAG = “ “ ($20$) will force #OOFPDF1 to be initialized to all default values the next time Report-IV to PDF is selected as the output device.
#OOFPDF1.BACKPG
Section titled “#OOFPDF1.BACKPG”Contains the background .pdf file name.
Background .pdf files function as overlays or templates. When a .pdf file is created the contents of a background .pdf is layered with the Report-IV output. Using this technique, Report-IV to PDF can be used to print forms or print logos on reports.
To use this feature, set the name of the background .pdf file prior to executing a CONNECT REPORT report_name.
FORMAT INCLUDE #OOFPDF01,OPT="NONE"
LET #OOFPDF01.BACKPG = "BkpgExample.pdf"
CONNECT REPORT "MY_REPORT"
In the following example a Thoroughbred invoice was scanned and saved as a .pdf file. That .pdf file was used as a .pdf background when printing Invoices to the Report-IV to PDF converter.
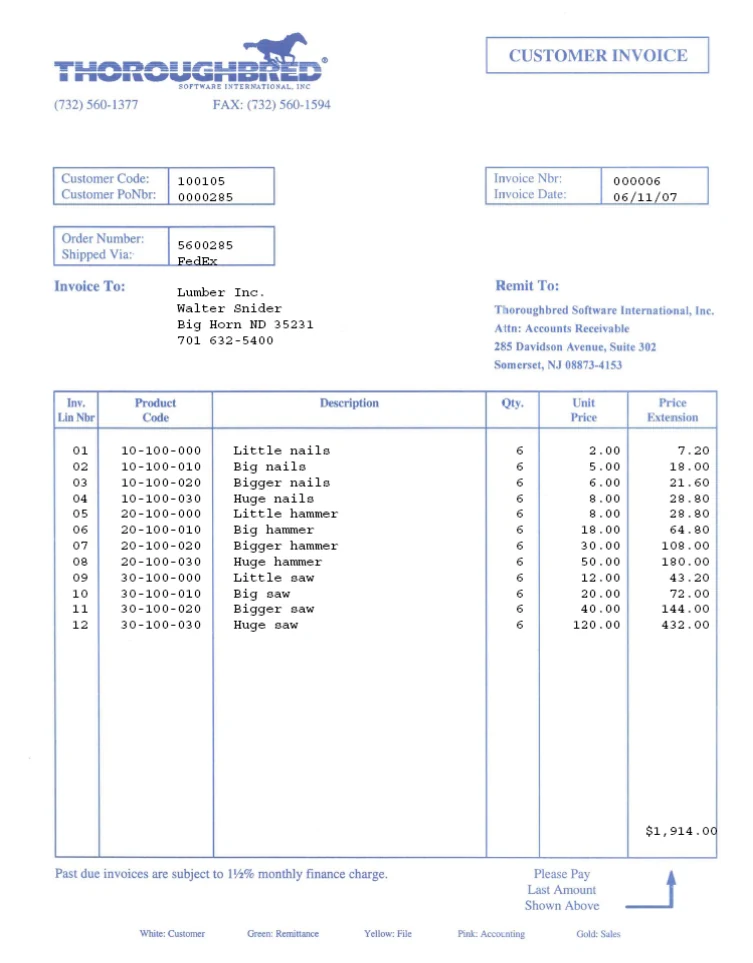
In addition to setting the background .pdf file name, the full path to the background .pdf file must be set. See Settings and Options, #OOFPDF1.BACKPG-PATH.
#OOFPDF1.LEFT-MARGIN
Section titled “#OOFPDF1.LEFT-MARGIN”The setting for the left margin in inches. The default value is .50. Defined as numeric, 5.2.
#OOFPDF1.RIGHT-MARGIN
Section titled “#OOFPDF1.RIGHT-MARGIN”The setting for the right margin in inches. The default value is .50. Defined as numeric, 5.2.
#OOFPDF1.LINE-SPACE
Section titled “#OOFPDF1.LINE-SPACE”The space between lines. This is always in points 1/72 of an inch. The default value is 2. Defined as numeric, 3.0. Setting this must be done prior to executing a CONNECT REPORT or CALLing OOR and can be done using a Pre Convert Method, it cannot be set in the I section of a Report-IV definition.
#OOFPDF1.FONT-FACE
Section titled “#OOFPDF1.FONT-FACE”The font face name. The default value is Courier. Defined as string, 30. This is intended primarily for international customers (Chinese, Japanese, and Korean). Setting this must be done prior to executing a CONNECT REPORT or CALLing OOR and can be done using a Pre Convert Method. For a list of supported fonts see the Overview, Fonts and Formatting section of this manual.
#OOFPDF1.FONT-SIZE
Section titled “#OOFPDF1.FONT-SIZE”The font size. The default font size is based on the Report-IV width (#OOFRPRT.RPRT-
WIDTH). Defined as string, 2. Setting this must be done prior to executing a CONNECT
REPORT or CALLing OOR and can be done using a Pre Convert Method, it cannot be set in the I section of a Report-IV definition. For a chart of report widths and corresponding font sizes see the Overview, Fonts and Formatting section of this manual.
#OOFPDF1.LINES-PER-PAGE
Section titled “#OOFPDF1.LINES-PER-PAGE”The lines-per-page value. The default lines-per-page is based on the report width and the default font size. Defined as string, 3. Setting this must be done prior to executing a CONNECT REPORT or CALLing OOR and can be done using a Pre Convert Method, it cannot be set in the I section of a Report-IV definition. For a chart of report widths and corresponding lines per page see the Overview, Fonts and Formatting section of this manual.
#OOFPDF1.ORIENTATION
Section titled “#OOFPDF1.ORIENTATION”The page orientation; portrait or landscape. The default orientation is based on the report width and the default font size. Defined as string, valid values are “P” for portrait or “L” for landscape. When #OOFPDF1.ORIENTATION = “L”, #OOFPDF1.PAGE-WIDTH and #OOFPDF1.PAGE-HEIGHT values will be swapped. Setting this must be done prior to executing a CONNECT REPORT or CALLing OOR and can be done using a Pre Convert Method, it cannot be set in the I section of a Report-IV definition. For a chart of report widths and corresponding page orientations see the Overview, Fonts and Formatting section of this manual.
#OOFPDF1.PAGE-WIDTH
Section titled “#OOFPDF1.PAGE-WIDTH”The page width in inches. The default page width is based on the report width and the default font size. Defined as numeric, 7.3. When #OOFPDF1.ORIENTATION = “L”, #OOFPDF1.PAGE-WIDTH and #OOFPDF1.PAGE-HEIGHT values will be swapped. Setting this must be done prior to executing a CONNECT REPORT or CALLing OOR and can be done using a Pre Convert Method, it cannot be set in the I section of a Report-IV definition. For a chart of report widths and corresponding page orientations see the Overview, Fonts and Formatting section of this manual.
#OOFPDF1.PAGE-HEIGHT
Section titled “#OOFPDF1.PAGE-HEIGHT”The page height in inches. The default page height is based on the report width and the default font size. Defined as numeric, 7.3. When #OOFPDF1.ORIENTATION = “L”, #OOFPDF1.PAGE-WIDTH and #OOFPDF1.PAGE-HEIGHT values will be swapped. Setting this must be done prior to executing a CONNECT REPORT or CALLing OOR and can be done using a Pre Convert Method, it cannot be set in the I section of a Report-IV definition. For a chart of report widths and corresponding page orientations see the Overview, Fonts and Formatting section of this manual.
#OOFPDF1.BARCODE-ENABLED
Section titled “#OOFPDF1.BARCODE-ENABLED”See the UPC Barcodes section of this manual for details.
#OOFPDF1.PDFFTR
Section titled “#OOFPDF1.PDFFTR”The footer offset. Number of lines + or – to adjust the first footer row. Defined as numeric, 3.0(+or-). When using a background image, it may be necessary to adjust the starting line for footers in order to achieve proper alignment with the background. Typically, a negative value is required.
#OOFPDF1.WEB-URL
Section titled “#OOFPDF1.WEB-URL”Note: When using T-Connect it is not necessary to define a URL, the PDF file will automatically be opened in the browser when printing has completed. For more information, please refer to the T-Connect Web Terminal Reference Manual.
Note: This option is only available on Linux with an Apache web server and requires TbredComm.
When set, PDF files can be opened in default browser on the local workstation.
Set this to the URL of the server where the PDF files are saved. This can be done at run time or can be set using Format maintenance by modifying the preset value of this data element.
Example WEB-URL settings:
http://www.mysite.com/PDFPublic
http://999.999.999.99/PDFPublic
The option to open a PDF file in a browser is available from the PDF File log view by pressing F3 on the desired PDF file name.
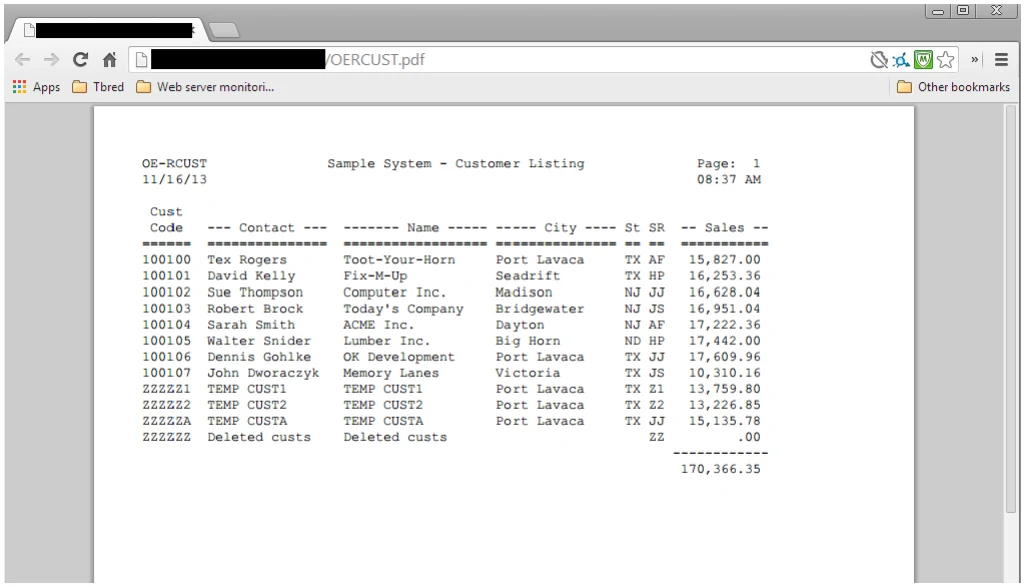
This can also be done programmatically by calling method OORPDF05. This method can be called at any time; it can be done as a standalone option in your application code, incorporated into a PDF email method, or in a PDF Post Save method.
Example OORPDF05 CALL:
CALL “OORPDF05”,PDFX$[ALL]
PDFX$[0]=”V”
“V” function indicates the PDF file is to be viewed in a browser
PDFX$[1]=pdf_file_name
Where pdf_file_name is the PDF file name to be viewed in a browser. No path is required, the PDF file must reside in the directory defined by #OOFPDF1.WEB-URL.
DIM PDFX$[1];
PDFX$[0]=”V”;
PDFX$[1]=”OERCUST.pdf”;
CALL “OORPDF05”,PDFX$[ALL];
#OOFPDF1.SAVE-CONFIG
Section titled “#OOFPDF1.SAVE-CONFIG”Enables or disable the save location rule. Defined as a Y/N field. Default value is N. When not “Y”, the standard PDF file save logic is used, saving the PDF file in the location defined by the Settings and Option screen. When “Y”, the PDF save rules defined by the Save and Security Settings configuration are used. See the Save and Security Settings section of this manual for more details.
#OOFPDF1.DEBUGGER
Section titled “#OOFPDF1.DEBUGGER”Enables or disable the PDF processing debugger. Defined as a Y/N field. Default value is N. When #OOFPDF1.DEBUGGER = “Y”, debug information will be displayed on the screen. At key points in the conversion process, a window will be created and pertinent debug info will be displayed. This must be run attended as you will be prompted to press Enter to continue processing. Note: To some degree this has been available in the product but was never documented and was not easily enabled and disabled. This enhancement improves the debugging and makes it more accessible.
#OOFPDF1.TC-AUTO-LOAD
Section titled “#OOFPDF1.TC-AUTO-LOAD”Only valid for T-Connect. Enables the PDF autoload in the browser. Defined as a Y/N field. Default value is N. When #OOFPDF1.TC-AUTO-LOAD = “Y”, PDF files will automatically be opened in the browser (based on browser settings).
UPC Barcodes
Section titled “UPC Barcodes”The barcode feature in Report-IV to PDF is font based. The Report-IV definition should contain the string characters that are to be converted to a barcode image. By manipulating fonts, the converted PDF file will contain the barcode image of those string characters.
In the I section of the Report-IV definition do FORMAT INCLUDE #OOFPDF1,OPT=”NONE”.
Prior to executing a CONNECT REPORT or within the I section of a Report-IV definition, enable the barcode flag #OOFPDF1.BARCODE-ENABLED = “Y”. If this is not set, the barcode feature will not work.
Immediately before the D line containing the barcode value, create a formula field to set the PDF font face value to “3of9”:
/FIELD(35) = “<FONT FACE=”+QUO+“3of9”+QUO+“>”
To increase or decrease the size of the barcode image, use the SIZE= option:
/FIELD(35) = “<FONT FACE=”+QUO+“3of9”+QUO+” SIZE=12>”
Print the data element containing the barcode string value then restore the normal PDF font. It is critical that you restore the current values for the PDF font and size:
/FIELD(35) = “<FONT FACE=”+QUO+“courier”+QUO+“SIZE=”+#OOFPDF1.FONT-SIZE-USED+“>”
The above can be combined into a single formula:
/FIELD(52) = “<FONT FACE=”+QUO+“3of9”+QUO+“>”+ CUST-CODE+“<FONT FACE=”+QUO+“courier”+QUO+ “ SIZE=“+ #OOFPDF1.FONT-SIZE-USED+”>”
The barcode image will occupy more than 1 line in the PDF, Report-IV can only count the 1 line used for the barcode string value. Print the appropriate number of blank D lines to accommodate the barcode image height. Use /LC to adjust the line count accordingly.
Thoroughbred does not supply the barcode font but does recommend the 3of9 barcode font.
PDF Log View
Section titled “PDF Log View”The PDF file log is updated automatically each time a PDF file is created. If files are moved, renamed, or deleted manually the log file will not be in sync with the directory contents. Deleting and renaming PDF files should be done from the PDF file log to keep the log file and the directory contents in sync.
From the Report-IV to PDF Utilities menu select the View PDF files and the following menu will display:
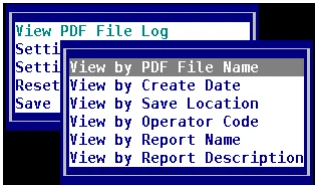
Select one of the View options and the PDF log will be displayed.
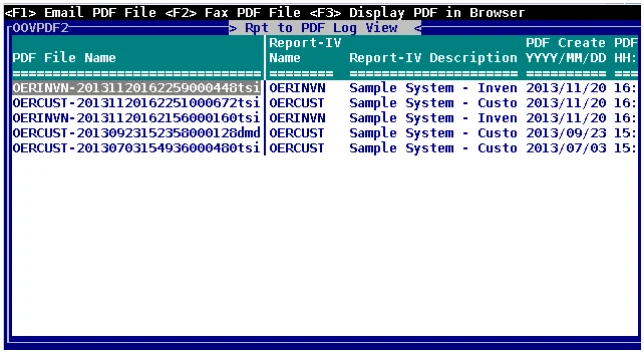
The view contains the following columns:
- PDF file name.
- Report-IV definition name.
- Report-IV definition description.
- Date the PDF file was created in YYYY/MM/DD format.
- Time the PDF file was created
- Save directory for the PDF file.
- Operator code.
- User Access ID.
Delete an archived .pdf file
Section titled “Delete an archived .pdf file”Scroll to the file to be deleted and enter the appropriate keystroke(s) for Line-Del. This will delete the entry from the log file and remove the .pdf file from the directory of saved .pdf files (#OOPDF1.RPT-PATH).
Rename an archived .pdf file
Section titled “Rename an archived .pdf file”Scroll to the file name, press Enter and type in the new file name. This will rename the file in the log and rename the file in the directory of saved .pdf files (#OOPDF1.RPT-PATH).
Email a .pdf file
Section titled “Email a .pdf file”Scroll to the file name, press F1 and the email command screen will be displayed.
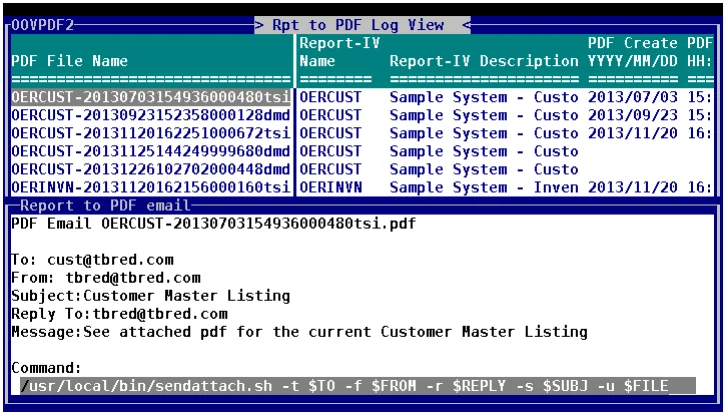
Enter the required information to send the .pdf file as an email attachment. The current value of #OOFPDF1.EMAIL-CMD will be used as the default command line argument. This can be modified before sending the email. The $variables will automatically be replaced with the appropriate values from #OOFPDF1 after a response of Y to the Send (Y/N) prompt. For more information see Configure Settings and Options, email Command Line section of this manual.
Fax a .pdf file
Section titled “Fax a .pdf file”Scroll to the file name, press F2 and the fax command screen will be displayed. The fax screen is similar to the email screen. Enter the required fields and respond Y to the Send (Y/N) prompt. For more information see Configure Settings and Options, Fax Command Line section of this manual.
Display PDF in Browser
Section titled “Display PDF in Browser”This option is available when using T-Connect or when using TbredComm with Linux and an Apache web server.
Scroll to the file name, press F3 and the PDF file will be opened in the default browser on the local workstation.
For more information see #OOFPDF1.WEB-URL.
Reset Global Settings
Section titled “Reset Global Settings”From the Report-IV to PDF Utilities menu, select the Reset Global Settings option to reset the #OOFPDF1 based on the default values saved in Settings and Options. This will prompt you to confirm the action before the default values are restored.
Resetting the global #OOFPDF1 can also be achieved using several other techniques:
-
To reset to all default values without any user prompts and with error messages:
DIM PDFX$[1];CALL "OORPDF02",PDFX$[ALL] -
To reset to all defaults values with a confirmation prompt:
DIM PDFX$[1];PDFX$[1]="r";CALL "OORPDF02",PDFX$[ALL] -
To reset to all defaults values in silent mode; no prompts, no error messages:
DIM PDFX$[1];PDFX$[1]="S";CALL "OORPDF02",PDFX$[ALL] -
Set #OOFPDF1.INIT-FLAG = “ “. This will force the #OOFPDF1 to be reset to default values the next time Report-IV to PDF is selected for output.
From the Report-IV to PDF Installation and User Guide, version 8.9.1. Open this page in the PDF