

Messages
Dictionary-IV provides a message Dictionary where messages are defined and stored. Using a message Dictionary allows you to avoid placing messages in a script or Format definition, which simplifies customization, language conversion, and maintenance.
Defining the message (content, display, position, etc.) in the dictionary saves development time and allows you to maintain consistency throughout a software application.
Messages are then referenced by the dictionary name, message type, and message number. These messages are used in Format definitions, menu definitions, reports, and scripts. The message display defaults can be overridden from any of these points.
If you are operating in a Multi-Language environment see Multi- Language in the
Dictionary-IV Administrator Guide.
Some of the features of a message dictionary are:
- Operator input and response for the message can be controlled and validated.
- Automatic on-line help can be defined for all message types except prompt/constant. If help is defined for a message, pressing F6 when this message is displayed brings up the help information.
- Application specific messages can be defined by using a substitution value in a message, which allows a variable parameter to be used when a message is displayed.
- Multiple message dictionaries can be referenced from one application.
- Special display modes are available, including a select (scroll type) message.
- You can override the dictionary specifications without altering the stored definition.
- Translation values (useful for foreign language translation) can be specified for messages requiring operator input.
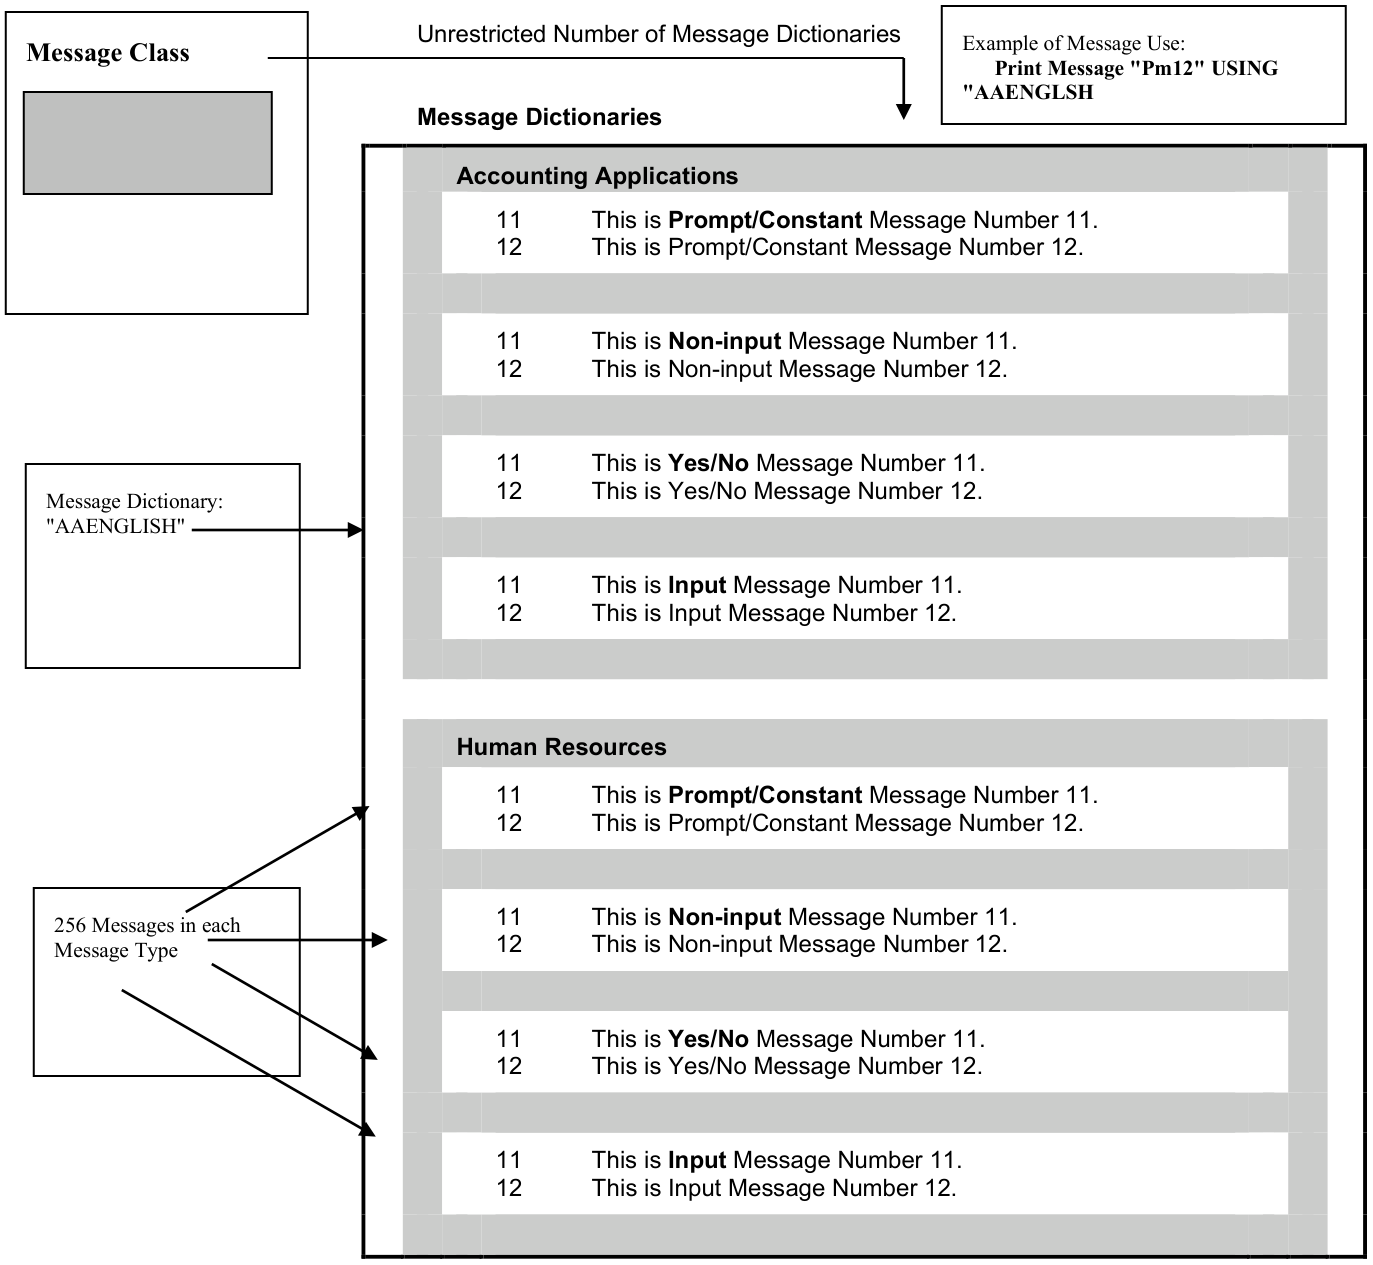
The following diagram shows the structure of the Dictionary-IV message Class:
Multiple Message Dictionaries in the System Dictionary
Types of Messages
Section titled “Types of Messages”There are four types of messages: Prompt/Constant, Non-input, Yes/No, and Input.
The type of message determines the degree of operator input allowed. A predefined suffix is automatically appended to certain message types. For more information, see Message Dictionary Suffixes in this document.
Prompt/Constant This message type is the simplest. You can specify the position, display mode, line clearing, and message content. It does not allow user response. On-line help is not available.
Message numbers 1 through 4 are used by Dictionary-IV as suffixes for other message processing. The naming of these messages cannot be altered.
Non-input This message type is the same as the prompt/constant messages. The differences are that you are allowed to specify help for the message, predefined suffix is automatically appended to the message, and the user is required to press Enter to continue. User responses allowed from this message type are: Enter, F4, and F6.
Yes/No This message requires the user to answer Yes or No in response to the message. A predefined suffix is automatically appended to the message. User responses allowed are: F4, F6 and the characters defined in Message Number 1 Prompt/Constant. This is what is used to validate input of a Y/N message.
Input Message This message allows you to specify the following input parameters: input length, input window length, fixed or variable length input, mandatory or optional input, numeric type, padding type, date type, and valid entries. A predefined suffix is automatically appended to the message. User responses are restricted by the input specifications.
Select message Select messages are a special type of input message. They can be specified to display multiple selections and allow the operator to scroll through the options, highlighting each selection. The operator can press Enter to make a selection or press the selection character. The input message suffix is not appended to select messages. For more information, see Select Messages in the Dictionary-IV User Guide.
Selection
Section titled “Selection”Select 1-Edit from the Dictionary-IV Development Menu or press F1 from any Dictionary-IV menu. The system displays the Class pop-up menu:
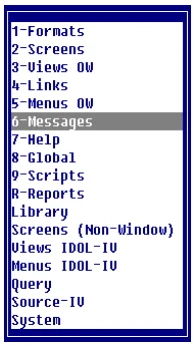
Select 6-Messages.
Message View
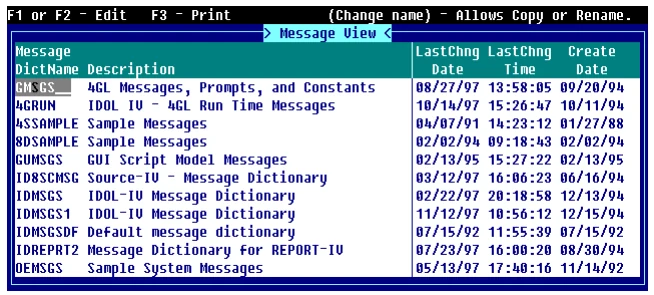
Components of Message View
Section titled “Components of Message View”The Message definition is composed of two parts: the header information and Message definition specifications.
Message View Header Information
Section titled “Message View Header Information”The message dictionary header information provides the specifications for the dictionary. The name and description are used to identify message dictionary within the System Dictionary and allow you to access and reference the dictionary in format and menu definitions, and in scripts. The list type is used to specify the type of message and is used to reference the message.
Enter the following information:
Message Dictionary Name Type from 3 to 8 alphanumeric characters for the name of this message and press Enter. This field is mandatory.
Characters one and two are the Library name. Characters three through eight are the message name.
For more information, see Class definition in this document, which provides a file naming convention you may implement.
Description Type up to 30 alphanumeric characters for the description of message dictionary and press Enter. This field is optional.
Last Change Date
Displays the date of the last change to the selected Message.
Last Change Time
Displays the time of the last change to the selected Message.
Create Date
Displays the date of creation of the selected Message.
Editing Messages
Section titled “Editing Messages”Press F1 to edit messages and the system displays the following:
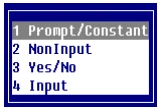
Select one of the following:
- 1
- Prompt/Constant
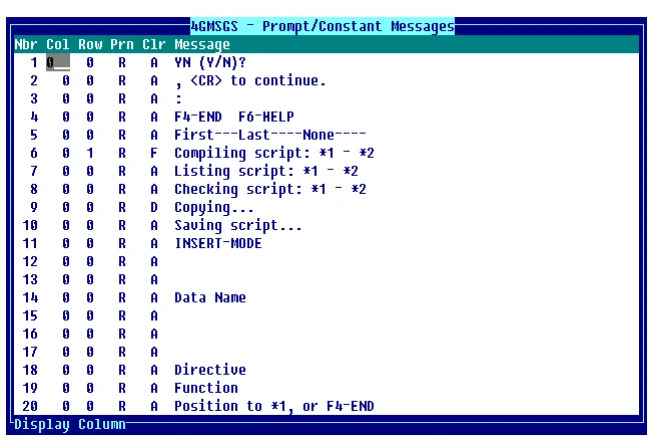
- 2
- NonInput
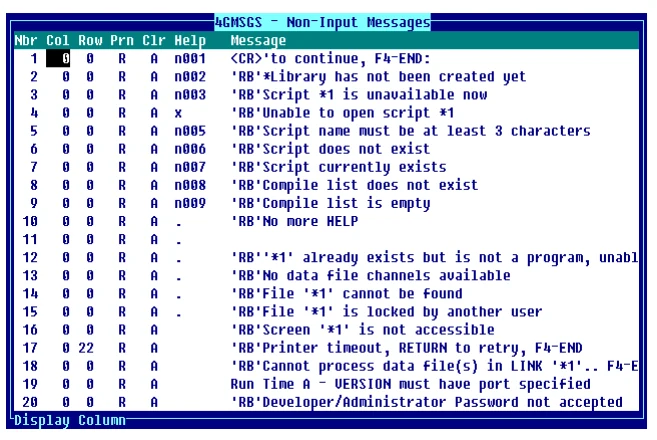
- 3
- Yes/No
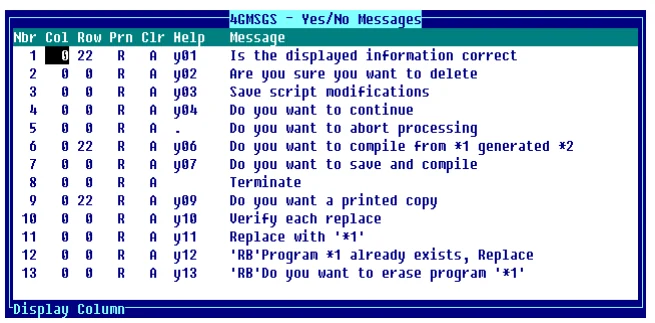
- 4
- Input
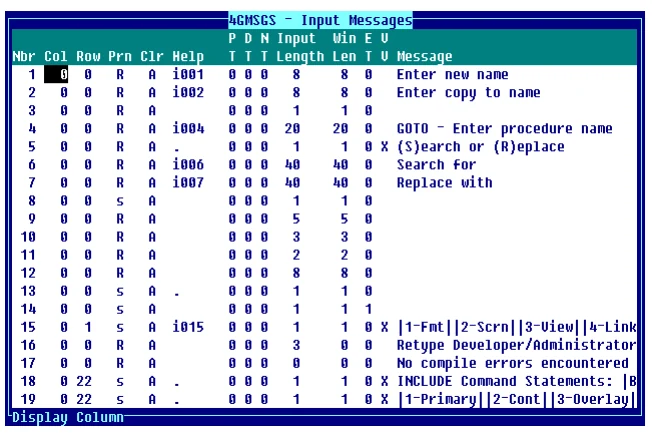
Message Attributes
Section titled “Message Attributes”The Message definition attributes display the specifications and content of the message. Additional attributes are available for Input messages. Default values are displayed in these fields when F1 is used to create a message.
The existing messages are listed in numeric sequence on the bottom half of the screen.
The following are available in Message definition attributes. Look for the field names specific to your type of message:
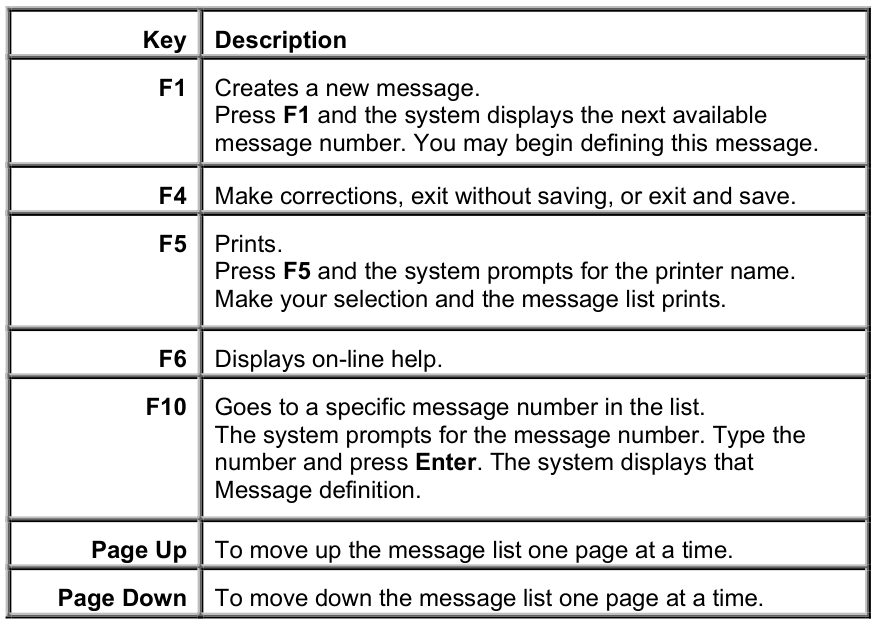
You may enter the following information (depending on the type of message you are creating):
Message Number (Nbr)
Type a number from 1 to 255 to edit an existing message number. Press F1 to add a new message. The system displays the next available message number.
Each message is assigned a number in ascending order. When calling a message you will reference the message type and number. This field is mandatory.
Column (Col)
Type a number from 0 to 79 for the column where this message will start and press Enter. The default is 0. This field is mandatory.
Row Type a number from 0 to 23 for the row where this message will start and press Enter. Row 99 specifies the status line. The default is 0. This field is mandatory.
| Print Mode Select one | (Prn) of the following for the display print mode: |
|---|---|
| (blank) | Foreground. |
| B | Background. |
| F | Foreground. |
| R | Reverse video foreground. |
| r | Reverse video background. |
| S | Scrolling Select Message; selections in reverse video background. |
| s | Scrolling Select Message; reverse video background. |
The default is R.
Clear Mode (Clr)
This is an optional code that sets the clearing option for the message. Depending upon the clear code, one line or the entire screen can be cleared before and/or after the message is displayed.
Select one of the following:
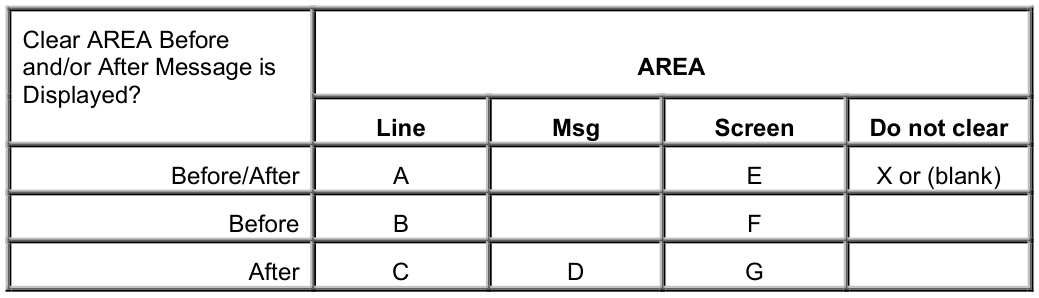
This code specifies the clearing option for the message.
- The default is A for input, non-input, and yes/no messages.
- The default is B for prompt/constant messages.
Help Type from 1 to 6 alphanumeric characters for the help module and press Enter. This is the text to be displayed when you press F6 for the item.
When a help request is processed, Dictionary-IV searches the Library for the help module in a non-window format. If the help is not found, then it searches the Library for the help module in a window format.
The Library where help is located is the same as the message you’re defining.
You may specify a new or existing module. Press F1 to edit help text. Press Enter or Down Arrow to enter a help module name in the field without invoking the editor.
In non-window help, before entering text, make sure the help window width is the appropriate size.
To modify the width use F5 Change Help Window Width at the item.
This field is not available for prompt/constant messages.
Pad Type (PT)
This field is only available for input messages. Determines the leading and trailing characters to be used. Padding is independent of whether a field is numeric or alphanumeric.
The padding can be either spaces or zeros placed before or after the input.
Select one of the following for the input padding type:
- 0
- Left justify and pad with trailing spaces.
- 1
- Right justify and pad with leading spaces.
- 2
- Left justify and pad with trailing zeros.
- 3
- Right justify and pad with leading zeros.
- The default is
- 0. For more information, see Formats in this document.
Date Type (DT)
This field is only available for input messages. The date type defines the format of a date; where DD = day, MM = month, YY = year, and CC = century. For more information see Date Type (DT) in Formats.
Select one of the following:
- 0
- Not a date.
- 1
- MMDDYY Automatically sets the Length field to 6 and makes this a fixed length field.
- 2
- YYMMDD Automatically sets the Length field to 6 and makes this a fixed length field.
- 3
- DDMMYY Automatically sets the Length field to 6 and makes this a fixed length field.
- 4
- YYDDD (Julian Calendar) Automatically sets the Length field to 5 and makes this a fixed length field.
- 5
- SQL Automatically sets the Length field to 6 and makes this a fixed length field. For more information, see Valid Entries.
- 6 & 7
- Not supported in messages.
- 8
- MMDDYYYY Date type 8 stores Thoroughbred Basic SQL data as a number in your data files. This eliminates the problems caused by binary storage found with Date Type 5. Date type 8 is stored as a string.
Date type 5 is stored as a 6-byte binary field, but the definition length is 6 and the numeric type is
- This stores date and time. To store just the date, set the length to 4 and the numeric type to 0. When date type 5 is stored in 4 bytes, the result is an Informix compatible SQL date.
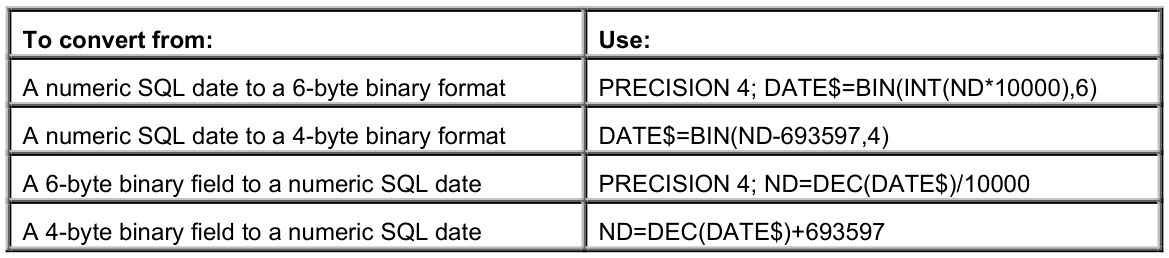
If you previously selected a padding type for a telephone number, social security number, or text field, the system automatically enters the default value of 0 in these fields.
During file maintenance the system automatically tests for input of valid date values. If the type is mandatory and you press the Enter key the system displays the current date in the selected format.
For more information, see Formats in this document.
Numeric Type (NT)
This field is only available for Input messages. Specifies the storage method and the types of numbers that are accepted as valid input.
| Select | one of the following for the input numeric type: |
|---|---|
| 0 | Fixed point positive/negative |
| 1 | Fixed point positive |
| 2 | Fixed point negative |
| 3 | Binary positive/negative |
| 4 | Binary positive |
| 5 | Binary negative |
| 6 | Packed positive/negative |
| 7 | Informix |
| 8 | IEEE single precision |
| 9 | IEEE double precision |
| A | BCD signed |
| B | BCD unsigned |
| C | BCD no sign |
| D | ASCII sign masked |
| E | ASCII leading byte sign |
| F | ASCII trailing byte sign |
The default is 0. For more information, see Formats in this document.
Input Length This field is only available for Input messages. It specifies the maximum size of the message input and defines the input as alphanumeric or numeric.
The same rules apply to message input length as Data Name (except repeating fields are not allowed). For more information, see Formats in this document.
Window Length (Win Len)
This field is only available for Input messages. It specifies the message input window length. This is the length of the input as displayed on the screen.
It does not limit the actual length of the input. If you reach the end of the window, the input will scroll.
This field is similar to the /FIELD(n)= option in screen formulas.
Entry Type (ET)
This field is only available for Input messages. Specifies whether input is optional or mandatory and of variable or fixed length.
| Select | one of the following for the input entry type: |
|---|---|
| 0 | input optional, variable length |
| 1 | input optional, fixed length |
| 2 | input required, variable length |
| 3 | input required, fixed length |
The default is 0. For more information, see Formats in this document.
Valid Values This field is only available for input messages. This specifies values that can be accepted as valid for entry. With the exception of select messages, message valid entries follow the same rules as valid entries in the format. Use the following syntax:
Valid Values: List
0,val-1[,val-2...][:trans-val-1,trans-val-2...]For a select message you must specify a list of valid values (valid values type 0).
The valid values list syntax for select messages allows you to select multiple sets of valid entries (and translation values) that correspond with the selections in the select message.
For more information, see Select message. Also see the Valid Values section in Formats.
Valid Values: Range
1,lo-val-1,hi-val-1[;lo-val-2,hi-val-2...]Valid Values: File Lookup
2,lookup-link,read-opt[,"prefix"]Valid Values: Text Field Window
Text fields (type 3) are not valid for messages.
Message Type the message that is to display on the screen. The length can range from 1 to 80 characters. Messages cannot be deleted. They can be changed.
You should not modify the default messages, but add to the list.
You can place the following codes in front of the message:
- 'RB'
- To beep (Ring Bell) when the message displays.
- 'CI'
- To clear the type-ahead buffer (Clear Input) when message displays.
On color terminals the RB and rb are used to control the colors.
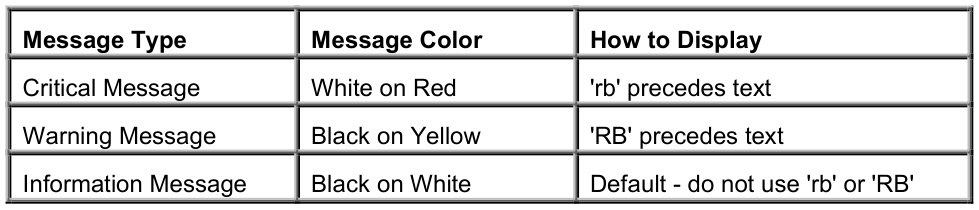
Examples:
Value entered is not allowed.
Displays the message typed.
‘RB’ Do not enter zero!
Rings the bell and displays the message typed. The black text displays on a yellow background.
‘CI’ Are you sure you want to delete?
Clears the input and displays the message typed.
The following fields apply only to Input messages.
Message Maintenance
Section titled “Message Maintenance”The size of the message dictionary affects script memory usage, but the number of message dictionaries specified in a script does not. Therefore, it may be better to define two or more smaller message dictionaries than to create one large message dictionary for a software application.
Message dictionary maintenance differs from standard definition maintenance in the way that specifications are saved. If you change specifications in standard definition maintenance, when you exit, you must verify whether or not you want to save the changes.
In message maintenance, changes are saved on a field-by-field basis. If you edit or change a message specification, such as the message text, the changes will be saved when you move to the next field. You can cancel the changes to a field by pressing F4 at that field and before you move to the next field.
Create Messages
Section titled “Create Messages”Type the message dictionary name and the optional description and press Enter.
Enter the type of message you wish to create, and the appropriate definition screen displays.
Press F1 and the next available message number is displayed in the Msg# field; default values are shown in the specification fields and the cursor is positioned at the Col field (column).
Modify the default values as necessary and enter in the message text. The system adds the message to the dictionary and the fields clear to allow a new entry. The cursor returns to the message number field. The existing messages display in the bottom part of the screen with the new message last.
Modify Messages
Section titled “Modify Messages”Enter the message type that you wish to modify.
Enter the message number and the corresponding specifications are displayed. Use the standard editing keys to change the definition. Changing the message in the dictionary changes the message globally (wherever you specify the message dictionary, type, and number).
A message number cannot be deleted once a message is created for it, but the message number can be re-used by changing the definition. To keep track of unused messages, when a message number becomes available the developer should replace the message text with a comment such as:
Not Used
or
Available
Message Dictionary Suffixes
Section titled “Message Dictionary Suffixes”When creating a new message dictionary, four prompt/messages are automatically generated. These messages provide the suffixes for the Yes/No, Non-input, and Input message types.
They can be altered, but they still function in the same way. You should keep this in mind when creating messages, so that you do not repeat the suffix in your message.
YN (Y/N)?
Prompt/constant message #1 is used as a suffix for all Yes/No messages. The first part of the suffix ‘YN’ is not appended to the message but is used to validate message input. For the Y/N use in multiple languages, see Multiple Language in the Dictionary-IV Administrator Guide.
, RETURN to Continue Prompt/constant message #2 is used as a suffix for all Non input messages. An option is provided in scripts and formats to suppress this suffix.
:
Prompt/constant message #3 is used as a suffix for all Input messages, except blank messages (no text) and Select messages.
F4-End F6-Help
Prompt/constant message #4 is used as a suffix for all messages.
Select Messages
Section titled “Select Messages”A special type of input message called a select message is used to display multiple selections through which the operator can scroll the cursor and make a selection.
For more information about the display and operation, see Select messages in the
Dictionary-IV User Guide.
Select Message Definition
Section titled “Select Message Definition”The following specifications must be used for a select message:
- Message list type 4 (Input messages).
- Print or Display Mode (Prnt field) of S or s.
S Uses normal display mode for the message, with the current selection in background reverse video.
s Uses background reverse video for the message, with the current selection in foreground reverse video. - The Message Text field is used to specify the selections for the message.
- The Length field (entry length) must be 1.
- The Valid Entries field specifies selection values that correspond with the selections in the message text (see below).

Message Text
The Message Text field specifies the message and the beginning and end of each selection.
Use pipe characters ( | ) to delimit each selection and to mark the start and end of reverse video.
Spacing of text inside a selection is optional, and spacing between selections is optional.
Text can be placed before, after, or in between the selections. The selection bar does not highlight this text.
Valid Values The Valid Values field specifies selection values that correspond position with the selections defined in the message text.
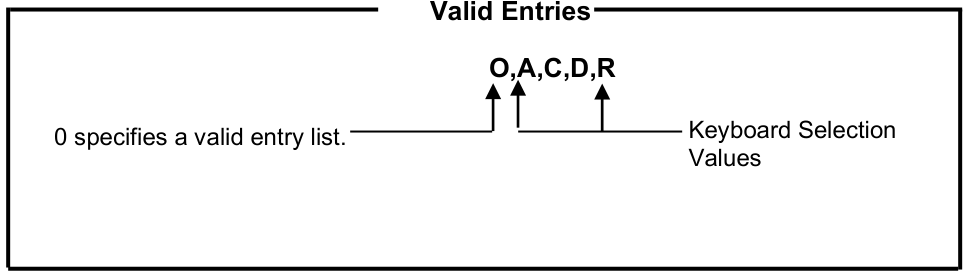
The valid entries must be preceded by a (0), which specifies a valid entries list (rather than a range or file lookup). Each entry should be separated by a comma.
A select message can be specified in a script using the INPUT MESSAGE command. When the user makes a selection, the corresponding value from the valid values list is returned to the script.
For more information, see the Script-IV Language Reference.
Translation Values
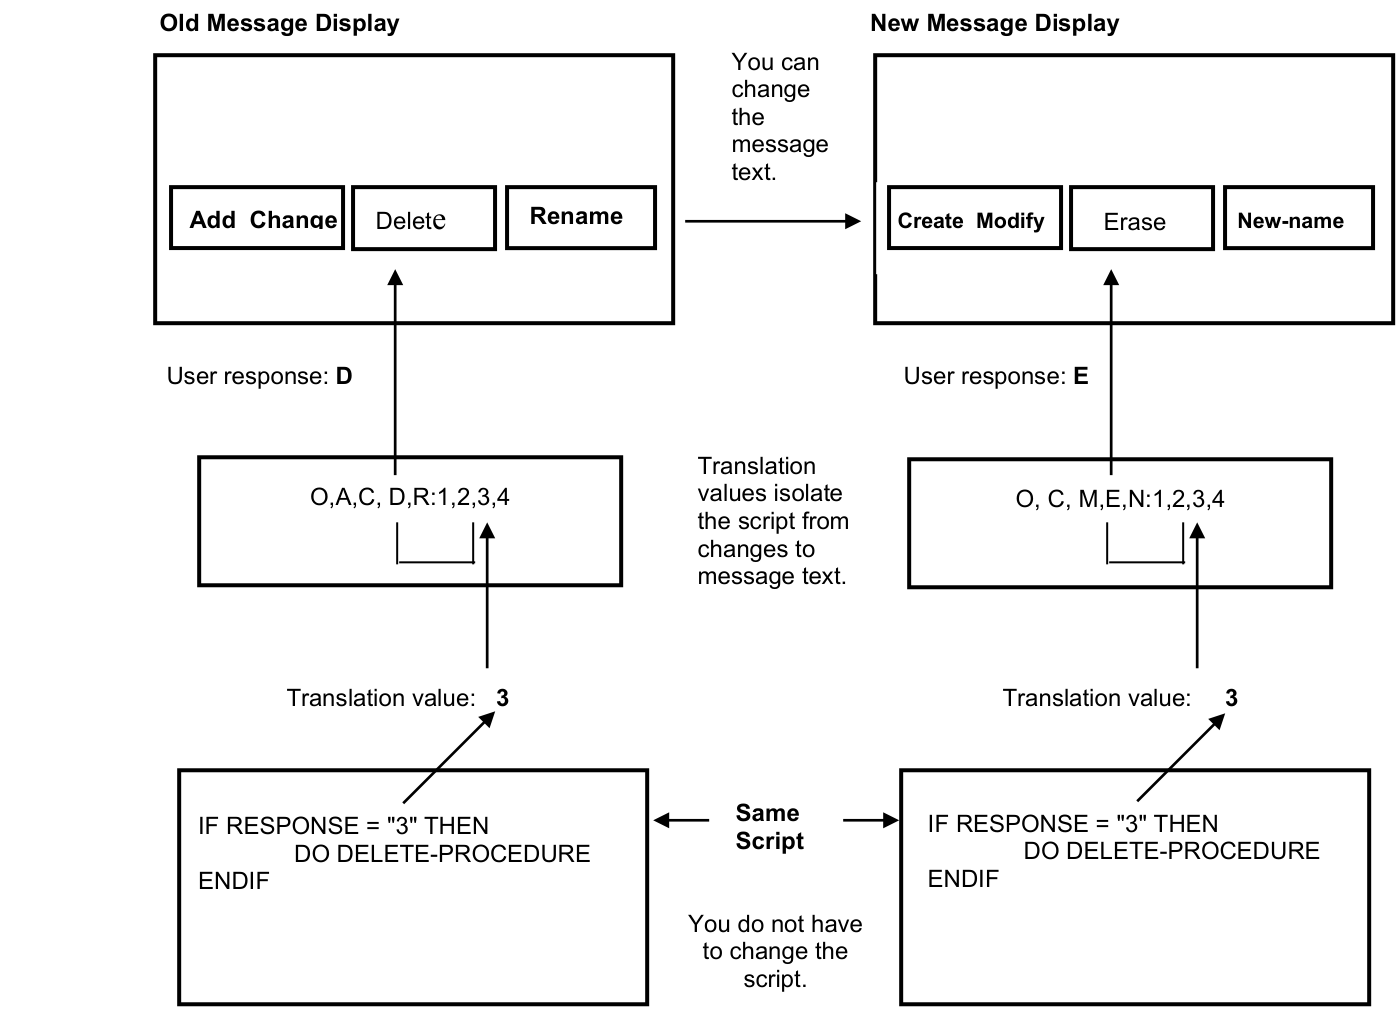
Section titled “Translation Values”Translation values allow you to change the message text of input messages (including select messages) without having to change the scripts that use those messages.
This allows your messages to be independent of the script logic that processes the user response to the messages.
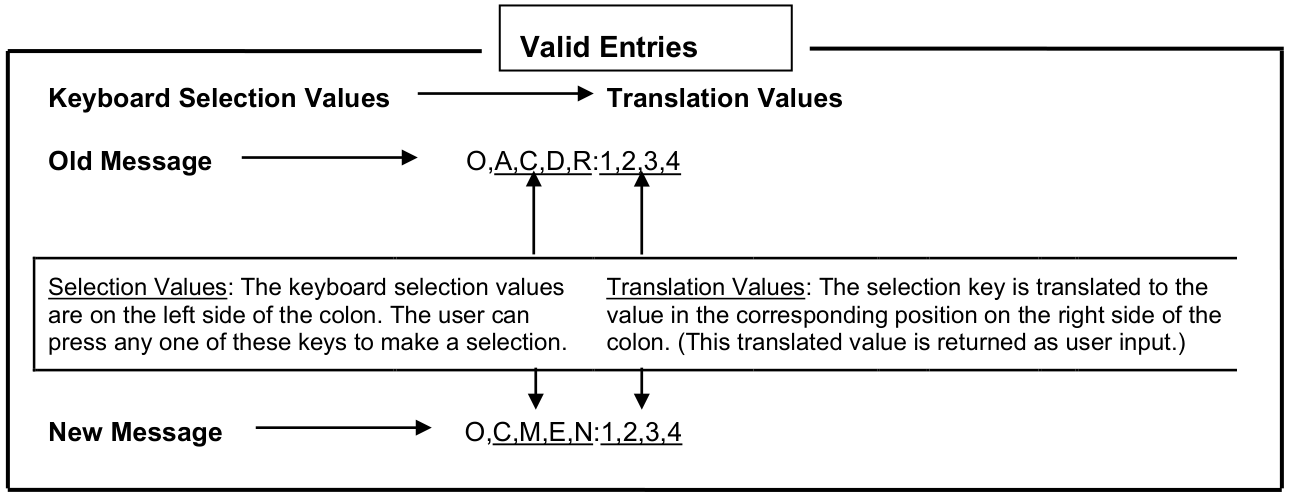
Translation values can also be used with any data name that is defined in a format. They are documented in formats under Valid. For example:
0,A,C,D,R:1,2,3,4
While Create, Modify, Erase, and New-name appear on the screen, the following translations take place.
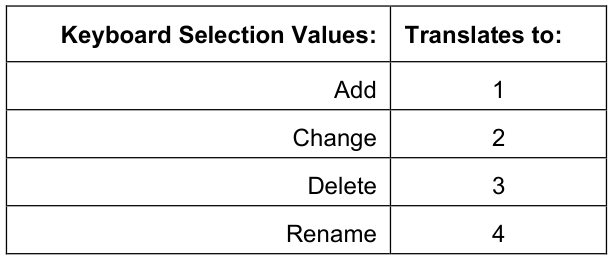
For information on translation values in Multi-Language environments, see Multi-Language in the Dictionary-IV Administrator Guide.
Translation of a Sample Select Message
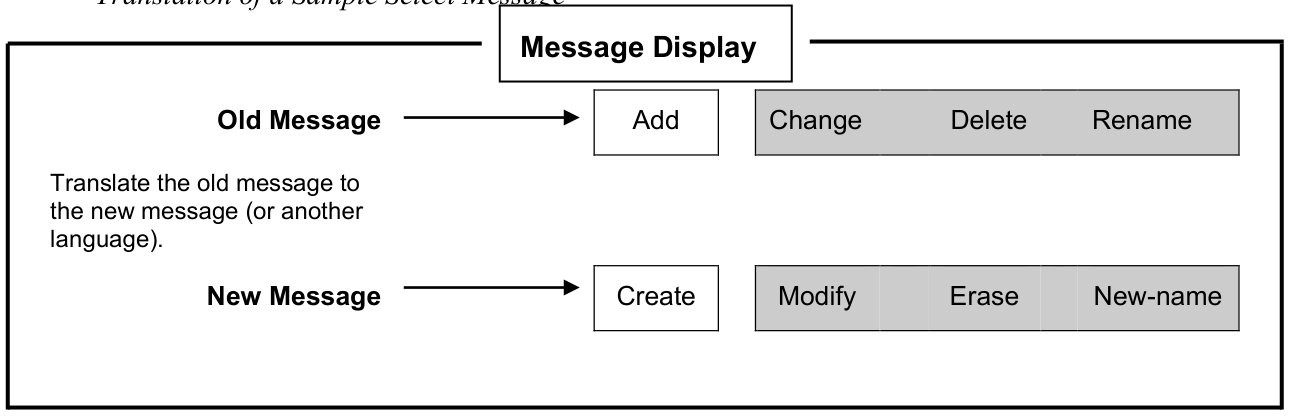
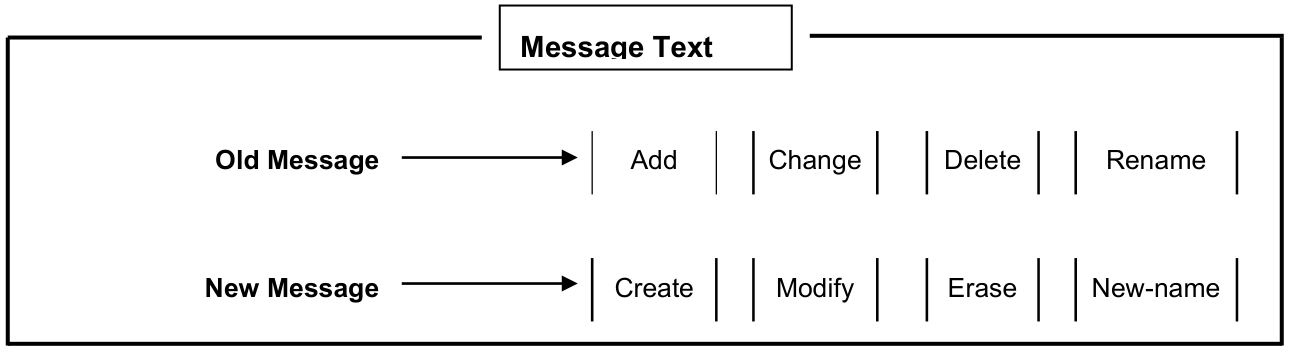
How Translation Values Provide Independence
Multiple Selection Mapping
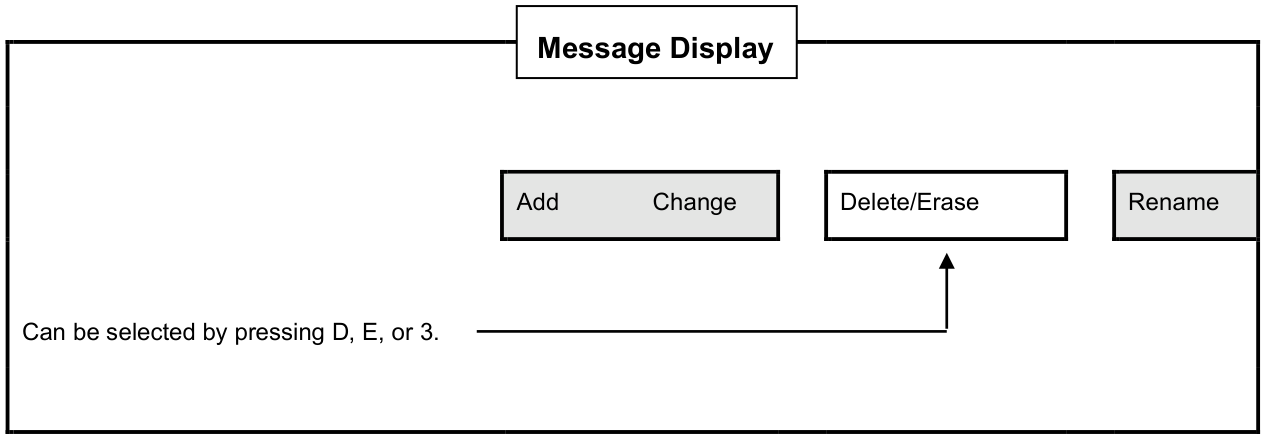
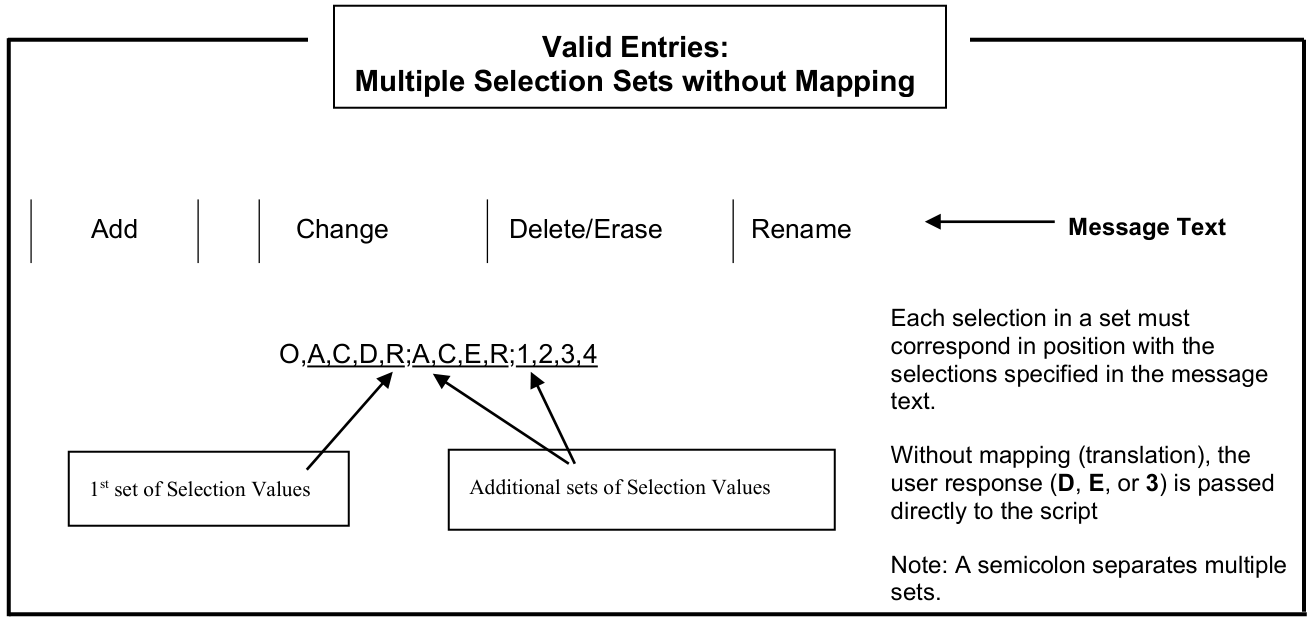
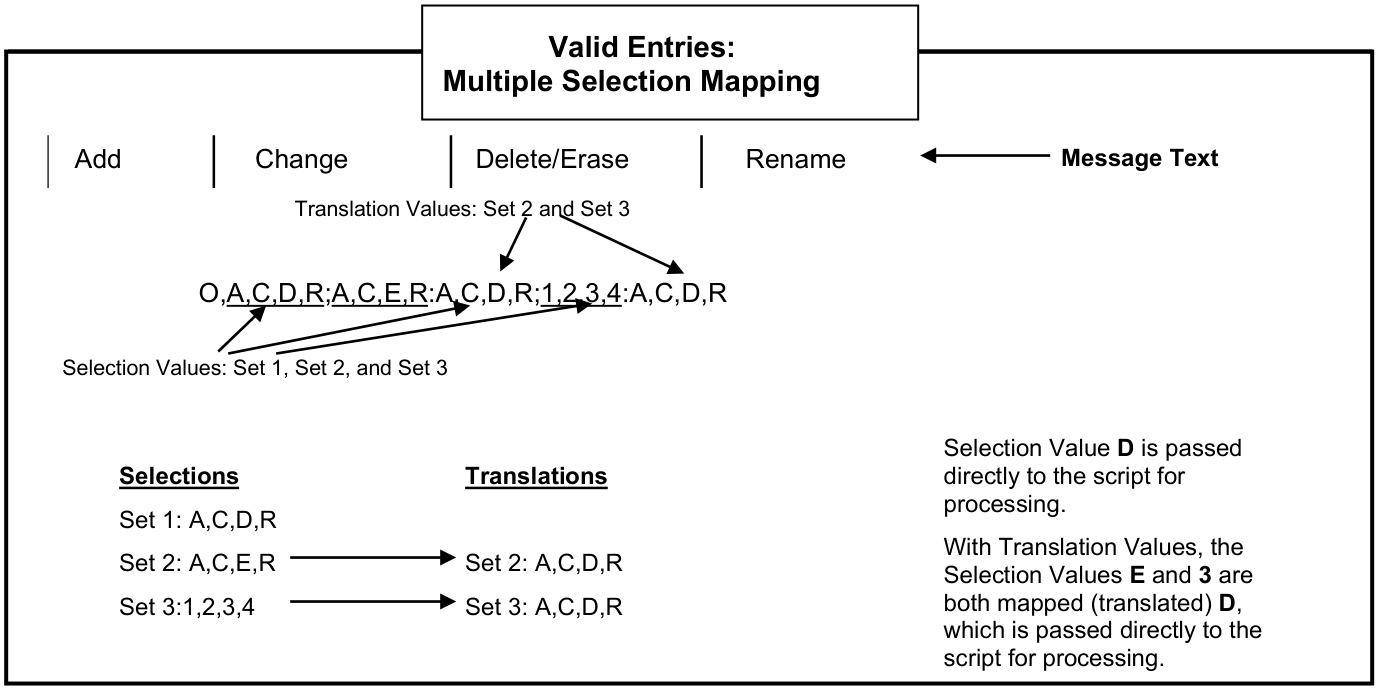
Section titled “Multiple Selection Mapping”Multiple selection sets can be used in select messages to specify more than one keyboard selection value per displayed selection (more than one set of keyboard selection values).
For example, if one set of selection values are specified, the user can press one of three keys to make the same selection. Multiple selection sets are defined in the valid entries list.
Multiple selection mapping is an efficient method of handling the user responses to a message that has multiple selection sets. The mapping is an option defined in the valid entries list using translation values, which allows you to map, or translate, multiple sets of keyboard selection values to a single set of processed values.
Multiple selection mapping is illustrated in the following diagrams.
Example of Multiple Selection Mapping in a Select Message

From the Dictionary-IV Developer Guide, version 8.9.1. Open this page in the PDF